Sony CHC-CL1 Operating Instructions - Page 23
Optional Components, Hooking up the optional components
 |
View all Sony CHC-CL1 manuals
Add to My Manuals
Save this manual to your list of manuals |
Page 23 highlights
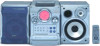
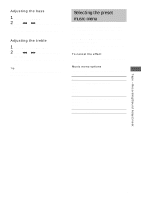
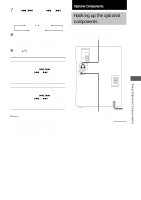
7 Turn ./> (or press . or > on the remote) to select the desired sound source. The indication changes as follows: t TUNER y CD PLAY T t TAPE PLAY T 8 Press ENTER/YES on the remote. The start time, the stop time, and the sound source appear in turn, before the original display returns. 9 Press ?/1 to turn off the system. To Check the setting Change the setting Cancel the timer Do this Press CLOCK/TIMER SELECT on the remote, then turn ./> (or press . or > on the remote) until "DAILY SELECT?" appears. Then, press ENTER/ YES on the remote. Start over from step 1. Press CLOCK/TIMER SELECT on the remote, then turn ./> (or press . or > on the remote) until "TIMER OFF" appears. Then, press ENTER/YES on the remote. Notes • If the system is on about 30 seconds before the preset time, the Daily Timer will not be activated. • Do not operate the system from the time the system turns on until the play starts (about 30 seconds before the preset time). Optional Components Hooking up the optional components You can connect a digital or an analog component to this system. To the audio output jacks of an analog component To the digital input jack of a digital component continued Timer/Optional Components 23
-
 1
1 -
2
-
3
-
4
-
5
-
6
-
7
-
8
-
9
-
10
-
11
-
12
-
13
-
14
-
15
-
16
-
17
-
 18
18 -
 19
19 -
 20
20 -
 21
21 -
 22
22 -
 23
23 -
 24
24 -
 25
25 -
 26
26 -
 27
27 -
 28
28 -
29
-
30
-
31
-
32
 |
 |