Sony HVR-Z5E Operation Guide - Page 14
Using an outside power source, Step 3: Charging the battery pack Continued
 |
View all Sony HVR-Z5E manuals
Add to My Manuals
Save this manual to your list of manuals |
Page 14 highlights
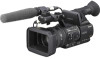
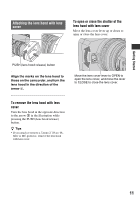
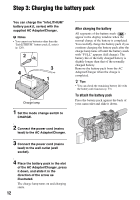
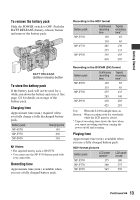
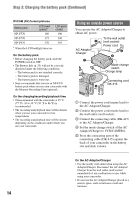
Step 3: Charging the battery pack (Continued) DVCAM (DV) format pictures Battery pack NP-F570 NP-F770 NP-F970 LCD panel opened* 180 375 570 LCD panel closed 190 390 595 * When the LCD backlight turns on. On the battery pack • Before changing the battery pack, slide the POWER switch to OFF. • The Battery Info (p. 53) will not be correctly displayed under the following conditions. - The battery pack is not attached correctly. - The battery pack is damaged. - The battery pack is worn-out. • Sony recommends that you use an NP-F970 battery pack when you use your camcorder with the Memory Recording Unit (optional). On the charging/recording/playback time • Times measured with the camcorder at 25 °C (77 °F). 10 to 30 °C (50 °F to 86 °F) is recommended. • The recording and playback time will be shorter when you use your camcorder in low temperatures. • The recording and playback time will be shorter depending on the conditions under which you use your camcorder. Using an outside power source You can use the AC Adaptor/Charger to obtain AC power. AC Adaptor/ Charger To the wall outlet (wall socket) Power cord Mode change switch Charge lamp Connecting cord DK-415 1 Connect the power cord (mains lead) to the AC Adaptor/Charger. 2 Connect the power cord (mains lead) to the wall outlet (wall socket). 3 Connect the connecting cable (DK-415) to the AC Adaptor/Charger. 4 Set the mode change switch of the AC Adaptor/Charger to VCR/CAMERA. 5 Press the connecting part of the connecting cable (DK-415) against the back of your camcorder in the battery slot and slide it down. On the AC Adaptor/Charger • Use the nearby wall outlet when using the AC Adaptor/Charger. Disconnect the AC Adaptor/ Charger from the wall outlet (wall socket) immediately if any malfunction occurs while using your camcorder. • Do not use the AC Adaptor/Charger placed in a narrow space, such as between a wall and furniture. 14
-
 1
1 -
2
-
3
-
4
-
5
-
6
-
7
-
8
-
 9
9 -
 10
10 -
 11
11 -
 12
12 -
 13
13 -
 14
14 -
 15
15 -
 16
16 -
 17
17 -
 18
18 -
 19
19 -
20
-
21
-
22
-
23
-
24
-
25
-
26
-
27
-
28
-
29
-
30
-
31
-
32
-
33
-
34
-
35
-
36
-
37
-
38
-
39
-
40
-
41
-
42
-
43
-
44
-
45
-
46
-
47
-
48
-
49
-
50
-
51
-
52
-
53
-
54
-
55
-
56
-
57
-
58
-
59
-
60
-
61
-
62
-
63
-
64
-
65
-
66
-
67
-
68
-
69
-
70
-
71
-
72
-
73
-
74
-
75
-
76
-
77
-
78
-
79
-
80
-
81
-
82
-
83
-
84
-
85
-
86
-
87
-
88
-
89
-
90
-
91
-
92
-
93
-
94
-
95
-
96
-
97
-
98
-
99
-
100
-
101
-
102
-
103
-
104
-
105
-
106
-
107
-
108
-
109
-
110
-
111
-
112
-
113
-
114
-
115
-
116
-
117
-
118
-
119
-
120
-
121
-
122
-
123
-
124
-
125
-
126
-
127
-
128
-
129
-
130
-
131
-
132
-
133
-
134
-
135
-
136
-
137
-
138
-
139
-
140
-
141
-
142
-
143
 |
 |
