Sony HVR-Z5E Operation Guide - Page 42
Adjusting the volume, Attaching a Memory Recording Unit, To restore automatic adjustment - operating instructions
 |
View all Sony HVR-Z5E manuals
Add to My Manuals
Save this manual to your list of manuals |
Page 42 highlights
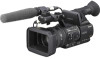
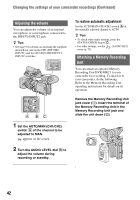
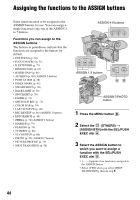
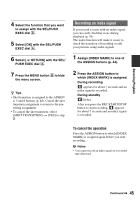
Changing the settings of your camcorder recordings (Continued) Adjusting the volume You can adjust the volume of an internal microphone or a microphone connected to the INPUT1/INPUT2 jack. z Tips • See page 9 for details on attaching the supplied microphone, and on the CH1 (INT MIC/ INPUT1) and the CH2 (INT MIC/INPUT1/ INPUT2) switches. 1 Set the AUTO/MAN (CH1/CH2) switch A of the channel to be adjusted to MAN. appears on the screen. 2 Turn the AUDIO LEVEL dial B to adjust the volume during recording or standby. To restore automatic adjustment Set the AUTO/MAN (CH1/CH2) switch A of the manually adjusted channel to AUTO. z Tips • To check other audio settings, press the STATUS CHECK button C. • For other settings, see the menu (p. 75). (AUDIO SET) Attaching a Memory Recording Unit You can attach an optional Memory Recording Unit HVR-MRC1 to your camcorder for recording. To attach it to your camcorder, do the following. Refer to the Memory Recording Unit operating instructions for details on its operation. Remove the Memory Recording Unit jack cover (1). Insert the terminal of the Memory Recording Unit in the Memory Recording Unit jack and slide the unit down (2). 42
-
 1
1 -
2
-
3
-
4
-
5
-
6
-
7
-
8
-
9
-
10
-
11
-
12
-
13
-
14
-
15
-
16
-
17
-
18
-
19
-
20
-
21
-
22
-
23
-
24
-
25
-
26
-
27
-
28
-
29
-
30
-
31
-
32
-
33
-
34
-
35
-
36
-
 37
37 -
 38
38 -
 39
39 -
 40
40 -
 41
41 -
 42
42 -
 43
43 -
 44
44 -
 45
45 -
 46
46 -
 47
47 -
48
-
49
-
50
-
51
-
52
-
53
-
54
-
55
-
56
-
57
-
58
-
59
-
60
-
61
-
62
-
63
-
64
-
65
-
66
-
67
-
68
-
69
-
70
-
71
-
72
-
73
-
74
-
75
-
76
-
77
-
78
-
79
-
80
-
81
-
82
-
83
-
84
-
85
-
86
-
87
-
88
-
89
-
90
-
91
-
92
-
93
-
94
-
95
-
96
-
97
-
98
-
99
-
100
-
101
-
102
-
103
-
104
-
105
-
106
-
107
-
108
-
109
-
110
-
111
-
112
-
113
-
114
-
115
-
116
-
117
-
118
-
119
-
120
-
121
-
122
-
123
-
124
-
125
-
126
-
127
-
128
-
129
-
130
-
131
-
132
-
133
-
134
-
135
-
136
-
137
-
138
-
139
-
140
-
141
-
142
-
143
 |
 |
