Sony HVR-Z5E Operation Guide - Page 18
When the picture in the viewfinder is, hard to see
 |
View all Sony HVR-Z5E manuals
Add to My Manuals
Save this manual to your list of manuals |
Page 18 highlights
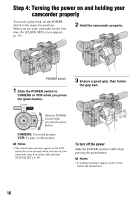
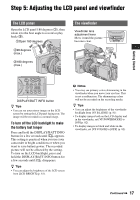
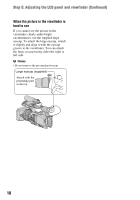
Step 5: Adjusting the LCD panel and viewfinder (Continued) When the picture in the viewfinder is hard to see If you cannot see the picture in the viewfinder clearly under bright circumstances, use the supplied large eyecup. To attach the large eyecup, stretch it slightly and align it with the eyecup groove in the viewfinder. You can attach the large eyecup facing either the right or left side. b Notes • Do not remove the pre-attached eyecup. Large eyecup (supplied) Attach with the protruding part at the top. 18
-
 1
1 -
2
-
3
-
4
-
5
-
6
-
7
-
8
-
9
-
10
-
11
-
12
-
 13
13 -
 14
14 -
 15
15 -
 16
16 -
 17
17 -
 18
18 -
 19
19 -
 20
20 -
 21
21 -
 22
22 -
 23
23 -
24
-
25
-
26
-
27
-
28
-
29
-
30
-
31
-
32
-
33
-
34
-
35
-
36
-
37
-
38
-
39
-
40
-
41
-
42
-
43
-
44
-
45
-
46
-
47
-
48
-
49
-
50
-
51
-
52
-
53
-
54
-
55
-
56
-
57
-
58
-
59
-
60
-
61
-
62
-
63
-
64
-
65
-
66
-
67
-
68
-
69
-
70
-
71
-
72
-
73
-
74
-
75
-
76
-
77
-
78
-
79
-
80
-
81
-
82
-
83
-
84
-
85
-
86
-
87
-
88
-
89
-
90
-
91
-
92
-
93
-
94
-
95
-
96
-
97
-
98
-
99
-
100
-
101
-
102
-
103
-
104
-
105
-
106
-
107
-
108
-
109
-
110
-
111
-
112
-
113
-
114
-
115
-
116
-
117
-
118
-
119
-
120
-
121
-
122
-
123
-
124
-
125
-
126
-
127
-
128
-
129
-
130
-
131
-
132
-
133
-
134
-
135
-
136
-
137
-
138
-
139
-
140
-
141
-
142
-
143
 |
 |

18
When the picture in the viewfinder is
hard to see
If you cannot see the picture in the
viewfinder clearly under bright
circumstances, use the supplied large
eyecup. To attach the large eyecup, stretch
it slightly and align it with the eyecup
groove in the viewfinder. You can attach
the large eyecup facing either the right or
left side.
b
Notes
•
Do not remove the pre-attached eyecup.
Large eyecup (supplied)
Attach with the
protruding part
at the top.
Step 5: Adjusting the LCD panel and viewfinder (Continued)