Sony HVR-Z5E Operation Guide - Page 95
When connecting with the A/V connecting cable with S VIDEO optional, Dubbing/Editing - z5p
 |
View all Sony HVR-Z5E manuals
Add to My Manuals
Save this manual to your list of manuals |
Page 95 highlights
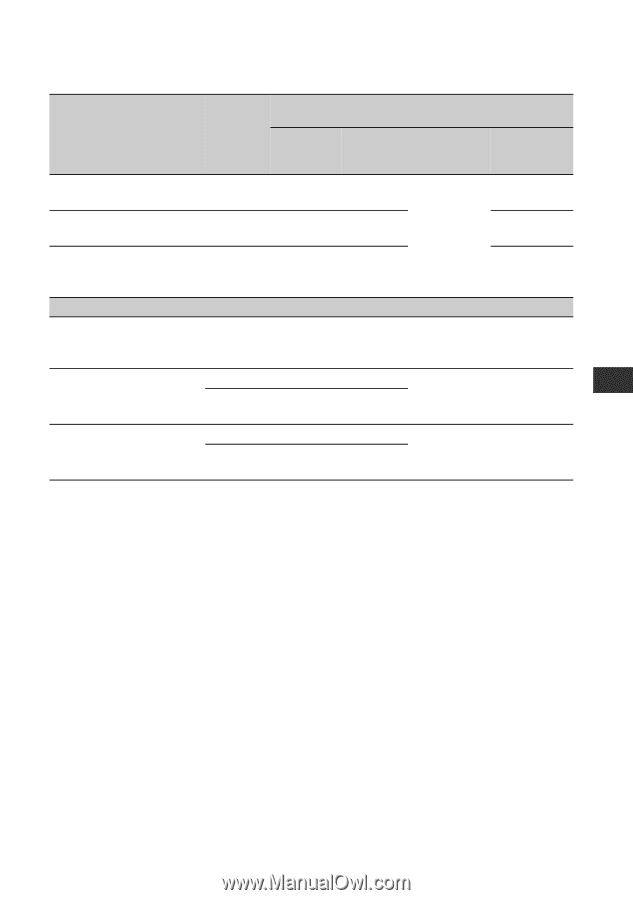
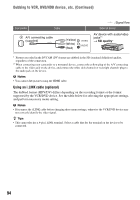
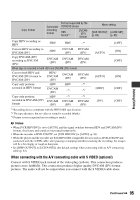
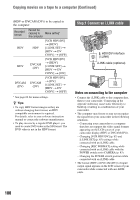
Dubbing/Editing Copy format Camcorder recording format Format supported by the VCR/DVD device HDV format*1 DVCAM (DV) format Menu setting [VCR HDV/DV] [i.LINK SET] (p. 83) (p. 85) Copy HDV recording as HDV HDV HDV -*3 Convert HDV recording to DVCAM (DV) HDV DVCAM DVCAM (DV) (DV) Copy DVCAM (DV) recording as DVCAM (DV) DVCAM DVCAM DVCAM (DV) (DV) (DV) When tape is recorded in both HDV and DVCAM (DV) format Convert both HDV and DVCAM (DV) format to DVCAM (DV) HDV/ DVCAM (DV) DVCAM (DV) DVCAM (DV) Copy only portions HDV HDV -*3 recorded in HDV format DVCAM (DV) -*2 -*3 Copy only portions recorded in DVCAM (DV) format HDV DVCAM (DV) -*2 DVCAM (DV) -*2 DVCAM (DV) [AUTO] [AUTO] [HDV] [DV] [OFF] [ON] [OFF] [ON] [OFF] [OFF] *1 Recording device compliant with the HDV1080i specification. *2 The tape advances, but no video or sound is recorded (blank). *3 Picture is not recognized (no recording is made). b Notes • When [VCR HDV/DV] is set to [AUTO], and the signal switches between HDV and DVCAM (DV) formats, the picture and sound are interrupted temporarily. • When the recorder is HVR-Z5E/Z5P, set [VCR HDV/DV] to [AUTO] (p. 83). • When the player and the recorder are both HDV1080i compatible devices such as HVR-Z5E/Z5P and connected with the i.LINK cable, after pausing or stopping and then resuming the recording, the images will be a bit choppy or rough at that point. • Set [DISP OUTPUT] to [LCD PANEL] (the default setting) when connecting with an A/V connecting cable (p. 82). When connecting with the A/V connecting cable with S VIDEO (optional) Connect with S VIDEO jack instead of the video plug (yellow). This connection produces pictures more faithfully. This connection produces higher quality DVCAM (DV) format pictures. The audio will not be output when you connect with the S VIDEO cable alone. Continued , 95
-
 1
1 -
2
-
3
-
4
-
5
-
6
-
7
-
8
-
9
-
10
-
11
-
12
-
13
-
14
-
15
-
16
-
17
-
18
-
19
-
20
-
21
-
22
-
23
-
24
-
25
-
26
-
27
-
28
-
29
-
30
-
31
-
32
-
33
-
34
-
35
-
36
-
37
-
38
-
39
-
40
-
41
-
42
-
43
-
44
-
45
-
46
-
47
-
48
-
49
-
50
-
51
-
52
-
53
-
54
-
55
-
56
-
57
-
58
-
59
-
60
-
61
-
62
-
63
-
64
-
65
-
66
-
67
-
68
-
69
-
70
-
71
-
72
-
73
-
74
-
75
-
76
-
77
-
78
-
79
-
80
-
81
-
82
-
83
-
84
-
85
-
86
-
87
-
88
-
89
-
 90
90 -
 91
91 -
 92
92 -
 93
93 -
 94
94 -
 95
95 -
 96
96 -
 97
97 -
 98
98 -
 99
99 -
 100
100 -
101
-
102
-
103
-
104
-
105
-
106
-
107
-
108
-
109
-
110
-
111
-
112
-
113
-
114
-
115
-
116
-
117
-
118
-
119
-
120
-
121
-
122
-
123
-
124
-
125
-
126
-
127
-
128
-
129
-
130
-
131
-
132
-
133
-
134
-
135
-
136
-
137
-
138
-
139
-
140
-
141
-
142
-
143
 |
 |