Sony ILCE-9 Instruction Manual Large File - 14.58 MB - Page 201
Connecting to a computer, Check that [USB Connection] under
 |
View all Sony ILCE-9 manuals
Add to My Manuals
Save this manual to your list of manuals |
Page 201 highlights
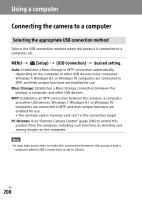
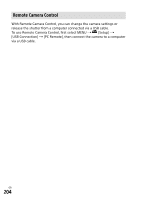
Connecting to a computer 1 Insert a fully charged battery pack into the camera. 2 Turn on the camera and the computer. 3 Check that [USB Connection] under (Setup) is set to [Mass Storage]. 4 Connect the camera to the computer using the micro USB cable (supplied). ••When you connect the camera to the computer for the first time, the procedure for recognizing the camera may start automatically on the computer. Wait until the procedure is finished. ••If you connect the product to your computer using the micro USB cable when [USB Power Supply] is set to [On], power is supplied from your computer. (Default setting: [On]) To a USB terminal To the Multi/Micro USB Terminal Micro USB cable (supplied) Using a computer GB 201
-
 1
1 -
2
-
3
-
4
-
5
-
6
-
7
-
8
-
9
-
10
-
11
-
12
-
13
-
14
-
15
-
16
-
17
-
18
-
19
-
20
-
21
-
22
-
23
-
24
-
25
-
26
-
27
-
28
-
29
-
30
-
31
-
32
-
33
-
34
-
35
-
36
-
37
-
38
-
39
-
40
-
41
-
42
-
43
-
44
-
45
-
46
-
47
-
48
-
49
-
50
-
51
-
52
-
53
-
54
-
55
-
56
-
57
-
58
-
59
-
60
-
61
-
62
-
63
-
64
-
65
-
66
-
67
-
68
-
69
-
70
-
71
-
72
-
73
-
74
-
75
-
76
-
77
-
78
-
79
-
80
-
81
-
82
-
83
-
84
-
85
-
86
-
87
-
88
-
89
-
90
-
91
-
92
-
93
-
94
-
95
-
96
-
97
-
98
-
99
-
100
-
101
-
102
-
103
-
104
-
105
-
106
-
107
-
108
-
109
-
110
-
111
-
112
-
113
-
114
-
115
-
116
-
117
-
118
-
119
-
120
-
121
-
122
-
123
-
124
-
125
-
126
-
127
-
128
-
129
-
130
-
131
-
132
-
133
-
134
-
135
-
136
-
137
-
138
-
139
-
140
-
141
-
142
-
143
-
144
-
145
-
146
-
147
-
148
-
149
-
150
-
151
-
152
-
153
-
154
-
155
-
156
-
157
-
158
-
159
-
160
-
161
-
162
-
163
-
164
-
165
-
166
-
167
-
168
-
169
-
170
-
171
-
172
-
173
-
174
-
175
-
176
-
177
-
178
-
179
-
180
-
181
-
182
-
183
-
184
-
185
-
186
-
187
-
188
-
189
-
190
-
191
-
192
-
193
-
194
-
195
-
 196
196 -
 197
197 -
 198
198 -
 199
199 -
 200
200 -
 201
201 -
 202
202 -
 203
203 -
 204
204 -
 205
205 -
 206
206 -
207
-
208
-
209
-
210
-
211
-
212
-
213
-
214
-
215
-
216
-
217
-
218
-
219
-
220
-
221
-
222
-
223
-
224
-
225
-
226
-
227
-
228
-
229
-
230
-
231
-
232
-
233
-
234
-
235
-
236
-
237
-
238
-
239
-
240
-
241
-
242
-
243
-
244
-
245
-
246
-
247
-
248
-
249
-
250
-
251
-
252
-
253
-
254
-
255
-
256
-
257
-
258
-
259
-
260
-
261
-
262
-
263
 |
 |

GB
201
Using a computer
Connecting to a computer
1
Insert a fully charged battery pack into the camera.
2
Turn on the camera and the computer.
3
Check that [USB Connection] under
(Setup) is set to
[Mass Storage].
4
Connect the camera to the
computer using the micro USB
cable (supplied).
• When you connect the
camera to the computer for
the first time, the procedure
for recognizing the camera
may start automatically on
the computer. Wait until the
procedure is finished.
• If you connect the product
to your computer using
the micro USB cable when
[USB Power Supply] is set to
[On], power is supplied from
your computer. (Default setting:
[On])
To the Multi/Micro
USB Terminal
Micro USB cable (supplied)
To a USB
terminal