Sony KDS-70Q006 Owners Guide - Page 109
Using the Menus, Overview - problems
 |
View all Sony KDS-70Q006 manuals
Add to My Manuals
Save this manual to your list of manuals |
Page 109 highlights
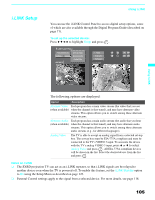
Using the Menus Using the Menus Overview z Press MENU to enter and exit Menus. Opening and choosing a menu 1 Press MENU to display the menu screen. 2 Press V or v to highlight the desired menu icon and press to select it. 3 Use the arrow button to scroll through the features. 4 See the specific menu page for instructions on moving through the menu. To end a menu session ❑ Press MENU again. To end one menu session and move to another ❑ Press B to return to the menu icons. Press the arrow buttons to choose the next menu icon and press to select it. The Menu gives you access to the following features: Menu Icon Description Page The Video Menu allows you to make adjustments to your 108 picture settings. It also allows you to customize the Picture Mode based on the type of program you are viewing, select Advanced Video options, and more. The Audio Menu offers enhanced audio options such as 112 listening to second audio programming (SAP) or customizing the Effect of the sound on your TV. The Screen Menu allows you to make Wide Mode 114 adjustments and make changes to the screen's vertical center and size. The newly added Overscan feature lets you fix the overscan problem. The Channel Menu allows you to set up a Favorite 116 Channels list, run the Auto Program function, label channels, and more. The Parent Menu lets you control the viewing of programs 118 based on their ratings. The Setup Menu provides options for setting up your 122 system, including selecting closed caption modes, labeling video inputs, selecting the language of the on-screen menus, and more. The Applications Menu lets you display the Memory Stick 125 Viewer and the i.LINK Control Panel, set on/off Timers, access CableCARD and diagnostics information, and more. 107
-
 1
1 -
2
-
3
-
4
-
5
-
6
-
7
-
8
-
9
-
10
-
11
-
12
-
13
-
14
-
15
-
16
-
17
-
18
-
19
-
20
-
21
-
22
-
23
-
24
-
25
-
26
-
27
-
28
-
29
-
30
-
31
-
32
-
33
-
34
-
35
-
36
-
37
-
38
-
39
-
40
-
41
-
42
-
43
-
44
-
45
-
46
-
47
-
48
-
49
-
50
-
51
-
52
-
53
-
54
-
55
-
56
-
57
-
58
-
59
-
60
-
61
-
62
-
63
-
64
-
65
-
66
-
67
-
68
-
69
-
70
-
71
-
72
-
73
-
74
-
75
-
76
-
77
-
78
-
79
-
80
-
81
-
82
-
83
-
84
-
85
-
86
-
87
-
88
-
89
-
90
-
91
-
92
-
93
-
94
-
95
-
96
-
97
-
98
-
99
-
100
-
101
-
102
-
103
-
 104
104 -
 105
105 -
 106
106 -
 107
107 -
 108
108 -
 109
109 -
 110
110 -
 111
111 -
 112
112 -
 113
113 -
 114
114 -
115
-
116
-
117
-
118
-
119
-
120
-
121
-
122
-
123
-
124
-
125
-
126
-
127
-
128
-
129
-
130
-
131
-
132
-
133
-
134
-
135
-
136
-
137
-
138
-
139
-
140
-
141
-
142
-
143
-
144
-
145
-
146
-
147
 |
 |
