Sony MZ-NF610 Operating Instructions - Page 30
To start/stop recording in sync with the sound source (Synchro-recording), way control key
 |
View all Sony MZ-NF610 manuals
Add to My Manuals
Save this manual to your list of manuals |
Page 30 highlights
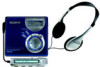
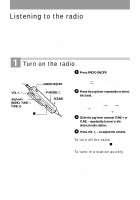
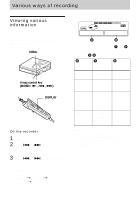
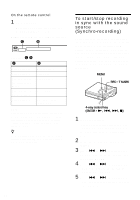
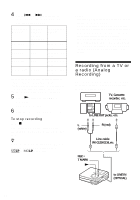
On the remote control 1 Press DISPLAY. Each time you press the button, the display changes as follows: Display window on the remote control C D Display: C/D C D Track number Elapsed time Track number Track name The number of the track in the group Group name The number of Disc name tracks in the disc Track number The name of the sound mode Note Depending on whether the group function is used or not, the operating conditions, and the disc settings, you may not be able to select certain indications or the indications may appear different. z For more details about the indications in the display while playing, see "Viewing various information" (page 36). 30 To start/stop recording in sync with the sound source (Synchro-recording) During synchro-recording, the recorder starts and stops recording in sync with the sound source. When recording from digital equipment (such as a CD player), you can omit operating both the recorder and the sound source, and easily make digital recording. You can make synchrorecording only when the optical cable is connected. MENU REC • T MARK 4-way control key (ENTER • N, ., >, x) 1 Make connections. Use the appropriate optical cable to suit the source equipment. Connect the cable firmly to the appropriate jacks. 2 While the recorder is stopped, press MENU. 3 Press . or > repeatedly until "R-SET" appears in the display, and then press ENTER. 4 Press . or > repeatedly until "SYNC-R" appears in the display, and then press ENTER. 5 Press . or > repeatedly until "ON" appears in the display, and then press ENTER.
-
 1
1 -
2
-
3
-
4
-
5
-
6
-
7
-
8
-
9
-
10
-
11
-
12
-
13
-
14
-
15
-
16
-
17
-
18
-
19
-
20
-
21
-
22
-
23
-
24
-
 25
25 -
 26
26 -
 27
27 -
 28
28 -
 29
29 -
 30
30 -
 31
31 -
 32
32 -
 33
33 -
 34
34 -
 35
35 -
36
-
37
-
38
-
39
-
40
-
41
-
42
-
43
-
44
-
45
-
46
-
47
-
48
-
49
-
50
-
51
-
52
-
53
-
54
-
55
-
56
-
57
-
58
-
59
-
60
-
61
-
62
-
63
-
64
-
65
-
66
-
67
-
68
-
69
-
70
-
71
-
72
-
73
-
74
-
75
-
76
-
77
-
78
-
79
-
80
-
81
-
82
-
83
-
84
-
85
-
86
-
87
-
88
-
89
-
90
-
91
-
92
-
93
-
94
-
95
-
96
-
97
-
98
-
99
-
100
-
101
-
102
-
103
-
104
-
105
-
106
-
107
-
108
-
109
-
110
-
111
-
112
-
113
-
114
-
115
-
116
-
117
-
118
-
119
-
120
-
121
-
122
-
123
-
124
 |
 |