Sony MZ-NF610 Operating Instructions - Page 33
Adding track marks while recording, Adding track marks manually
 |
View all Sony MZ-NF610 manuals
Add to My Manuals
Save this manual to your list of manuals |
Page 33 highlights
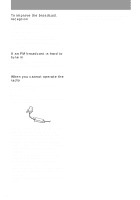
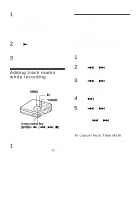
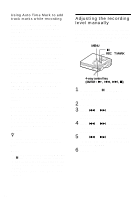
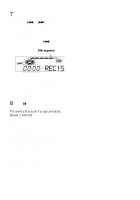
1 Make connections. Use the appropriate connecting cord to suit the source equipment*. When connecting the cable, make sure to insert the connectors firmly. ∗ For details, see "Optional accessories" (page 71) 2 Press N while pressing REC • T MARK. The recording starts. 3 Play the source you want to record. Adding track marks while recording You can add track marks (track number) while recording. MENU X T MARK 4-way control key (ENTER • N, ., >, x) Adding track marks manually 1 While the recorder is recording, press T MARK (press P-MODE/ on the remote control). Adding track marks automatically (Auto Time Mark) Use this feature to add track marks automatically at specified intervals when recording through the analog input connector. This function is convenient for recording long period of time, such as lectures, meetings, etc. 1 While the recorder is recording or in recording pause, press MENU. 2 Press . or > repeatedly "R-SET" appears in the display, and then press ENTER. 3 Press . or > repeatedly "TimeMk" appears in the display, and then press ENTER. "OFF" appears in the display. 4 Press > to show "ON" in the display, and then press ENTER. 5 Press . or > repeatedly until the desired time interval appears in the display, and then press ENTER. Pressing . or > changes the time setting (Time:) by 1 minute, within the range of 1 to 99 minutes. To cancel Auto Time Mark Select "OFF" in step 4 or stop recording. 33
-
 1
1 -
2
-
3
-
4
-
5
-
6
-
7
-
8
-
9
-
10
-
11
-
12
-
13
-
14
-
15
-
16
-
17
-
18
-
19
-
20
-
21
-
22
-
23
-
24
-
25
-
26
-
27
-
 28
28 -
 29
29 -
 30
30 -
 31
31 -
 32
32 -
 33
33 -
 34
34 -
 35
35 -
 36
36 -
 37
37 -
 38
38 -
39
-
40
-
41
-
42
-
43
-
44
-
45
-
46
-
47
-
48
-
49
-
50
-
51
-
52
-
53
-
54
-
55
-
56
-
57
-
58
-
59
-
60
-
61
-
62
-
63
-
64
-
65
-
66
-
67
-
68
-
69
-
70
-
71
-
72
-
73
-
74
-
75
-
76
-
77
-
78
-
79
-
80
-
81
-
82
-
83
-
84
-
85
-
86
-
87
-
88
-
89
-
90
-
91
-
92
-
93
-
94
-
95
-
96
-
97
-
98
-
99
-
100
-
101
-
102
-
103
-
104
-
105
-
106
-
107
-
108
-
109
-
110
-
111
-
112
-
113
-
114
-
115
-
116
-
117
-
118
-
119
-
120
-
121
-
122
-
123
-
124
 |
 |