Sony PEG-TJ35 CLIE Handbook (primary manual) - Page 54
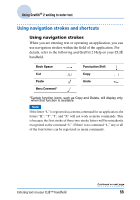
Notes on writing Graffiti, characters, writing area. Start your stroke
 |
UPC - 027242636811
View all Sony PEG-TJ35 manuals
Add to My Manuals
Save this manual to your list of manuals |
Page 54 highlights
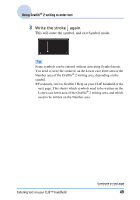
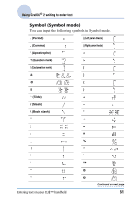
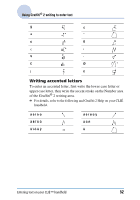
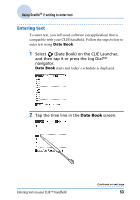
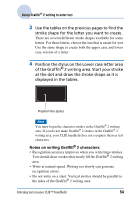
Using Graffiti® 2 writing to enter text 3 Use the tables on the previous pages to find the stroke shape for the letter you want to create. There are several different stroke shapes available for some letters. For those letters, choose the one that is easier for you. Use the same shape to create both the upper case and lower case version of a letter. 4 Position the stylus on the Lower case letter area of the Graffiti® 2 writing area. Start your stroke at the dot and draw the stroke shape as it is displayed in the tables. Position the stylus Note You must begin the character strokes in the Graffiti® 2 writing area. If you do not make Graffiti® 2 strokes in the Graffiti® 2 writing area, your CLIÉ handheld does not recognize them as text characters. Notes on writing Graffiti® 2 characters • Recognition accuracy improves when you write large strokes. You should draw strokes that nearly fill the Graffiti® 2 writing area. • Write at natural speed. Writing too slowly can generate recognition errors. • Do not write on a slant. Vertical strokes should be parallel to the sides of the Graffiti® 2 writing area. Entering text on your CLIÉ™ handheld 54
-
 1
1 -
2
-
3
-
4
-
5
-
6
-
7
-
8
-
9
-
10
-
11
-
12
-
13
-
14
-
15
-
16
-
17
-
18
-
19
-
20
-
21
-
22
-
23
-
24
-
25
-
26
-
27
-
28
-
29
-
30
-
31
-
32
-
33
-
34
-
35
-
36
-
37
-
38
-
39
-
40
-
41
-
42
-
43
-
44
-
45
-
46
-
47
-
48
-
 49
49 -
 50
50 -
 51
51 -
 52
52 -
 53
53 -
 54
54 -
 55
55 -
 56
56 -
 57
57 -
 58
58 -
 59
59 -
60
-
61
-
62
-
63
-
64
-
65
-
66
-
67
-
68
-
69
-
70
-
71
-
72
-
73
-
74
-
75
-
76
-
77
-
78
-
79
-
80
-
81
-
82
-
83
-
84
-
85
-
86
-
87
-
88
-
89
-
90
-
91
-
92
-
93
-
94
-
95
-
96
-
97
-
98
-
99
-
100
-
101
-
102
-
103
-
104
-
105
-
106
-
107
-
108
-
109
-
110
-
111
-
112
-
113
-
114
-
115
-
116
-
117
-
118
-
119
-
120
-
121
-
122
-
123
-
124
-
125
-
126
-
127
-
128
-
129
-
130
-
131
-
132
-
133
-
134
-
135
-
136
-
137
-
138
-
139
-
140
-
141
-
142
-
143
-
144
-
145
-
146
-
147
-
148
-
149
-
150
-
151
-
152
-
153
-
154
-
155
-
156
-
157
-
158
-
159
-
160
-
161
-
162
-
163
-
164
-
165
-
166
-
167
-
168
-
169
-
170
-
171
-
172
-
173
-
174
-
175
-
176
-
177
-
178
-
179
-
180
-
181
-
182
-
183
-
184
-
185
-
186
-
187
-
188
-
189
-
190
 |
 |