Sony RM-AV2500 Operating Instructions (primary manual) - Page 10
Checking if the code number works - remote codes
 |
View all Sony RM-AV2500 manuals
Add to My Manuals
Save this manual to your list of manuals |
Page 10 highlights
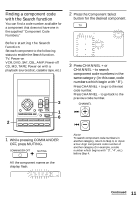
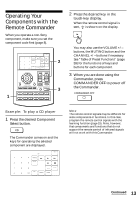
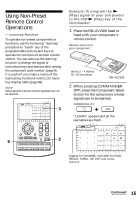
Setting the Code for Preset Audio and Visual Components (continued) Checking if the code number works 1 Press the corresponding Component Select button for the component you have set up. 4 If you have succeeded, check that the Commander is operating the other functions of your component, such as channel and volume control. See page 13 for details. 5 Press COMMANDER OFF. The Commander turns on and the touch-keys appear on the display. 2 Power on the component with its power switch. 3 Aim the Commander at the component and press the POWER key in the touch-key display. When the remote control signal is sent, is shown on the display. The component should power off. If the Commander does not seem to be working Try repeating these setup procedures using the other codes listed for your components (page 8). Notes on keys which have "learned" a remote control signal already If another signal has already been programmed on that key or button by the learning function (page 15), that "learned" signal will work even after you set the component code number. To use it as a preset component key or button, first erase its learned signal (page 19). Note on the touch-key display When you set a component code number, only the keys that have been preset with the signals for the desired component will be displayed. Preset signal of each key varies depending on the brand. By using the learning function, you can program remote control signals to both the displayed keys and keys that are not displayed (page 15). 10
-
 1
1 -
2
-
3
-
4
-
 5
5 -
 6
6 -
 7
7 -
 8
8 -
 9
9 -
 10
10 -
 11
11 -
 12
12 -
 13
13 -
 14
14 -
 15
15 -
16
-
17
-
18
-
19
-
20
-
21
-
22
-
23
-
24
-
25
-
26
-
27
-
28
-
29
-
30
-
31
-
32
-
33
-
34
-
35
-
36
-
37
-
38
-
39
-
40
-
41
-
42
-
43
-
44
-
45
-
46
-
47
-
48
-
49
-
50
-
51
-
52
-
53
-
54
-
55
-
56
-
57
-
58
-
59
-
60
-
61
-
62
-
63
-
64
-
65
-
66
-
67
-
68
-
69
-
70
-
71
-
72
-
73
-
74
-
75
-
76
 |
 |
