Sony RM-AV2500 Operating Instructions (primary manual) - Page 45
Then follow Steps 3 to 6 the key or button you want
 |
View all Sony RM-AV2500 manuals
Add to My Manuals
Save this manual to your list of manuals |
Page 45 highlights
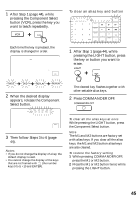
1 After Step 1 (page 44), while pressing the Component Select button (VCR), press the key you want to teach repeatedly. To clear an alias key and button Each time the key is pressed, the display is changed in order. 1 After Step 1 (page 44), while pressing the LIGHT button, press the key or button you want to erase. 2 When the desired display appears, release the Component Select button. The cleared key flashes together with other settable alias keys. 2 Press COMMANDER OFF. 3 Then follow Steps 3 to 6 (page 44). Notes • If you do not change the display of a key, the default display is used. • You cannot change the display of the keys that are not framed with (the number keys 0 to 9, +10 and ENTER). To clear all the alias keys at once While pressing the LIGHT button, press the Component Select button. Note The M1 and M2 buttons are factory set with alias keys. If you clear all the alias keys, the M1 and M2 button alias keys are also cleared. To restore the factory setting 1 While pressing COMMANDER OFF, press the M1 or M2 button. 2 Press the M1 or M2 button twice while pressing the LIGHT button. 45
-
 1
1 -
2
-
3
-
4
-
5
-
6
-
7
-
8
-
9
-
10
-
11
-
12
-
13
-
14
-
15
-
16
-
17
-
18
-
19
-
20
-
21
-
22
-
23
-
24
-
25
-
26
-
27
-
28
-
29
-
30
-
31
-
32
-
33
-
34
-
35
-
36
-
37
-
38
-
39
-
 40
40 -
 41
41 -
 42
42 -
 43
43 -
 44
44 -
 45
45 -
 46
46 -
 47
47 -
 48
48 -
 49
49 -
 50
50 -
51
-
52
-
53
-
54
-
55
-
56
-
57
-
58
-
59
-
60
-
61
-
62
-
63
-
64
-
65
-
66
-
67
-
68
-
69
-
70
-
71
-
72
-
73
-
74
-
75
-
76
 |
 |
