Sony RM-AV2500 Operating Instructions (primary manual) - Page 64
AMP, To move the cursor to the left
 |
View all Sony RM-AV2500 manuals
Add to My Manuals
Save this manual to your list of manuals |
Page 64 highlights
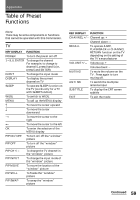
Table of Preset Functions (continued) AMP KEY DISPLAY FUNCTION POWER To turn the power on/off VIDEO 1 To select the input source: VIDEO 1 VIDEO 2 To select the input source: VIDEO 2 VIDEO 3 To select the input source: VIDEO 3 AUX To select the input source: AUX DVD To select the input source: DVD TV To select the input source: TV CD To select the input source: CD MD/DAT To select the input source: MD TUNER To select the input source: TUNER TAPE To select the input source: TAPE PHONO To select the input source: PHONO 5.1 INPUT To change the multi-channel of 5.1ch and above MENU To call up the MENU display, or return to the previous MENU R To move the cursor upward r To move the cursor downward t To move the cursor to the right T To move the cursor to the left OK To enter the selection of the MENU display KEY DISPLAY FUNCTION RECALL To shift band or preset select EXIT To return to the basic MENU CHANNEL Presetting or tuning frequency +/- to a higher: + Presetting or tuning frequency to a lower: - VOLUME +/- Volume up: + Volume down: - MUTING To mute the volume on the AMP Press again to turn muting off S.FIELD To turn on/off the sound field MODE To select a sound field mode T.TONE To output a test tone CENTER To adjust the center speaker level: + CENTER To adjust the center speaker level: - REAR To adjust the rear speaker level: + REAR To adjust the rear speaker level: - SUB WOOFER To adjust the subwoofer level: + SUB WOOFER To adjust the subwoofer level: - FRONT BAL To control the front speaker balance REAR BAL To control the rear speaker balance EFFECT To control the effect 64
-
 1
1 -
2
-
3
-
4
-
5
-
6
-
7
-
8
-
9
-
10
-
11
-
12
-
13
-
14
-
15
-
16
-
17
-
18
-
19
-
20
-
21
-
22
-
23
-
24
-
25
-
26
-
27
-
28
-
29
-
30
-
31
-
32
-
33
-
34
-
35
-
36
-
37
-
38
-
39
-
40
-
41
-
42
-
43
-
44
-
45
-
46
-
47
-
48
-
49
-
50
-
51
-
52
-
53
-
54
-
55
-
56
-
57
-
58
-
 59
59 -
 60
60 -
 61
61 -
 62
62 -
 63
63 -
 64
64 -
 65
65 -
 66
66 -
 67
67 -
 68
68 -
 69
69 -
70
-
71
-
72
-
73
-
74
-
75
-
76
 |
 |
