Sony SHAKE-X10D Operating Instructions - Page 23
Changing the color system, Performing the quick setup, To change the setting manually
 |
View all Sony SHAKE-X10D manuals
Add to My Manuals
Save this manual to your list of manuals |
Page 23 highlights
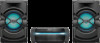
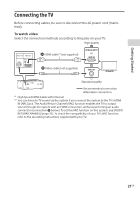
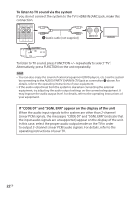
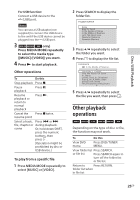
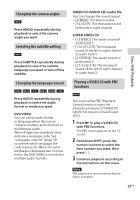
Changing the color system (Except for Latin American, European, and Russian models) Set the color system to PAL or NTSC depending on the color system of your TV. Each time you perform the procedure below, the color system changes as follows: COLOR NTSC COLOR PAL Use the buttons on the unit to perform this operation. 1 Press to turn on the system. 2 Press FUNCTION repeatedly to select "DVD/CD". 3 Hold down MIC ECHO and ENTER for more than 3 seconds. "COLOR NTSC" or "COLOR PAL" appears on the display. Performing the quick setup Before using the system, you can make the minimum basic adjustments in the quick setup. 1 Turn on your TV and select the input according to the connection. 2 Press to turn on the system. 3 Press FUNCTION +/- repeatedly to select "DVD/CD". The guide message [Press ENTER to run QUICK SETUP.] appears at the bottom of the TV screen. Getting Started 4 Press without loading a disc. [LANGUAGE SETUP] appears on the TV screen. Displayed items may vary depending on country or region. LANGUAGE SETUP OSD: MENU: AUDIO: SUBTITLE: ENGLISH ENGLISH CHINESE 1 CHINESE 2 THAI 5 Press / repeatedly to select a language, then press . [VIDEO SETUP] appears on the TV screen. 6 Press / repeatedly to select the setting that matches your TV type, then press . After [QUICK SETUP is complete.] appears on the TV screen, the system is ready for playback. To change the setting manually See "Using the Setup Menu" (page 31). To quit the quick setup Press SETUP. Note The guide message appears when you turn on the system for the first time or after performing [RESET] (see "Returning the setup menu settings to the default" on page 65). 23GB
-
 1
1 -
2
-
3
-
4
-
5
-
6
-
7
-
8
-
9
-
10
-
11
-
12
-
13
-
14
-
15
-
16
-
17
-
 18
18 -
 19
19 -
 20
20 -
 21
21 -
 22
22 -
 23
23 -
 24
24 -
 25
25 -
 26
26 -
 27
27 -
 28
28 -
29
-
30
-
31
-
32
-
33
-
34
-
35
-
36
-
37
-
38
-
39
-
40
-
41
-
42
-
43
-
44
-
45
-
46
-
47
-
48
-
49
-
50
-
51
-
52
-
53
-
54
-
55
-
56
-
57
-
58
-
59
-
60
-
61
-
62
-
63
-
64
-
65
-
66
-
67
-
68
-
69
-
70
-
71
-
72
-
73
-
74
-
75
-
76
 |
 |