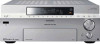
Sony STR-DA7100ES Operating Instructions - Page 53
For more precise adjustment, To operate on the receiver, Turn MAIN MENU to select - test
 |
View all Sony STR-DA7100ES manuals
Add to My Manuals
Save this manual to your list of manuals |
Page 53 highlights
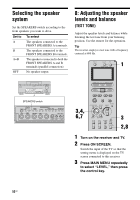
Getting Started 4 Move the control key b to select "AUTO." The test tone is output from each speaker in sequence. Also, if you press b, the pattern will become the "FIX" pattern in, which the test tone is output from the selected speaker only. 5 Adjust the speaker level and balance using the LEVEL menu so that the level of the test tone sounds the same from each speaker. For details on the LEVEL menu settings, see page 99. Tips • To adjust the level of all speakers at the same time, press MASTER VOL +/- on the remote or turn MASTER VOLUME on the receiver. • You can also use +/- on the receiver for the adjustment. 6 Press the control key V/v repeatedly to select "TEST TONE." 7 Move the control key B to select "OFF." The test tone turns off. 8 Press ON SCREEN. The menu setting display disappears. For more precise adjustment You can output the test tone or sound source from two adjacent speakers to adjust their balance and level. Set "MENU EXPAND" in the CUSTOMIZE menu to "ON" (page 67). Then select the two speakers you want to adjust using "PHASE NOISE" or "PHASE AUDIO" on the LEVEL menu (page 100). To operate on the receiver When you operate using the receiver, be sure to perform the following procedure. 1 3,5,7 2 4,6,8 1 Turn on this receiver. 2 Turn MAIN MENU to select "LEVEL." 3 Turn MENU to select "TEST TONE." 4 Turn +/- clockwise to select "AUTO." The test tone is output from each speaker. 5 Turn MENU to select a speaker you want to adjust. 6 Turn +/- to adjust the parameter. Adjust the speaker level and balance so that the level (volume) of the test tone sounds the same from each speaker. Repeat step 5 and 6 to adjust the volume of each speaker. 7 Turn MENU to select "TEST TONE." 8 Turn +/- counter-clockwise to select "OFF." 53GB
-
 1
1 -
2
-
3
-
4
-
5
-
6
-
7
-
8
-
9
-
10
-
11
-
12
-
13
-
14
-
15
-
16
-
17
-
18
-
19
-
20
-
21
-
22
-
23
-
24
-
25
-
26
-
27
-
28
-
29
-
30
-
31
-
32
-
33
-
34
-
35
-
36
-
37
-
38
-
39
-
40
-
41
-
42
-
43
-
44
-
45
-
46
-
47
-
 48
48 -
 49
49 -
 50
50 -
 51
51 -
 52
52 -
 53
53 -
 54
54 -
 55
55 -
 56
56 -
 57
57 -
 58
58 -
59
-
60
-
61
-
62
-
63
-
64
-
65
-
66
-
67
-
68
-
69
-
70
-
71
-
72
-
73
-
74
-
75
-
76
-
77
-
78
-
79
-
80
-
81
-
82
-
83
-
84
-
85
-
86
-
87
-
88
-
89
-
90
-
91
-
92
-
93
-
94
-
95
-
96
-
97
-
98
-
99
-
100
-
101
-
102
-
103
-
104
-
105
-
106
-
107
-
108
-
109
-
110
-
111
-
112
-
113
-
114
-
115
-
116
-
117
-
118
-
119
-
120
-
121
-
122
-
123
-
124
-
125
-
126
-
127
-
128
-
129
-
130
-
131
-
132
-
133
-
134
-
135
-
136
-
137
-
138
-
139
 |
 |
