Sony STR-DA7100ES Operating Instructions - Page 83
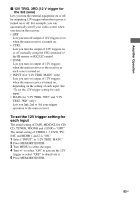
To set the 12V trigger setting for, each input, 12V TRIG. 3RD 12 V trigger for, the 3rd zone
 |
View all Sony STR-DA7100ES manuals
Add to My Manuals
Save this manual to your list of manuals |
Page 83 highlights
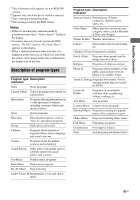
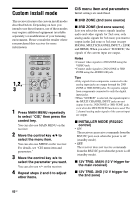
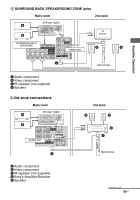
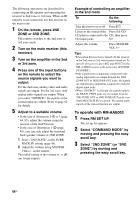
Amplifier Operation x 12V TRIG. 3RD (12 V trigger for the 3rd zone) Lets you turn the external equipment on or off by outputting 12V triggers when the receiver is turned on or off. For example, you can automatically unroll your video screen when you turn on the receiver. • OFF Lets you turn off output of 12V triggers even when the main receiver is turned on. • CTRL Lets you turn the output of 12V triggers on or off manually using the CIS command of the IR remote or RS232C control. • ZONE Lets you turn on output of 12V triggers when the main receiver or the receiver in each zone is turned on. • INPUT (for "12V TRIG. MAIN" only) Lets you turn on output of 12V triggers when the main receiver is turned on, depending on the setting of each input. See "To set the 12V trigger setting for each input." • MAIN (for "12V TRIG. 2ND" and "12V TRIG. 3RD" only) Lets you link 2nd or 3rd zone trigger operation to the main receiver. To set the 12V trigger setting for each input The initial setting of TAPE, MD/DAT, SA-CD/ CD, TUNER, PHONO and i.LINK is "OFF." The initial setting of VIDEO 1-3, DVD, TV/ SAT, and HDMI 1 and 2 is "ON." 1 Select "INPUT" in "12V TRIG. MAIN." 2 Press MEMORY/ENTER. 3 Turn MENU to select the input. 4 Turn +/- to select "ON" to activate the 12V trigger or select "OFF" to deactivate it. 5 Press MEMORY/ENTER. 83GB
-
 1
1 -
2
-
3
-
4
-
5
-
6
-
7
-
8
-
9
-
10
-
11
-
12
-
13
-
14
-
15
-
16
-
17
-
18
-
19
-
20
-
21
-
22
-
23
-
24
-
25
-
26
-
27
-
28
-
29
-
30
-
31
-
32
-
33
-
34
-
35
-
36
-
37
-
38
-
39
-
40
-
41
-
42
-
43
-
44
-
45
-
46
-
47
-
48
-
49
-
50
-
51
-
52
-
53
-
54
-
55
-
56
-
57
-
58
-
59
-
60
-
61
-
62
-
63
-
64
-
65
-
66
-
67
-
68
-
69
-
70
-
71
-
72
-
73
-
74
-
75
-
76
-
77
-
 78
78 -
 79
79 -
 80
80 -
 81
81 -
 82
82 -
 83
83 -
 84
84 -
 85
85 -
 86
86 -
 87
87 -
 88
88 -
89
-
90
-
91
-
92
-
93
-
94
-
95
-
96
-
97
-
98
-
99
-
100
-
101
-
102
-
103
-
104
-
105
-
106
-
107
-
108
-
109
-
110
-
111
-
112
-
113
-
114
-
115
-
116
-
117
-
118
-
119
-
120
-
121
-
122
-
123
-
124
-
125
-
126
-
127
-
128
-
129
-
130
-
131
-
132
-
133
-
134
-
135
-
136
-
137
-
138
-
139
 |
 |
