Sony STR-DA7100ES Operating Instructions - Page 63
Watching component images from other inputs (COMPONENT VIDEO ASSIGN), COMPONENT VIDEO ASSIGN
 |
View all Sony STR-DA7100ES manuals
Add to My Manuals
Save this manual to your list of manuals |
Page 63 highlights
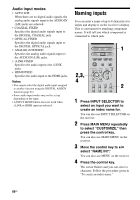
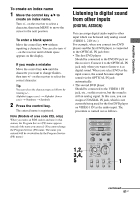
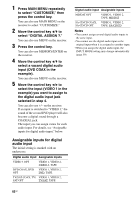
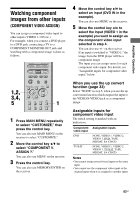
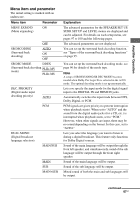
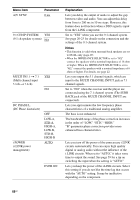
Amplifier Operation Watching component images from other inputs (COMPONENT VIDEO ASSIGN) You can assign a component video input to other inputs (VIDEO 1-3 IN etc.). For example, when you connect a DVD player to a DVD jack, connecting a TV to a COMPONENT MONITOR OUT jack and watching with a component image is done as follows. 1,2, 3,4, 5 1 1 Press MAIN MENU repeatedly to select "CUSTOMIZE," then press the control key. You can also use MAIN MENU on the receiver to select "CUSTOMIZE." 2 Move the control key V/v to select "COMPONENT V. ASSIGN ?." You can also use MENU on the receiver. 3 Press the control key. You can also use MEMORY/ENTER on the receiver. 4 Move the control key V/v to select an input (DVD IN in the example). You can also use MENU on the receiver. 5 Move the control key B/b to select the input (VIDEO 1 in the example) you want to assign as the component video input selected in step 4. You can also use +/- on the receiver. If an input is switched to "VIDEO 1," the image from the DVD player will be a component image. The input you can assign varies for each component video input. For details, see "Assignable inputs for component video input," below. When you use the up convert function (page 33) Select "NONE" in step 5, when you use the up conversion function which outputs the input to the VIDEO/S-VIDEO jack as a component image. Assignable inputs for component video input The initial setting is marked with an underscore. Component video input DVD TV/SAT Assignable inputs NONE, VIDEO 1, VIDEO 2, VIDEO 3, DVD, TAPE, MD/DAT, SA-CD/CD NONE, VIDEO 1, VIDEO 2, VIDEO 3, TV/SAT, TAPE, MD/DAT, SA-CD/CD Notes • You cannot assign several visual inputs to the same input. • You cannot use the component video input as the original input when it is assigned to another input. 63GB
-
 1
1 -
2
-
3
-
4
-
5
-
6
-
7
-
8
-
9
-
10
-
11
-
12
-
13
-
14
-
15
-
16
-
17
-
18
-
19
-
20
-
21
-
22
-
23
-
24
-
25
-
26
-
27
-
28
-
29
-
30
-
31
-
32
-
33
-
34
-
35
-
36
-
37
-
38
-
39
-
40
-
41
-
42
-
43
-
44
-
45
-
46
-
47
-
48
-
49
-
50
-
51
-
52
-
53
-
54
-
55
-
56
-
57
-
 58
58 -
 59
59 -
 60
60 -
 61
61 -
 62
62 -
 63
63 -
 64
64 -
 65
65 -
 66
66 -
 67
67 -
 68
68 -
69
-
70
-
71
-
72
-
73
-
74
-
75
-
76
-
77
-
78
-
79
-
80
-
81
-
82
-
83
-
84
-
85
-
86
-
87
-
88
-
89
-
90
-
91
-
92
-
93
-
94
-
95
-
96
-
97
-
98
-
99
-
100
-
101
-
102
-
103
-
104
-
105
-
106
-
107
-
108
-
109
-
110
-
111
-
112
-
113
-
114
-
115
-
116
-
117
-
118
-
119
-
120
-
121
-
122
-
123
-
124
-
125
-
126
-
127
-
128
-
129
-
130
-
131
-
132
-
133
-
134
-
135
-
136
-
137
-
138
-
139
 |
 |
