Sony UPCR20L Operating Instructions - Page 15
Installation, Connecting the Power Cord, Adjusting the Display Angle - borders
 |
View all Sony UPCR20L manuals
Add to My Manuals
Save this manual to your list of manuals |
Page 15 highlights
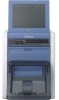
Chapter 2 Preparations C USB port (host) × 2 Allows connection of a USB device. You can connect a commercially available card reader or USB memory device to this port and use it to read data.1) You can also connect an expansion printer. To use Bluetooth communication, insert a Bluetooth USB adaptor here. 1) Correct operation with every card reader and USB memory device is not guaranteed. Operation is not guaranteed when connected by a USB hub. PictBridge is not supported. D Expansion CompactFlash card slot When using features such as border print or promotional images, insert the expansion CompactFlash card here. d POWER switch Turns the unit's power on or off. e ~ AC IN (power source) connector (page 15) Connect the power cord here. f Security slot Allows you to attach a wire lock to prevent theft. Installation Connecting the Power Cord Connect the power cord to the ~ AC IN connector on the back of the unit, and then connect the plug to a power outlet. UP-CR20L to - AC IN connector AC power cord (not supplied) To secure the power cord Wrap the cable clamp around the power cord, and fasten it securely as shown. Adjusting the Display Angle The display angle can be adjusted to make the display more easily viewable. Four settings are available for angle adjustment. 15 Installation
-
 1
1 -
2
-
3
-
4
-
5
-
6
-
7
-
8
-
9
-
 10
10 -
 11
11 -
 12
12 -
 13
13 -
 14
14 -
 15
15 -
 16
16 -
 17
17 -
 18
18 -
 19
19 -
 20
20 -
21
-
22
-
23
-
24
-
25
-
26
-
27
-
28
-
29
-
30
-
31
-
32
-
33
-
34
-
35
-
36
-
37
-
38
-
39
-
40
-
41
-
42
-
43
-
44
-
45
-
46
-
47
-
48
-
49
-
50
-
51
-
52
-
53
-
54
-
55
-
56
-
57
-
58
-
59
-
60
-
61
-
62
-
63
-
64
-
65
-
66
-
67
-
68
-
69
-
70
-
71
-
72
-
73
-
74
-
75
-
76
-
77
-
78
-
79
-
80
-
81
 |
 |
