Symphonic SF225A Owner's Manual - Page 26
Screen, Display
 |
View all Symphonic SF225A manuals
Add to My Manuals
Save this manual to your list of manuals |
Page 26 highlights
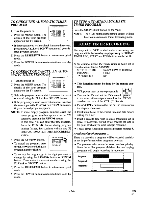
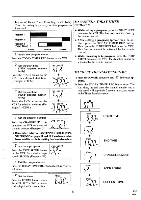
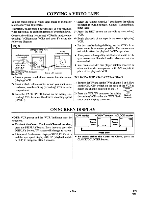
COPYING A VIDEO TAPE You can make copies of video tapes made by friends or relatives for your enjoyment. Warning:Unauthorized recordings of copyrighted video tapes may be an infringement of copyright laws. Connect the editing (recording) VCR(this unit), source (playing) VCR(another VCR) and your TV using the following diagram. Fig.9: [Editing (Recording) VCR] (this unit) AudioNideo cables (not supplied) o" [TV set] (Use for monitoring) ovr *OUT * OUT * IN * IN AUDIO VIDEO 0 Antenna input jack [Source (Playing) VCR ] (another VCR) Coaxial cable (supplied) 1) Insert a pre-recorded video cassette into the source (playing) VCR. 2) Insert a blank video cassette, or one you want to record over, into the editing (recording) VCR cassette compartment. 3) Press the TAPE SPEED button on the editing (recording) VCR to select the desired recording speed (SP/SLP). 4) Select the "LineIn Rear (LI)" position on the editing (recording) VCR. See page 13, under "Connecting to input jacks". 5) Press the REC button on the editing (recording) VCR. 6) Begin playback of the tape in the source (playing) VCR. • For best results during dubbing, use the VCR's front panel controls whenever possible. The remote control might affect the playback VCR's operation. • Always use video-quality shielded cables with RCAtype connectors. Standard audio cables are not recommended. • You can use a video disc player, satellite receiver, or other audio/video component with AN outputs in place of the playback VCR. TO MONITOR THE RECORDING 1) Turn on the TV and set the TV to channel 3 or 4. Now set the CH3/CH4 switch on the back of the VCR to match the channel selected on the TV. 4-> CH3 CH4 2) Press the VCR/TV button on the editing (recording) VCR so that the "VCR" indi- [Back of the VCR] cator on the display comes on. ON SCREEN DISPLAY NOTE: VCR power and the "VCR" indicator must be turned on. • To check the Count, Clock and Channel number, press the DISPLAY button. Each time you press the DISPLAY button, TV screen will change as shown. • It is normal for the status display (STOP, PLAY etc.) and the tape speed display (SP, LP (playback only), or SLP) to disappear after 5 seconds. ' STOP ameello. Press Press S once P 0:12:34 once Press once • To check either the Count or Clock, press the CLOCK/COUNTER button. - 26 - EN 9I21
-
 1
1 -
2
-
3
-
4
-
5
-
6
-
7
-
8
-
9
-
10
-
11
-
12
-
13
-
14
-
15
-
16
-
17
-
18
-
19
-
20
-
 21
21 -
 22
22 -
 23
23 -
 24
24 -
 25
25 -
 26
26 -
 27
27 -
 28
28 -
 29
29 -
 30
30 -
 31
31 -
32
-
33
-
34
-
35
-
36
-
37
-
38
-
39
-
40
-
41
-
42
-
43
-
44
 |
 |
