TEAC AI-303 Owners Manual English Francais Espanol - Page 9
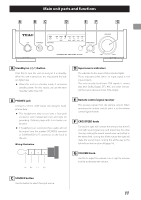
DIGITAL IN COAXIAL, OPTICAL audio, Analog audio input LINE 1, LINE 2
 |
View all TEAC AI-303 manuals
Add to My Manuals
Save this manual to your list of manuals |
Page 9 highlights
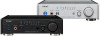
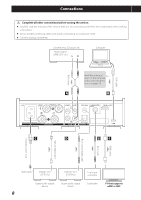
A Analog audio input (LINE 1, LINE 2) connectors Use these to input 2-channel analog audio signals. Connect an audio output device such as a cassette deck or CD player to these connectors using commercially-available RCA cables. Connect this unit's R input connector to the R output connector of the audio output device, and this unit's L input connector to the L output connector of the other device. White (L) Red (R) White (L) Red (R) E SUBWOOFER OUT connector If you want to use a subwoofer, connect it to this connector. oo The VOLUME knob on the unit front controls the output level. F HDMI (eARC) audio input connector B USB input port Use this to input digital audio from a computer. Connect it to a computer's USB port. Use a commercially-available USB cable. oo Install the dedicated driver on the computer before connecting this unit to it (page 19). C Power inlet (~IN) Connect the supplied power cord here. After all other connections are complete, connect the power cord's plug to a wall outlet. VV Do not use any power cord other than the one included with this unit. Use of other power cords could result in fire or electric shock. VV Disconnect the power plug from the outlet if you will not use the unit for a long time. D DIGITAL IN (COAXIAL, OPTICAL) audio input connectors Use these to input digital audio. Connect digital audio output connectors of digital audio devices here. COAXIAL: RCA digital coaxial cable OPTICAL: Optical digital cable (TOS) 9
-
 1
1 -
2
-
3
-
 4
4 -
 5
5 -
 6
6 -
 7
7 -
 8
8 -
 9
9 -
 10
10 -
 11
11 -
 12
12 -
 13
13 -
 14
14 -
15
-
16
-
17
-
18
-
19
-
20
-
21
-
22
-
23
-
24
-
25
-
26
-
27
-
28
-
29
-
30
-
31
-
32
-
33
-
34
-
35
-
36
-
37
-
38
-
39
-
40
-
41
-
42
-
43
-
44
-
45
-
46
-
47
-
48
-
49
-
50
-
51
-
52
-
53
-
54
-
55
-
56
-
57
-
58
-
59
-
60
-
61
-
62
-
63
-
64
-
65
-
66
-
67
-
68
-
69
-
70
-
71
-
72
-
73
-
74
-
75
-
76
 |
 |
