TP-Link TL-PS110U User Manual - Page 7
Hardware Installation, 2.1 Preparation, 2.2 Connection - usb
 |
UPC - 845973031008
View all TP-Link TL-PS110U manuals
Add to My Manuals
Save this manual to your list of manuals |
Page 7 highlights
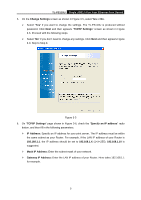
TL-PS110U Single USB2.0 Port Fast Ethernet Print Server Chapter 2. Hardware Installation 2.1 Preparation Before you start, you should prepare the following items: ¾ One printer with USB port ¾ One USB printer cable ¾ One Router 2.2 Connection Follow the instructions below to connect the print server. Figure 2-1 is a typical typology for the print server. ¾ Power off the printer. ¾ Connect the print server to your printer with the USB cable. ¾ Connect the print server to your Router with an Ethernet cable. ¾ Power on the printer. ¾ Power on print server. ¾ Wait 40 seconds as part of the print server's Power On Self Test (POST). Figure 2-1 )Note: The TL-PS110U is produced without password by default. 2
-
 1
1 -
 2
2 -
 3
3 -
 4
4 -
 5
5 -
 6
6 -
 7
7 -
 8
8 -
 9
9 -
 10
10 -
 11
11 -
 12
12 -
13
-
14
-
15
-
16
-
17
-
18
-
19
-
20
-
21
-
22
-
23
-
24
-
25
-
26
-
27
-
28
-
29
-
30
-
31
-
32
-
33
-
34
-
35
-
36
-
37
-
38
-
39
-
40
-
41
-
42
-
43
-
44
-
45
-
46
-
47
-
48
-
49
-
50
-
51
-
52
-
53
-
54
-
55
-
56
-
57
-
58
 |
 |

TL-PS110U
Single USB2.0 Port Fast Ethernet Print Server
2
Chapter 2. Hardware Installation
2.1 Preparation
Before you start, you should prepare the following items:
¾
One printer with USB port
¾
One USB printer cable
¾
One Router
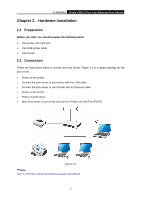
2.2 Connection
Follow the instructions below to connect the print server. Figure 2-1 is a typical typology for the
print server.
¾
Power off the printer.
¾
Connect the print server to your printer with the USB cable.
¾
Connect the print server to your Router with an Ethernet cable.
¾
Power on the printer.
¾
Power on print server.
¾
Wait 40 seconds as part of the print server’s Power On Self Test (POST).
Figure 2-1
)
Note:
The TL-PS110U is produced without password by default.