TRENDnet TEW-821DAP User's Guide - Page 28
Set date and time, Manage VLAN
 |
View all TRENDnet TEW-821DAP manuals
Add to My Manuals
Save this manual to your list of manuals |
Page 28 highlights
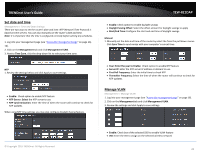
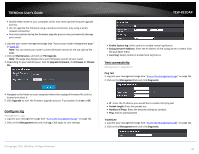
TRENDnet User's Guide Set date and time Management > Time and Date Settings There are two ways to set the router's date and time. NTP (Network Time Protocol) is based on time servers. You can also manually set the router's date and time. Note: It is important that the time is configured correctly before setting any schedules. 1. Log into your management page (see "Access the management page" on page 16). 16). 2. Click on the Management tab and click Management VLAN. 3. Next to Time Zone, click the drop-down list to select your time zone. NTP 1. Review the settings below and click Apply to save settings. Enable: Check option to enable NTP feature NTP Server: Select the NTP server to use NTP synchronization: Enter the time of when the router will continue to check for NTP updates. When using NTP time settings you may also configure Daylight Saving feature. TEW-821DAP Enable: Check option to enable daylight savings Daylight Saving Offset: Select the offset amount for daylight savings to apply Start/End Time: Configure the start and end time of daylight savings. Manual 1. Manually set the date and time of the router by select the from the pull down menus. Click Sync Time to synchronize with your computer's current time. Year: Enter the year to Enable: Check option to enable NTP feature Server IP: Enter the NTP server IP address or domain to use. First Poll Frequency: Enter the initial time to check NTP Thereafter Frequency: Select the time of when the router will continue to check for NTP updates. Manage VLAN Management > Manage VLAN 1. Log into your management page (see "Access the management page" on page 16). 2. Click on the Management tab and click Management VLAN. 3. Review the settings and click Apply to save settings. © Copyright 2015 TRENDnet. All Rights Reserved. Enable: Check box of the selected SSID to enable VLAN feature VID: Enter the VID to assign on the selected wireless network 28
-
 1
1 -
2
-
3
-
4
-
5
-
6
-
7
-
8
-
9
-
10
-
11
-
12
-
13
-
14
-
15
-
16
-
17
-
18
-
19
-
20
-
21
-
22
-
 23
23 -
 24
24 -
 25
25 -
 26
26 -
 27
27 -
 28
28 -
 29
29 -
 30
30 -
 31
31 -
 32
32 -
 33
33 -
34
-
35
-
36
-
37
-
38
-
39
-
40
-
41
-
42
-
43
-
44
-
45
 |
 |
