TRENDnet TPE-1020WS User's Guide - Page 13
System, Set your system information, Save Settings to Flash menu - review
 |
View all TRENDnet TPE-1020WS manuals
Add to My Manuals
Save this manual to your list of manuals |
Page 13 highlights
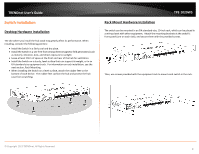
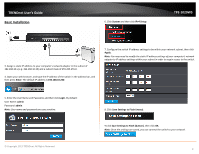
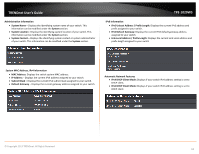
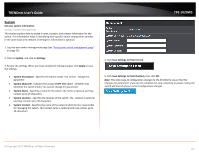
TRENDnet User's Guide System Set your system information System > System Management This section explains how to assign a name, location, and contact information for the switch. This information helps in identifying each specific switch among other switches in the same local area network. Entering this information is optional. 1. Log into your switch management page (see "Access your switch management page" on page 11). 2. Click on System, and click on Settings. 3. Review the settings. When you have completed making changes, click Apply to save the settings. • System Description - Specifies the Switch model. You cannot change this parameter. • System Object ID - Indicates the unique SNMP MIB object identifier that identifies the switch model. You cannot change this parameter. • System Name - Specifies a name for the switch, the name is optional and may contain up to 15 characters. • System Location - Specifies the location of the switch. The location is optional and may contain up to 30 characters. • System Contact - Specifies the name of the network administrator responsible for managing the switch. This contact name is optional and may contain up to 30 characters. TPE-1020WS 4. Click Save Settings to Flash (menu). 5. Click Save Settings to Flash (button), then click OK. Note: This step saves all configuration changes to the NV-RAM to ensure that the changes are permanent. If you do not complete this step, rebooting or power cycling the switch will lose all of your current configuration changes. © Copyright 2013 TRENDnet. All Rights Reserved. 13
-
 1
1 -
2
-
3
-
4
-
5
-
6
-
7
-
 8
8 -
 9
9 -
 10
10 -
 11
11 -
 12
12 -
 13
13 -
 14
14 -
 15
15 -
 16
16 -
 17
17 -
 18
18 -
19
-
20
-
21
-
22
-
23
-
24
-
25
-
26
-
27
-
28
-
29
-
30
-
31
-
32
-
33
-
34
-
35
-
36
-
37
-
38
-
39
-
40
-
41
-
42
-
43
-
44
-
45
-
46
-
47
-
48
-
49
-
50
-
51
-
52
-
53
-
54
-
55
-
56
-
57
-
58
-
59
-
60
-
61
-
62
-
63
-
64
-
65
-
66
-
67
-
68
-
69
-
70
-
71
-
72
-
73
-
74
-
75
-
76
-
77
-
78
-
79
-
80
-
81
-
82
-
83
-
84
-
85
-
86
-
87
-
88
-
89
-
90
-
91
-
92
-
93
-
94
-
95
-
96
-
97
-
98
-
99
-
100
-
101
-
102
-
103
-
104
-
105
 |
 |
