TRENDnet TPE-1020WS User's Guide - Page 72
Add TACACS+ Servers (TACACS+ Authentication Method
 |
View all TRENDnet TPE-1020WS manuals
Add to My Manuals
Save this manual to your list of manuals |
Page 72 highlights
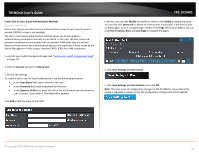
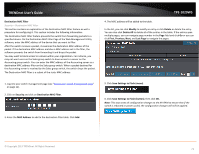
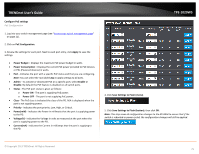
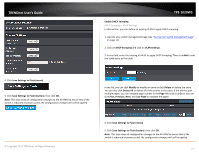
TRENDnet User's Guide Add TACACS+ Servers (TACACS+ Authentication Method) Security > TACACS+ Terminal Access Controller Access Control System (TACACS+) provides centralized security user access validation. The system supports up-to 5 TACACS+ servers. TACACS+ provides a centralized user management system, while still retaining consistency with RADIUS and other authentication processes. The TACACS+ protocol ensures network integrity through encrypted protocol exchanges between the client and TACACS+ server. The user-assigned TACACS+ parameters are applied to newly defined TACACS+ servers. If values are not defined, the system defaults are applied to the new TACACS+ servers. 1. Log into your switch management page (see "Access your switch management page" on page 11). 2. Click on Security and click on TACACS+. 3. Review the settings. • Server Priority - Enter the TACACS+ Server priority (Highest: 1, Lowest: 5). • Server IP Address - Enter the TACACS+ Server IP address. • Server Port - Enter the port number via which the TACACS+ session occurs. The default port is port 49. • Timeout - Enter the amount of time (in seconds) the device waits for an answer from the TACACS+ server before retrying the query, or switching to the next server. Possible field values are 1-255. The default value is 5. • Shared Secret - Enter the default authentication and encryption key for TACACS+ communication between the device and the TACACS+ server. Click Add to add the entry to the table. TPE-1020WS In the list, you can click Modify to modify an entry or click Delete or delete the entry. 4. Click Save Settings to Flash (menu). 5. Click Save Settings to Flash (button), then click OK. Note: This step saves all configuration changes to the NV-RAM to ensure that if the switch is rebooted or power cycled, the configuration changes will still be applied. © Copyright 2013 TRENDnet. All Rights Reserved. 72
-
 1
1 -
2
-
3
-
4
-
5
-
6
-
7
-
8
-
9
-
10
-
11
-
12
-
13
-
14
-
15
-
16
-
17
-
18
-
19
-
20
-
21
-
22
-
23
-
24
-
25
-
26
-
27
-
28
-
29
-
30
-
31
-
32
-
33
-
34
-
35
-
36
-
37
-
38
-
39
-
40
-
41
-
42
-
43
-
44
-
45
-
46
-
47
-
48
-
49
-
50
-
51
-
52
-
53
-
54
-
55
-
56
-
57
-
58
-
59
-
60
-
61
-
62
-
63
-
64
-
65
-
66
-
 67
67 -
 68
68 -
 69
69 -
 70
70 -
 71
71 -
 72
72 -
 73
73 -
 74
74 -
 75
75 -
 76
76 -
 77
77 -
78
-
79
-
80
-
81
-
82
-
83
-
84
-
85
-
86
-
87
-
88
-
89
-
90
-
91
-
92
-
93
-
94
-
95
-
96
-
97
-
98
-
99
-
100
-
101
-
102
-
103
-
104
-
105
 |
 |
