Tanaka TCG22EADSLP Owner's Manual - Page 9
Tanaka TCG22EADSLP Manual
 |
View all Tanaka TCG22EADSLP manuals
Add to My Manuals
Save this manual to your list of manuals |
Page 9 highlights
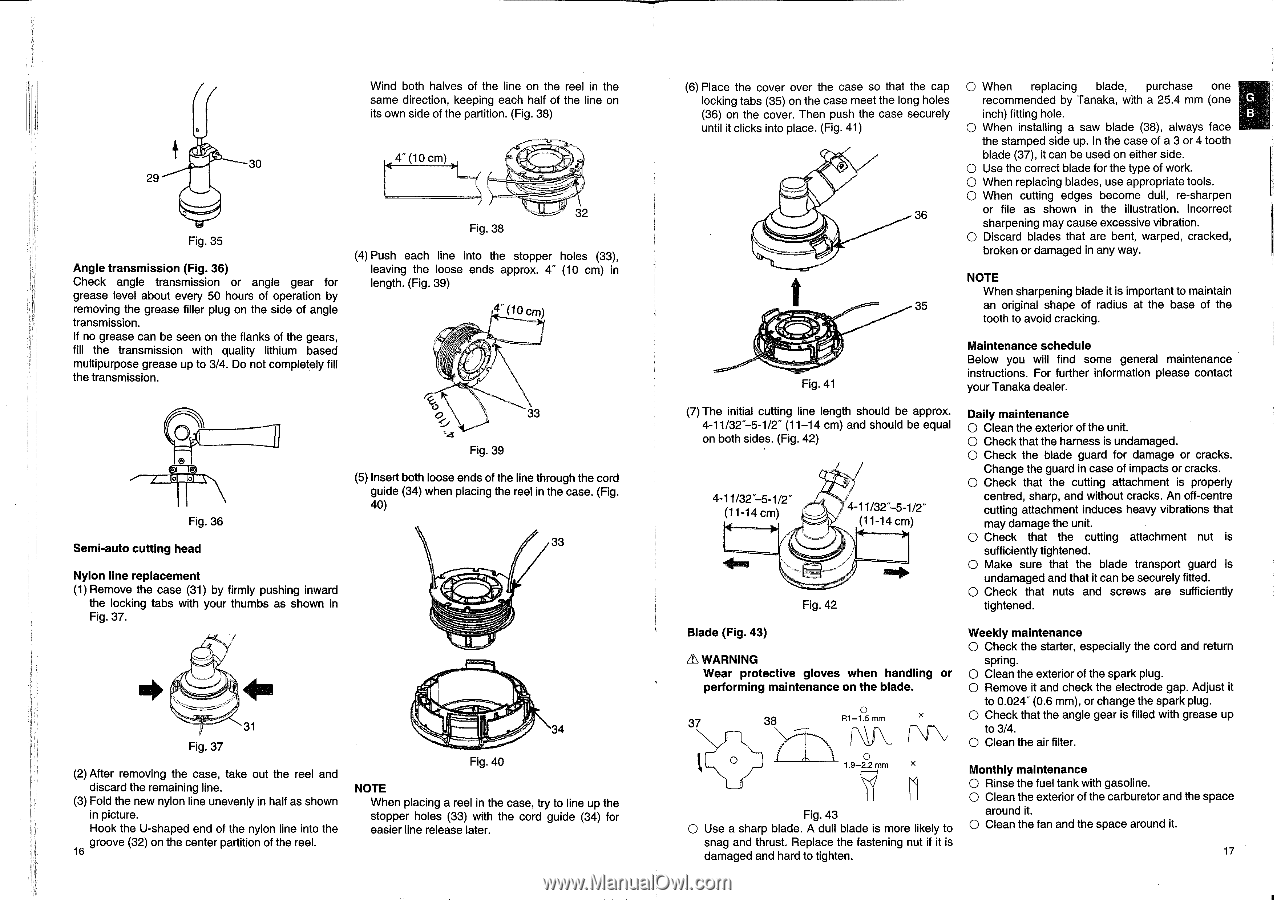
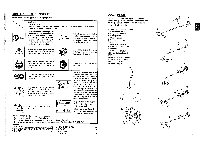
Wind both halves of the line on the reel in the same direction, keeping each half of the line on its own side of the partition. (Fig. 38) 30 29 4" (10 cm) Fig. 35 Angle transmission (Fig. 36) Check angle transmission or angle gear for grease level about every 50 hours of operation by removing the grease filler plug on the side of angle transmission. If no grease can be seen on the flanks of the gears, fill the transmission with quality lithium based multipurpose grease up to 3/4. Do not completely fill the transmission. 32 Fig. 38 (4) Push each line into the stopper holes (33), leaving the loose ends approx. 4" (10 cm) in length. (Fig. 39) 4"( cm) OJ0 33 'LC Fig. 39 Fig. 36 Semi-auto cutting head (5) Insert both loose ends of the line through the cord guide (34) when placing the reel in the case. (Fig. 40) 33 Nylon line replacement (1) Remove the case (31) by firmly pushing inward the locking tabs with your thumbs as shown in Fig. 37. 31 Fig. 37 (2) After removing the case, take out the reel and discard the remaining line. (3) Fold the new nylon line unevenly in half as shown in picture. Hook the U-shaped end of the nylon line into the groove (32) on the center partition of the reel. 16 34 Fig. 40 NOTE When placing a reel in the case, try to line up the stopper holes (33) with the cord guide (34) for easier line release later. (6) Place the cover over the case so that the cap locking tabs (35) on the case meet the long holes (36) on the cover. Then push the case securely until it clicks into place. (Fig. 41) 36 O When replacing blade, purchase one recommended by Tanaka, with a 25.4 mm (one inch) fitting hole. O When installing a saw blade (38), always face the stamped side up. In the case of a 3 or 4 tooth blade (37), it can be used on either side. O Use the correct blade for the type of work. O When replacing blades, use appropriate tools. O When cutting edges become dull, re-sharpen or file as shown in the illustration. Incorrect sharpening may cause excessive vibration. O Discard blades that are bent, warped, cracked, broken or damaged in any way. NOTE When sharpening blade it is important to maintain 35 an original shape of radius at the base of the tooth to avoid cracking. fl Fig. 41 Maintenance schedule Below you will find some general maintenance instructions. For further information please contact your Tanaka dealer. (7) The initial cutting line length should be approx. 4-11/32"-5-1/2" (11-14 cm) and should be equal on both sides. (Fig. 42) 4-11/32"-5-1/2" (11-14 cm) 4-11/32"-5-1/2" (11-14cm) Fig. 42 Daily maintenance O Clean the exterior of the unit. O Check that the harness is undamaged. O Check the blade guard for damage or cracks. Change the guard in case of impacts or cracks. O Check that the cutting attachment is properly centred, sharp, and without cracks. An off-centre culling attachment induces heavy vibrations that may damage the unit. O Check that the cutting attachment nut is sufficiently tightened. O Make sure that the blade transport guard is undamaged and that it can be securely fitted. O Check that nuts and screws are sufficiently tightened. Blade (Fig. 43) .L WARNING Wear protective gloves when handling or performing maintenance on the blade. 37 38 O R1-1.5 mm O O 1.9-2.2 mm X Fig. 43 O Use a sharp blade. A dull blade is more likely to snag and thrust. Replace the fastening nut if it is damaged and hard to tighten. Weekly maintenance O Check the starter, especially the cord and return spring. O Clean the exterior of the spark plug. O Remove it and check the electrode gap. Adjust it to 0.024" (0.6 mm), or change the spark plug. O Check that the angle gear is filled with grease up to 3/4. O Clean the air filter. Monthly maintenance O Rinse the fuel tank with gasoline. O Clean the exterior of the carburetor and the space around it. O Clean the fan and the space around it. 17
-
 1
1 -
2
-
3
-
 4
4 -
 5
5 -
 6
6 -
 7
7 -
 8
8 -
 9
9 -
 10
10 -
 11
11 -
 12
12 -
 13
13 -
 14
14 -
15
-
16
-
17
-
18
-
19
-
20
-
21
-
22
-
23
-
24
-
25
-
26
-
27
-
28
-
29
-
30
 |
 |