Thermador CET366YB Instructions for Use - Page 11
Recommended cooking settings
 |
View all Thermador CET366YB manuals
Add to My Manuals
Save this manual to your list of manuals |
Page 11 highlights
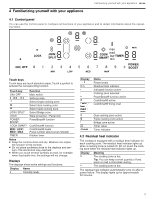
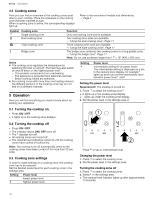
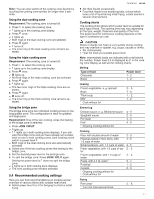
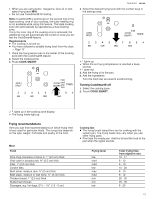
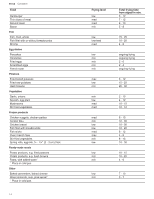
Note: You can also switch off the cooking zone directly by touching the cooking zone symbol for longer than 3 seconds. Using the dual cooking zone Requirement: The cooking zone is turned off. 1. Press to select the cooking zone. a lights up in the cooking zone display. 2. Press once. a lights up. a Both rings of the dual cooking zone are selected. 3. Press again. a turns off. a The inner ring of the dual cooking zone remains se- lected. Using the triple cooking zone Requirement: The cooking zone is turned off. 1. Press to select the cooking zone. a lights up in the cooking zone display. 2. Press once. a lights up. a All three rings of the triple cooking zone are selected. 3. Press again. 4. lights up. a The two inner rings of the triple cooking zone are se- lected. 5. Press again. a turns off. a The inner ring of the triple cooking zone remains se- lected. Using the bridge zone The bridge zone joins two individual cooking zones to one long griddle zone. This configuration is ideal for griddles and large pans. Requirement: One of the two cooking zones that belong to the bridge zone is selected. 1. Press JOIN I SPLIT. a lights up. a . lights up in both cooking zone displays. If you acti- vate the bridge zone and you have already set a power level on one or both cooking zones, both cooking zones switch to power level . a Both rings of the dual cooking zone are automatically activated. 2. Select one of the two cooking zones that belong to the bridge zone. 3. Set the desired power level in the settings area. 4. To split the bridge zone, Press JOIN I SPLIT again. Setting the power level to does not split the bridge zone. a lights up in both cooking zone displays. a The front cooking zone remains selected. 5.4 Recommended cooking settings Here you can find recommendations on cooking and an overview of various dishes with suitable heat levels. ¡ Select power level 8 or 9 for bringing to a boil or initial frying. Operation en-us ¡ Stir thick liquids occasionally. ¡ Food that needs to be seared quickly, or food which loses a lot of liquid during initial frying, is best seared in several small portions. Cooking charts The cooking chart shows which power level is suitable for each type of food. The cooking time may vary depending on the type, weight, thickness and quality of the food. The power level for continuous cooking depends on the type of cookware you use. CAUTION Stews or liquids can heat up very quickly during cooking and may overflow or spatter, e.g. soups, sauces or drinks. ▶ Stir continuously. ▶ Heat the food at a suitable power level. Note: Intermediate levels are indicated with a dot behind the number. Power level 2.5 is displayed as 2. in the cooking zone display as well as the cooking charts. Melting Type of food Chocolate Butter Power level 1 - 2 1 - 2 Heating Frozen vegetables, e. g. spinach Broth Thick soup Milk1 1 Cook without lid 2. - 3. 7 - 8 1. - 2. 1 - 2 Simmering Delicate sauce, e. g. Béchamel sauce Spaghetti sauce Pot roast Fish1 1 Ongoing cooking without lid 4 - 5 2 - 3 4 - 5 4 - 5 Cooking Rice, with double amount of water Potatoes boiled in their skins, with 1-2 cups of water Boiled potatoes, with 1-2 cups of water Fresh vegetables, with 1-2 cups of water Frozen vegetables, with 1-2 cups of water Pasta, with 2-4 qt. water1 Pudding2 Cereals 1 Ongoing cooking without lid 2 Cook without lid 2 - 3 4 - 5 4 - 5 2. - 3. 3. - 4. 6 - 7 1 - 2 2 - 3 Frying Pork chop1 1 Turn the food several times. 5. - 6. 11
-
 1
1 -
2
-
3
-
4
-
5
-
 6
6 -
 7
7 -
 8
8 -
 9
9 -
 10
10 -
 11
11 -
 12
12 -
 13
13 -
 14
14 -
 15
15 -
 16
16 -
17
-
18
-
19
-
20
-
21
-
22
-
23
-
24
-
25
-
26
-
27
-
28
-
29
-
30
-
31
-
32
-
33
-
34
-
35
-
36
-
37
-
38
-
39
-
40
-
41
-
42
-
43
-
44
-
45
-
46
-
47
-
48
-
49
-
50
-
51
-
52
-
53
-
54
-
55
-
56
-
57
-
58
-
59
-
60
-
61
-
62
-
63
-
64
-
65
-
66
-
67
-
68
-
69
-
70
-
71
-
72
 |
 |
