Toshiba Excite AT330 PDA0BC Users Manual Canada; English - Page 22
Turning on the power, Initial Setup, Power, Start, Settings, Not now, Google Location Service™
 |
View all Toshiba Excite AT330 PDA0BC manuals
Add to My Manuals
Save this manual to your list of manuals |
Page 22 highlights
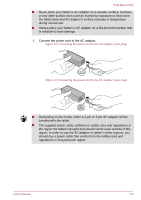
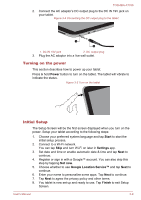
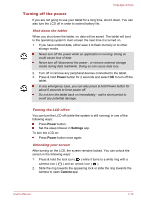
TOSHIBA AT330 2. Connect the AC adaptor's DC output plug to the DC IN 19V jack on your tablet. Figure 3-4 Connecting the DC output plug to the tablet 1 2 1. DC IN 19V jack 2. DC output plug 3. Plug the AC adaptor into a live wall outlet. Turning on the power This section describes how to power up your tablet. Press & hold Power button to turn on the tablet. The tablet will vibrate to indicate the status. Figure 3-5 Turn on the tablet Initial Setup The Setup Screen will be the first screen displayed when you turn on the power. Setup your tablet according to the following steps: 1. Choose your preferred system language and tap Start to start the initial setup process. 2. Connect to a Wi-Fi network. You can tap Skip and turn Wi-Fi on later in Settings app. 3. Set date and time or enable automatic date & time and tap Next to continue. 4. Register or sign in with a Google™ account. You can also skip this step by tapping Not now. 5. Choose whether to use Google Location Service™ and tap Next to continue. 6. Enter your name to personalize some apps. Tap Next to continue. 7. Tap Next to agree the privacy policy and other terms. 8. You tablet is now set up and ready to use. Tap Finish to exit Setup Screen. User's Manual 3-9
-
 1
1 -
2
-
3
-
4
-
5
-
6
-
7
-
8
-
9
-
10
-
11
-
12
-
13
-
14
-
15
-
16
-
 17
17 -
 18
18 -
 19
19 -
 20
20 -
 21
21 -
 22
22 -
 23
23 -
 24
24 -
 25
25 -
 26
26 -
 27
27 -
28
-
29
-
30
-
31
-
32
-
33
-
34
-
35
-
36
-
37
-
38
-
39
-
40
-
41
-
42
-
43
-
44
-
45
-
46
-
47
-
48
-
49
-
50
-
51
-
52
-
53
-
54
-
55
-
56
-
57
-
58
-
59
-
60
-
61
-
62
-
63
-
64
-
65
-
66
-
67
-
68
-
69
-
70
-
71
-
72
-
73
-
74
-
75
-
76
-
77
-
78
-
79
-
80
-
81
-
82
-
83
-
84
-
85
 |
 |
