Toshiba Portege M780 PPM78C-007006 Users Manual Canada; English - Page 108
Removing the Tablet PC Pen, Pen actions
 |
View all Toshiba Portege M780 PPM78C-007006 manuals
Add to My Manuals
Save this manual to your list of manuals |
Page 108 highlights
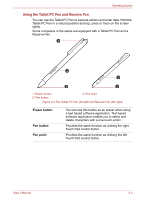
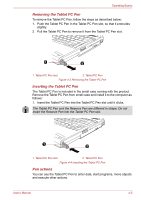
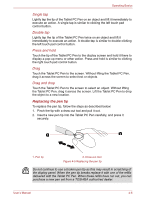
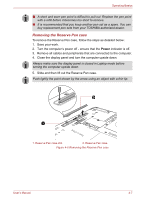
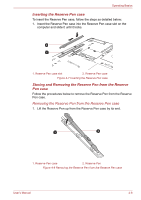
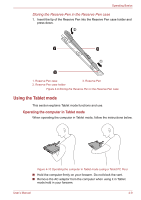
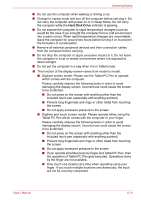
Operating Basics Removing the Tablet PC Pen To remove the Tablet PC Pen, follow the steps as described below: 1. Push the Tablet PC Pen in the Tablet PC Pen slot, so that it protrudes slightly. 2. Pull the Tablet PC Pen to remove it from the Tablet PC Pen slot. 1 2 1. Tablet PC Pen slot 2. Tablet PC Pen Figure 4-3 Removing the Tablet PC Pen Inserting the Tablet PC Pen The Tablet PC Pen is included in the small case coming with the product. Remove the Tablet PC Pen from small case and install it to the computer as follows: 1. Insert the Tablet PC Pen into the Tablet PC Pen slot until it clicks. The Tablet PC Pen and the Reserve Pen are different in shape. Do not insert the Reserve Pen into the Tablet PC Pen slot. 1 2 1. Tablet PC Pen slot 2. Tablet PC Pen Figure 4-4 Inserting the Tablet PC Pen Pen actions You can use the Tablet PC Pen to enter data, start programs, move objects and execute other actions. User's Manual 4-5
-
 1
1 -
2
-
3
-
4
-
5
-
6
-
7
-
8
-
9
-
10
-
11
-
12
-
13
-
14
-
15
-
16
-
17
-
18
-
19
-
20
-
21
-
22
-
23
-
24
-
25
-
26
-
27
-
28
-
29
-
30
-
31
-
32
-
33
-
34
-
35
-
36
-
37
-
38
-
39
-
40
-
41
-
42
-
43
-
44
-
45
-
46
-
47
-
48
-
49
-
50
-
51
-
52
-
53
-
54
-
55
-
56
-
57
-
58
-
59
-
60
-
61
-
62
-
63
-
64
-
65
-
66
-
67
-
68
-
69
-
70
-
71
-
72
-
73
-
74
-
75
-
76
-
77
-
78
-
79
-
80
-
81
-
82
-
83
-
84
-
85
-
86
-
87
-
88
-
89
-
90
-
91
-
92
-
93
-
94
-
95
-
96
-
97
-
98
-
99
-
100
-
101
-
102
-
 103
103 -
 104
104 -
 105
105 -
 106
106 -
 107
107 -
 108
108 -
 109
109 -
 110
110 -
 111
111 -
 112
112 -
 113
113 -
114
-
115
-
116
-
117
-
118
-
119
-
120
-
121
-
122
-
123
-
124
-
125
-
126
-
127
-
128
-
129
-
130
-
131
-
132
-
133
-
134
-
135
-
136
-
137
-
138
-
139
-
140
-
141
-
142
-
143
-
144
-
145
-
146
-
147
-
148
-
149
-
150
-
151
-
152
-
153
-
154
-
155
-
156
-
157
-
158
-
159
-
160
-
161
-
162
-
163
-
164
-
165
-
166
-
167
-
168
-
169
-
170
-
171
-
172
-
173
-
174
-
175
-
176
-
177
-
178
-
179
-
180
-
181
-
182
-
183
-
184
-
185
-
186
-
187
-
188
-
189
-
190
-
191
-
192
-
193
-
194
-
195
-
196
-
197
-
198
-
199
-
200
-
201
-
202
-
203
-
204
-
205
-
206
-
207
-
208
-
209
-
210
-
211
-
212
-
213
-
214
-
215
-
216
-
217
-
218
-
219
-
220
-
221
-
222
-
223
-
224
-
225
-
226
-
227
-
228
-
229
-
230
-
231
-
232
-
233
-
234
-
235
-
236
-
237
-
238
-
239
-
240
-
241
-
242
-
243
-
244
-
245
-
246
-
247
-
248
-
249
-
250
-
251
-
252
-
253
-
254
-
255
-
256
-
257
-
258
-
259
-
260
-
261
-
262
-
263
-
264
-
265
-
266
-
267
-
268
 |
 |
