Toshiba Portege M780 PPM78C-007006 Users Manual Canada; English - Page 132
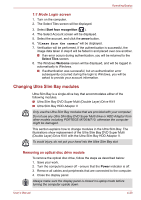
Changing Ultra Slim Bay modules, Removing an optical disc drive module
 |
View all Toshiba Portege M780 PPM78C-007006 manuals
Add to My Manuals
Save this manual to your list of manuals |
Page 132 highlights
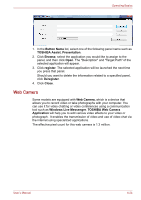
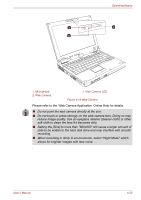
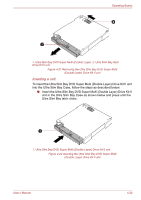
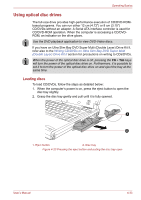
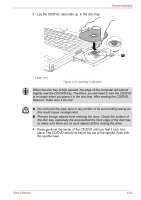
Operating Basics 1:1 Mode Login screen 1. Turn on the computer. 2. The Select Tiles screen will be displayed. 3. Select Start face recognition ( ). 4. The Select Account screen will be displayed. 5. Select the account, and click the arrow button. 6. "Please face the camera" will be displayed. 7. Verification will be performed. If the authentication is successful, the image data taken in step 6 will be faded in and placed over one another. ■ If an error occurs during authentication, you will be returned to the Select Tiles screen. 8. The Windows Welcome screen will be displayed, and will be logged in automatically to Windows. ■ If authentication was successful, but an authentication error subsequently occurred during the login to Windows, you will be asked to provide your account information. Changing Ultra Slim Bay modules Ultra Slim Bay is a single-drive bay that accommodates either of the following modules. ■ Ultra Slim Bay DVD Super Multi (Double Layer) Drive Kit II ■ Ultra Slim Bay HDD Adaptor II Only use the Ultra Slim Bay modules that are provided with your computer. Do not use any Ultra Slim Bay DVD Super Multi drive or HDD Adaptor from other models including PORTEGE M700/M710, otherwise the computer might be damaged. This section explains how to change modules in the Ultra Slim Bay. The illustrations show replacement of the Ultra Slim Bay DVD Super Multi (Double Layer) Drive Kit II with the Ultra Slim Bay HDD Adaptor II. To avoid injury, do not put your hand into the Ultra Slim Bay slot. Removing an optical disc drive module To remove the optical disc drive, follow the steps as described below: 1. Save your work. 2. Turn the computer's power off - ensure that the Power indicator is off. 3. Remove all cables and peripherals that are connected to the computer. 4. Close the display panel. Always make sure the display panel is closed in Laptop mode before turning the computer upside down. User's Manual 4-29
-
 1
1 -
2
-
3
-
4
-
5
-
6
-
7
-
8
-
9
-
10
-
11
-
12
-
13
-
14
-
15
-
16
-
17
-
18
-
19
-
20
-
21
-
22
-
23
-
24
-
25
-
26
-
27
-
28
-
29
-
30
-
31
-
32
-
33
-
34
-
35
-
36
-
37
-
38
-
39
-
40
-
41
-
42
-
43
-
44
-
45
-
46
-
47
-
48
-
49
-
50
-
51
-
52
-
53
-
54
-
55
-
56
-
57
-
58
-
59
-
60
-
61
-
62
-
63
-
64
-
65
-
66
-
67
-
68
-
69
-
70
-
71
-
72
-
73
-
74
-
75
-
76
-
77
-
78
-
79
-
80
-
81
-
82
-
83
-
84
-
85
-
86
-
87
-
88
-
89
-
90
-
91
-
92
-
93
-
94
-
95
-
96
-
97
-
98
-
99
-
100
-
101
-
102
-
103
-
104
-
105
-
106
-
107
-
108
-
109
-
110
-
111
-
112
-
113
-
114
-
115
-
116
-
117
-
118
-
119
-
120
-
121
-
122
-
123
-
124
-
125
-
126
-
 127
127 -
 128
128 -
 129
129 -
 130
130 -
 131
131 -
 132
132 -
 133
133 -
 134
134 -
 135
135 -
 136
136 -
 137
137 -
138
-
139
-
140
-
141
-
142
-
143
-
144
-
145
-
146
-
147
-
148
-
149
-
150
-
151
-
152
-
153
-
154
-
155
-
156
-
157
-
158
-
159
-
160
-
161
-
162
-
163
-
164
-
165
-
166
-
167
-
168
-
169
-
170
-
171
-
172
-
173
-
174
-
175
-
176
-
177
-
178
-
179
-
180
-
181
-
182
-
183
-
184
-
185
-
186
-
187
-
188
-
189
-
190
-
191
-
192
-
193
-
194
-
195
-
196
-
197
-
198
-
199
-
200
-
201
-
202
-
203
-
204
-
205
-
206
-
207
-
208
-
209
-
210
-
211
-
212
-
213
-
214
-
215
-
216
-
217
-
218
-
219
-
220
-
221
-
222
-
223
-
224
-
225
-
226
-
227
-
228
-
229
-
230
-
231
-
232
-
233
-
234
-
235
-
236
-
237
-
238
-
239
-
240
-
241
-
242
-
243
-
244
-
245
-
246
-
247
-
248
-
249
-
250
-
251
-
252
-
253
-
254
-
255
-
256
-
257
-
258
-
259
-
260
-
261
-
262
-
263
-
264
-
265
-
266
-
267
-
268
 |
 |