Toshiba Satellite A25-S208 Toshiba Online Users Guide for Satellite A20/A25 - Page 72
Removing a memory module, Reconnect any cables you removed.
 |
View all Toshiba Satellite A25-S208 manuals
Add to My Manuals
Save this manual to your list of manuals |
Page 72 highlights
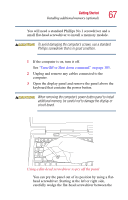
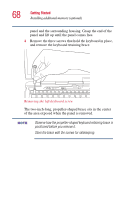
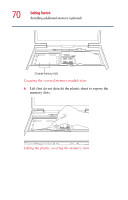
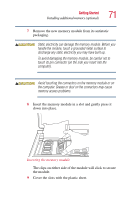
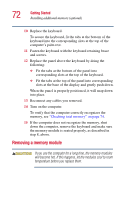
72 Getting Started Installing additional memory (optional) 10 Replace the keyboard. To secure the keyboard, fit the tabs at the bottom of the keyboard into the corresponding slots at the top of the computer's palm rest. 11 Fasten the keyboard with the keyboard retaining brace and screws. 12 Replace the panel above the keyboard by doing the following: ❖ Fit the tabs at the bottom of the panel into corresponding slots at the top of the keyboard. ❖ Fit the tabs at the top of the panel into corresponding slots at the base of the display and gently push down. When the panel is properly positioned, it will snap down into place. 13 Reconnect any cables you removed. 14 Turn on the computer. To verify that the computer correctly recognizes the memory, see "Checking total memory" on page 74. 15 If the computer does not recognize the memory, shut down the computer, remove the keyboard and make sure the memory module is seated properly, as described in step 8, above. Removing a memory module If you use the computer for a long time, the memory modules will become hot. If this happens, let the modules cool to room temperature before you replace them.
-
 1
1 -
2
-
3
-
4
-
5
-
6
-
7
-
8
-
9
-
10
-
11
-
12
-
13
-
14
-
15
-
16
-
17
-
18
-
19
-
20
-
21
-
22
-
23
-
24
-
25
-
26
-
27
-
28
-
29
-
30
-
31
-
32
-
33
-
34
-
35
-
36
-
37
-
38
-
39
-
40
-
41
-
42
-
43
-
44
-
45
-
46
-
47
-
48
-
49
-
50
-
51
-
52
-
53
-
54
-
55
-
56
-
57
-
58
-
59
-
60
-
61
-
62
-
63
-
64
-
65
-
66
-
 67
67 -
 68
68 -
 69
69 -
 70
70 -
 71
71 -
 72
72 -
 73
73 -
 74
74 -
 75
75 -
 76
76 -
 77
77 -
78
-
79
-
80
-
81
-
82
-
83
-
84
-
85
-
86
-
87
-
88
-
89
-
90
-
91
-
92
-
93
-
94
-
95
-
96
-
97
-
98
-
99
-
100
-
101
-
102
-
103
-
104
-
105
-
106
-
107
-
108
-
109
-
110
-
111
-
112
-
113
-
114
-
115
-
116
-
117
-
118
-
119
-
120
-
121
-
122
-
123
-
124
-
125
-
126
-
127
-
128
-
129
-
130
-
131
-
132
-
133
-
134
-
135
-
136
-
137
-
138
-
139
-
140
-
141
-
142
-
143
-
144
-
145
-
146
-
147
-
148
-
149
-
150
-
151
-
152
-
153
-
154
-
155
-
156
-
157
-
158
-
159
-
160
-
161
-
162
-
163
-
164
-
165
-
166
-
167
-
168
-
169
-
170
-
171
-
172
-
173
-
174
-
175
-
176
-
177
-
178
-
179
-
180
-
181
-
182
-
183
-
184
-
185
-
186
-
187
-
188
-
189
-
190
-
191
-
192
-
193
-
194
-
195
-
196
-
197
-
198
-
199
-
200
-
201
-
202
-
203
-
204
-
205
-
206
-
207
-
208
-
209
-
210
-
211
-
212
-
213
-
214
-
215
-
216
-
217
-
218
-
219
-
220
-
221
-
222
-
223
-
224
-
225
-
226
-
227
-
228
-
229
-
230
-
231
-
232
-
233
-
234
-
235
-
236
-
237
-
238
-
239
-
240
-
241
-
242
-
243
-
244
-
245
-
246
-
247
-
248
-
249
-
250
-
251
-
252
-
253
-
254
-
255
-
256
-
257
-
258
-
259
-
260
-
261
-
262
-
263
-
264
-
265
-
266
-
267
-
268
-
269
 |
 |