Toshiba Satellite Pro L630 PSK01C-00901C Users Manual Canada; English - Page 91
Removing Discs, To remove the CD/DVD/BD, follow the steps below and refer to below
 |
View all Toshiba Satellite Pro L630 PSK01C-00901C manuals
Add to My Manuals
Save this manual to your list of manuals |
Page 91 highlights
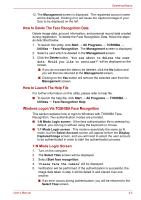
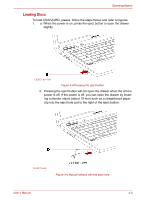
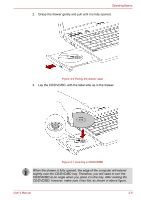
Operating Basics ■ Do not touch the laser lens. Doing so could cause misalignment. ■ Do not keep foreign matter from entering the drive. Check the back edge of the tray to make sure it carries no debris before closing the drive. 4. Press gently at the center of the CD/DVD/BD until you feel it click into place. The CD/DVD/BD should lie below the top of the spindle, flush with the spindle base. 5. Push the center of the drawer to close it. Press gently until it locks into place. If the CD/DVD/BD is not seated properly when the drawer is closed, the CD/DVD/BD might be damaged. Also, the drawer might not open fully when you press the eject button. Figure 4-8 Closing the drawer Removing Discs To remove the CD/DVD/BD, follow the steps below and refer to below figure. Do not press the eject button while the computer is accessing the drive. Wait for the optical disc drive indicator to go out before you open the drawer. Also, if the CD/DVD/BD is spinning when you open the drawer, wait for it to stop before you remove it. Please follow the steps below and refer to figures. 1. To pop the drawer partially open, press the eject button. Gently pull the drawer out until it is fully opened. User's Manual 4-10
-
 1
1 -
2
-
3
-
4
-
5
-
6
-
7
-
8
-
9
-
10
-
11
-
12
-
13
-
14
-
15
-
16
-
17
-
18
-
19
-
20
-
21
-
22
-
23
-
24
-
25
-
26
-
27
-
28
-
29
-
30
-
31
-
32
-
33
-
34
-
35
-
36
-
37
-
38
-
39
-
40
-
41
-
42
-
43
-
44
-
45
-
46
-
47
-
48
-
49
-
50
-
51
-
52
-
53
-
54
-
55
-
56
-
57
-
58
-
59
-
60
-
61
-
62
-
63
-
64
-
65
-
66
-
67
-
68
-
69
-
70
-
71
-
72
-
73
-
74
-
75
-
76
-
77
-
78
-
79
-
80
-
81
-
82
-
83
-
84
-
85
-
 86
86 -
 87
87 -
 88
88 -
 89
89 -
 90
90 -
 91
91 -
 92
92 -
 93
93 -
 94
94 -
 95
95 -
 96
96 -
97
-
98
-
99
-
100
-
101
-
102
-
103
-
104
-
105
-
106
-
107
-
108
-
109
-
110
-
111
-
112
-
113
-
114
-
115
-
116
-
117
-
118
-
119
-
120
-
121
-
122
-
123
-
124
-
125
-
126
-
127
-
128
-
129
-
130
-
131
-
132
-
133
-
134
-
135
-
136
-
137
-
138
-
139
-
140
-
141
-
142
-
143
-
144
-
145
-
146
-
147
-
148
-
149
-
150
-
151
-
152
-
153
-
154
-
155
-
156
-
157
-
158
-
159
-
160
-
161
-
162
-
163
-
164
-
165
-
166
-
167
-
168
-
169
-
170
-
171
-
172
-
173
-
174
-
175
-
176
-
177
-
178
-
179
-
180
-
181
-
182
-
183
-
184
-
185
-
186
-
187
-
188
-
189
-
190
-
191
-
192
-
193
-
194
-
195
-
196
-
197
-
198
-
199
-
200
-
201
-
202
-
203
-
204
-
205
 |
 |