Toshiba Tecra M2-S519 Maintenance Manual - Page 273
Cooling fin/CPU, Removing the Cooling fin/CPU
 |
View all Toshiba Tecra M2-S519 manuals
Add to My Manuals
Save this manual to your list of manuals |
Page 273 highlights
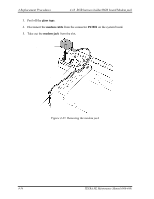
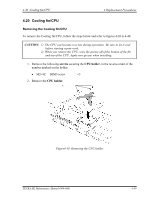
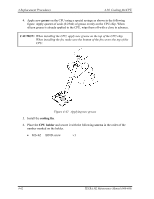
4.20 Cooling fin/CPU 4 Replacement Procedures 4.20 Cooling fin/CPU Removing the Cooling fin/CPU To remove the Cooling fin/CPU, follow the steps below and refer to figures 4-38 to 4-40. CAUTION: 1) The CPU can become very hot during operation. Be sure to let it cool before starting repair work. 2) When you remove the CPU, wipe the grease off of the bottom of the fin and top of the CPU. Apply new grease when installing. 1. Remove the following screws securing the CPU holder, in the reverse order of the number marked on the holder. • M2×4Z BIND screw ×3 2. Remove the CPU holder. M2×4Z BIND CPU holder Figure4-38 Removing the CPU holder TECRA M2 Maintenance Manual (960-468) 4-59
-
 1
1 -
2
-
3
-
4
-
5
-
6
-
7
-
8
-
9
-
10
-
11
-
12
-
13
-
14
-
15
-
16
-
17
-
18
-
19
-
20
-
21
-
22
-
23
-
24
-
25
-
26
-
27
-
28
-
29
-
30
-
31
-
32
-
33
-
34
-
35
-
36
-
37
-
38
-
39
-
40
-
41
-
42
-
43
-
44
-
45
-
46
-
47
-
48
-
49
-
50
-
51
-
52
-
53
-
54
-
55
-
56
-
57
-
58
-
59
-
60
-
61
-
62
-
63
-
64
-
65
-
66
-
67
-
68
-
69
-
70
-
71
-
72
-
73
-
74
-
75
-
76
-
77
-
78
-
79
-
80
-
81
-
82
-
83
-
84
-
85
-
86
-
87
-
88
-
89
-
90
-
91
-
92
-
93
-
94
-
95
-
96
-
97
-
98
-
99
-
100
-
101
-
102
-
103
-
104
-
105
-
106
-
107
-
108
-
109
-
110
-
111
-
112
-
113
-
114
-
115
-
116
-
117
-
118
-
119
-
120
-
121
-
122
-
123
-
124
-
125
-
126
-
127
-
128
-
129
-
130
-
131
-
132
-
133
-
134
-
135
-
136
-
137
-
138
-
139
-
140
-
141
-
142
-
143
-
144
-
145
-
146
-
147
-
148
-
149
-
150
-
151
-
152
-
153
-
154
-
155
-
156
-
157
-
158
-
159
-
160
-
161
-
162
-
163
-
164
-
165
-
166
-
167
-
168
-
169
-
170
-
171
-
172
-
173
-
174
-
175
-
176
-
177
-
178
-
179
-
180
-
181
-
182
-
183
-
184
-
185
-
186
-
187
-
188
-
189
-
190
-
191
-
192
-
193
-
194
-
195
-
196
-
197
-
198
-
199
-
200
-
201
-
202
-
203
-
204
-
205
-
206
-
207
-
208
-
209
-
210
-
211
-
212
-
213
-
214
-
215
-
216
-
217
-
218
-
219
-
220
-
221
-
222
-
223
-
224
-
225
-
226
-
227
-
228
-
229
-
230
-
231
-
232
-
233
-
234
-
235
-
236
-
237
-
238
-
239
-
240
-
241
-
242
-
243
-
244
-
245
-
246
-
247
-
248
-
249
-
250
-
251
-
252
-
253
-
254
-
255
-
256
-
257
-
258
-
259
-
260
-
261
-
262
-
263
-
264
-
265
-
266
-
267
-
 268
268 -
 269
269 -
 270
270 -
 271
271 -
 272
272 -
 273
273 -
 274
274 -
 275
275 -
 276
276 -
 277
277 -
 278
278 -
279
-
280
-
281
-
282
-
283
-
284
-
285
-
286
-
287
-
288
-
289
-
290
-
291
-
292
-
293
-
294
-
295
-
296
-
297
-
298
-
299
-
300
-
301
-
302
-
303
-
304
-
305
-
306
-
307
-
308
-
309
-
310
-
311
-
312
-
313
-
314
-
315
-
316
-
317
-
318
-
319
-
320
-
321
-
322
-
323
-
324
-
325
-
326
-
327
-
328
-
329
-
330
-
331
-
332
-
333
-
334
-
335
-
336
-
337
-
338
-
339
-
340
-
341
-
342
-
343
-
344
-
345
-
346
-
347
-
348
-
349
-
350
-
351
-
352
-
353
-
354
-
355
-
356
-
357
-
358
-
359
-
360
-
361
-
362
-
363
-
364
-
365
-
366
-
367
-
368
-
369
-
370
-
371
-
372
-
373
-
374
-
375
-
376
-
377
-
378
-
379
-
380
-
381
-
382
-
383
-
384
-
385
-
386
-
387
-
388
-
389
-
390
 |
 |
4.20
Cooling fin/CPU
4 Replacement Procedures
4.20 Cooling fin/CPU
Removing the Cooling fin/CPU
To remove the Cooling fin/CPU, follow the steps below and refer to figures 4-38 to 4-40.
CAUTION:
1)
The CPU can become very hot during operation.
Be sure to let it cool
before starting repair work.
2)
When you remove the CPU, wipe the grease off of the bottom of the fin
and top of the CPU. Apply new grease when installing.
1.
Remove the following
screws
securing the
CPU holder
, in the reverse order of the
number marked on the holder.
•
M2
×
4Z
BIND screw
×
3
2.
Remove the
CPU holder
.
M2
×
4Z BIND
CPU holder
Figure4-38
Removing the CPU holder
TECRA M2 Maintenance Manual (960-468)
4-59