Turtle Beach Montego DDL User's Guide - Page 12
Checking Montego After Installation - windows 7 drivers
 |
View all Turtle Beach Montego DDL manuals
Add to My Manuals
Save this manual to your list of manuals |
Page 12 highlights
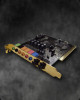
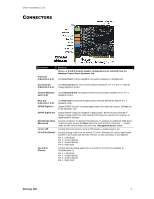
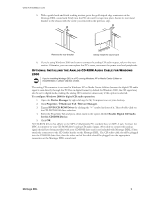
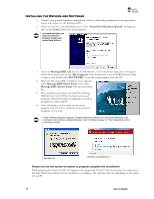
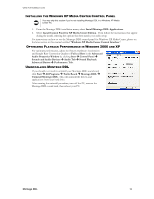
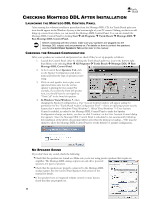
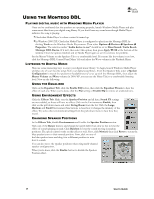
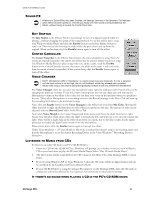
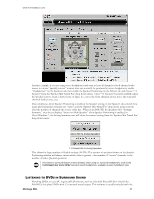
CHECKING MONTEGO DDL AFTER INSTALLATION LAUNCHING THE MONTEGO DDL CONTROL PANEL After running the software installation procedure from the Montego DDL CD, the Turtle Beach palm tree icon should appear in the Windows Systray at the bottom right of your PC screen. Clicking on this icon will bring up a menu from where you can launch the Montego DDL Control Panel. You can also launch the Montego DDL Control Panel by clicking Start All Programs Turtle Beach Montego DDL Run Montego DDL Control Panel. Before continuing with this section, make sure your speakers are plugged into the Montego DDL outputs and are powered on. For details on how to connect the speakers, see the Control Panel Speakers Tab section later in this manual. CHECKING THE SPEAKER CONFIGURATION After your speakers are connected and powered on, check if they're set up properly as follows: 1. Launch the Control Panel either by clicking the Turtle Beach palm tree icon in the bottom right Start Menu or by selecting Start All Programs Turtle Beach Montego DDL Run Montego DDL Control Panel. 2. In the Control Panel Speakers Tab, click on the Speaker Configuration pull-down menu and select the type of speakers you're using. 3. Click on each speaker icon to play a test signal and make sure that the correct speaker is playing the test sound. For example, if you click the front left speaker icon, you should hear the test signal say ―Front Left‖ in the front left speaker. 4. In Windows Vista/Windows 7, when changing the Speaker Configuration, a User Account Control window will appear asking for permission for the ―Turtle Beach Audio Configuration Tool‖ - this is an operating system security feature that is new to Windows Vista/Windows 7. When Vista/Windows 7's User Account Control is enabled, in order for the Montego DDL Control Panel to make the Speaker Configuration change you desire, you have to click ‗Continue' on the User Account Control dialog that appears. Since the Montego DDL Control Panel is scheduled to run automatically following the installation of the driver, this prompt will be seen when the desktop is loading - ‗OK' must be clicked to allow the Montego DDL Control Panel to set the default 5.1 speaker configuration. NO SPEAKER SOUND If you don't hear any sound, check the following: Check that the speakers are turned on. Make sure you're not using passive speakers that require an amplifier. The Montego DDL analog outputs can only drive powered speakers, not passive speakers. Check that the speakers are properly connected to the Montego DDL analog outputs. See the Control Panel Speakers Tab section in this manual for details. If the speakers have an integrated volume control or mute button, check that they are properly set. 12 User's Guide
-
 1
1 -
2
-
3
-
4
-
5
-
6
-
 7
7 -
 8
8 -
 9
9 -
 10
10 -
 11
11 -
 12
12 -
 13
13 -
 14
14 -
 15
15 -
 16
16 -
 17
17 -
18
-
19
-
20
-
21
-
22
-
23
-
24
-
25
-
26
-
27
-
28
-
29
-
30
-
31
-
32
-
33
-
34
-
35
-
36
 |
 |