ViewSonic CDE3201LED CDE3201LED User Guide (English) - Page 14
Front View of the Product
 |
View all ViewSonic CDE3201LED manuals
Add to My Manuals
Save this manual to your list of manuals |
Page 14 highlights
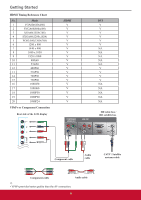
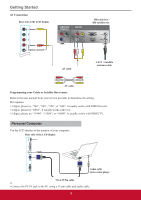
Getting Started Front View of the Product Item 1 Speakers 2 Menu 3 Volume 4 OSD Item Select 5 Input 6 Power 7 Remote Control Receiver 8 LED Indicator 1 23 4 56 78 Icon MENU VOL VOL + q p INPUT Description Emit audio sound. Turn the on-screen display (OSD) menu on / off. Decrease the volume. Move to the left or adjust the setting on the OSD menu. Increase the volume. Move to the right or adjust the setting on the OSD menu. Move downward to scroll through menu options. Move upward to scroll through menu options. Select the input source. Enter the submenu. Turn the power on from standby mode. Touch it again to return to standby mode. Receive IR signals from the remote control. Blue indicates power on. Red indicates standby mode. 5
-
 1
1 -
2
-
3
-
4
-
5
-
6
-
7
-
8
-
 9
9 -
 10
10 -
 11
11 -
 12
12 -
 13
13 -
 14
14 -
 15
15 -
 16
16 -
 17
17 -
 18
18 -
 19
19 -
20
-
21
-
22
-
23
-
24
-
25
-
26
-
27
-
28
-
29
-
30
-
31
-
32
-
33
-
34
-
35
-
36
-
37
-
38
-
39
-
40
-
41
-
42
-
43
-
44
-
45
-
46
-
47
-
48
-
49
-
50
 |
 |

Getting Started
5
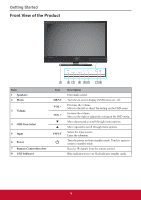
Front View of the Product
Item
Icon
Description
1
Speakers
Emit audio sound.
2
Menu
MENU
Turn the on-screen display (OSD) menu on / off.
3
Volume
VOL -
Decrease the volume.
Move to the left or adjust the setting on the OSD menu.
VOL +
Increase the volume.
Move to the right or adjust the setting on the OSD menu.
4
OSD Item Select
q
Move downward to scroll through menu options.
p
Move upward to scroll through menu options.
5
Input
INPUT
Select the input source.
Enter the submenu.
6
Power
Turn the power on from standby mode. Touch it again to
return to standby mode.
7
Remote Control Receiver
Receive IR signals from the remote control.
8
LED Indicator
Blue indicates power on. Red indicates standby mode.
7
8
6
5
4
3
2
1