ViewSonic CDE3201LED CDE3201LED User Guide (English) - Page 28
Resetting to Factory Default Settings
 |
View all ViewSonic CDE3201LED manuals
Add to My Manuals
Save this manual to your list of manuals |
Page 28 highlights
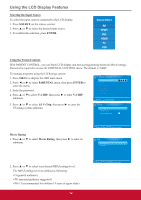
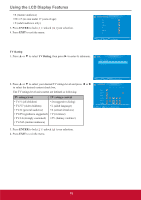
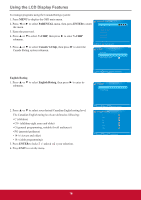
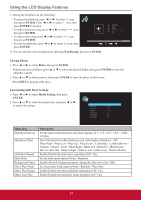
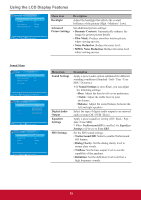
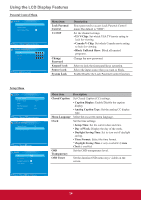
Using the LCD Display Features Resetting to Factory Default Settings To reset all setting to the factory default settings: 1. Press MENU to display the OSD main menu. 2. Press ◄ or ► to select OTHERS menu, then press ENTER to enter the menu. 3. Press ▲ or ▼ to select All Reset, then press ENTER to reset to the default settings. OTHERS Blue Back No Signal Power Off No Operation Power Off Usage Monitor Audio Only Display ID All Reset Off 1 Execute MENU :Return :Move :Change Setting Display ID Setting To set ID number to LCD display for RS232 function: 1. Press MENU to display the OSD main menu. 2. Press ◄ or ► to select OTHERS menu, then press ENTER to enter the menu. 3. Press ▲ or ▼ to select Display ID. 4. Press ◄ or ► to set the ID number (1~98). For details information, refer to the RS232 Protocol on page 29~36. 5. Press EXIT to exit the menu. OTHERS Blue Back No Signal Power Off No Operation Power Off Usage Monitor Audio Only Display ID All Reset Off 1 Execute MENU :Return :Move :Change Setting Customizing PC Display Connect the PC and your LCD display using the VGA cable. See "Personal Computer" on page 9. 1. Press SOURCE to display the Source Select menu. 2. Press ▲ or ▼ to select PC, then press ENTER to confirm the setting. 3. Press MENU to display the OSD main menu. 4. Press ◄ or ► to select PICTURE menu, then press ENTER to enter the menu. 5. Press ▲ or ▼ to select PC Settings, then press ENTER to enter its submenu. PICTURE Picture Settings Screen Size PC Settings Color Temperature Backlight Advanced Picture Settings Wide Normal High 6. Press ▲ or ▼ to select Auto Adjust, Horizontal Position, Vertical Position, Clock, or Phase, and press ◄ or ► to adjust the setting. 7. Press EXIT to exit the menu. MENU :Return :Move ENTER :Go to Next Menu PC SETTINGS Auto Adjust Horizontal Position Vertical Position Clock Phase Reset Execute Execute MENU :Return :Move ENTER :Press to Execute 19
-
 1
1 -
2
-
3
-
4
-
5
-
6
-
7
-
8
-
9
-
10
-
11
-
12
-
13
-
14
-
15
-
16
-
17
-
18
-
19
-
20
-
21
-
22
-
 23
23 -
 24
24 -
 25
25 -
 26
26 -
 27
27 -
 28
28 -
 29
29 -
 30
30 -
 31
31 -
 32
32 -
 33
33 -
34
-
35
-
36
-
37
-
38
-
39
-
40
-
41
-
42
-
43
-
44
-
45
-
46
-
47
-
48
-
49
-
50
 |
 |
