ViewSonic VSD220 VSD220 User Guide (English) - Page 28
Pop-up Menu
 |
View all ViewSonic VSD220 manuals
Add to My Manuals
Save this manual to your list of manuals |
Page 28 highlights
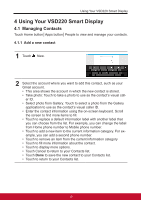
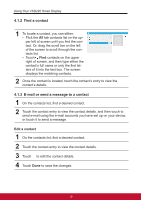
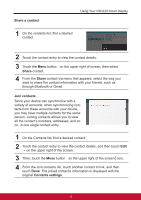
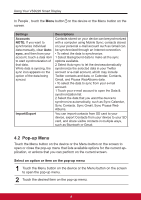
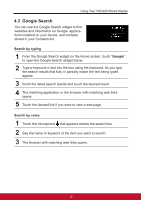
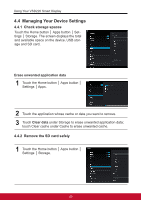
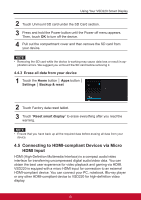
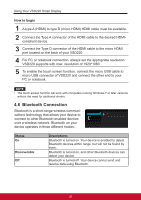
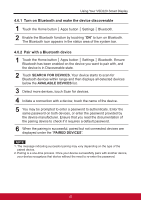
Using Your VSD220 Smart Display In People , touch the Menu button on the device or the Menu button on the screen. Settings Accounts NOTE: If you want to synchronize individual data manually, clear Autosync, and then from your account, touch a data item to start synchronization of that data. While data is syncing, the sync icon appears on the option of the data being synced. Import/Export Descriptions Contacts stored on your device can besynchronized with a computer using Mobile Sync; contacts stored on your personal e-mail account such as Gmail can be synchronized through an Internet connection. • To select the data to synchronize: 1 Select Background data to make all the sync options available. 2 Select Auto-sync to let the deviceautomatically synchronize the selected data in your Twitter account or e-mail account, which may include Twitter contacts and data, or Calendar, Contacts, Gmail, and Picasa WebAlbums data. • To select the data to sync from your e-mail account: 1 Touch your e-mail account to open the Data & synchronization list. 2 Select the data that you want the device to synchronize automatically, such as Sync Calendar, Sync Contacts, Sync Gmail, Sync Picasa Web Albums. You can import contacts from SD card to your device, export Contacts from your device to your SD card, and share visible contacts in multiple ways, such as Bluetooth or Gmail. 4.2 Pop-up Menu Touch the Menu button on the device or the Menu button on the screen to open or close the pop-up menu that lists available options for the current application, or actions that you can perform on the current screen. Select an option or item on the pop-up menu 1 Touch the Menu button on the device or the Menu button on the screen to open the pop-up menu. 2 Touch the desired item on the pop-up menu. 18
-
 1
1 -
2
-
3
-
4
-
5
-
6
-
7
-
8
-
9
-
10
-
11
-
12
-
13
-
14
-
15
-
16
-
17
-
18
-
19
-
20
-
21
-
22
-
 23
23 -
 24
24 -
 25
25 -
 26
26 -
 27
27 -
 28
28 -
 29
29 -
 30
30 -
 31
31 -
 32
32 -
 33
33 -
34
-
35
-
36
-
37
-
38
-
39
-
40
-
41
-
42
-
43
-
44
-
45
-
46
-
47
-
48
-
49
-
50
-
51
-
52
-
53
-
54
-
55
-
56
-
57
 |
 |