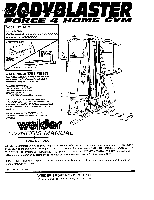
Weider Body Blaster Force 4 Owners Manual
Weider Body Blaster Force 4 Manual
 |
View all Weider Body Blaster Force 4 manuals
Add to My Manuals
Save this manual to your list of manuals |
Weider Body Blaster Force 4 manual content summary:
- Weider Body Blaster Force 4 | Owners Manual - Page 1
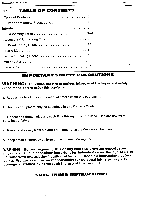
assistance with parts and information by calling our toll free number 1-800-225-0653, Mon. - Fri., 8 am - 5 pm CST. IMPORTANT: Read all safety precautions and instructions in this manual carefully before using this equipment. Save this manual for future reference. PRINTED IN CANADA WEIDER SPORTING - Weider Body Blaster Force 4 | Owners Manual - Page 2
instructions in this manual before using this equipment. 2. Use this equipment only as described in this Owner's Guide. 3. Inspect and tighten all parts each time this equipment is used. Replace any worn parts pre-existing health problems. Read all instructions before using. Weider assumes no - Weider Body Blaster Force 4 | Owners Manual - Page 3
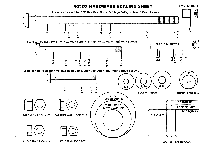
90102 HARDWARE SCALING SHEET Scale can be used for 3/8" Hex Head Bolts, Carriage Bolts, or Round Head Screws. 5/16" ID BUSHI nc I II I 1 1 1 N 1•/ tri et • str • CO 4 r co CO Scale can be used for S/16" Hex Head Bolts, Carriage Bolts, and Round Head Screws :•::4 3/8" ID BUSHINGS - Weider Body Blaster Force 4 | Owners Manual - Page 4
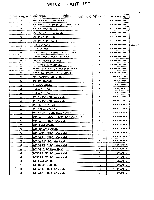
24 25 26 27 28 29 30 31 32 33 34 35 36 37 38 39 40 s PART NAME '' .,:: :, .ii:i...". i.i. .,i, ; BASE TUBE PEC-DECK UPRIGHT ARM PRESS UPRIGHT DIP STATION BASE HACK SQUAT BASE GUIDE ROD - CHROME 10 LB. WEIGHT PLATE 20 LB. WEIGHT PLATE WEIGHT SELECTOR TUBE HACK SQUAT RAIL HACK - Weider Body Blaster Force 4 | Owners Manual - Page 5
69 70 71 72 73 74 75 76 77 78 79 80 81 82 83 PART NAME SMALL SEAT - ARM PRESS BACKREST - ARMS PRESS - PEC-DECK HACK SQUAT FRAME LARGE SEAT - PEC-DECK DIPPING ARM - RIGHT DIPPING ARM - LEFT GUIDE BRACKET "L' BRACKET DUAL PULLEY CONNECTOR BRACKET OFFSET BEND PULLEY BRACKET PULLEY PIVOT - Weider Body Blaster Force 4 | Owners Manual - Page 6
111 112 11:: 114 115 116 117 118 119 120 122 123 124 125 126 PART NAME .. ... 3/8" X 10" HEX HEAD BOLT 3/8" X 8" HEX HEAD BOLT I.D. X 1" LONG METAL SPACER 5/16" I.D. X 7/16" LONG METAL SPACER 2 1/2" O.D. ROUND RUBBER BUMPER PLASTIC GUIDE BUSHING 1 2 3 1 2 1 6 2 1 1 3 20 2 5 6 4 8 1 4 8 2 - Weider Body Blaster Force 4 | Owners Manual - Page 7
I.D. X 3/8" LONG METAL SPACER TOP MAST BODY BLASTER DECAL ARM PRESS 300 LBS. TWIN STACK DECAL WEIGHT STACK DECAL ASSEMBLY MANUAL TRAINING MANUAL HARDWARE BAG - (3 1/2" PULLEYS) HARDWARE BAG - (3 1/2' & 41/2' PULLEYS) HARDWARE BAG - (48 PLASTIC GUIDE BUSHINGS) HARDWARE BAG - (DUMBBELL KIT) HARDWARE - Weider Body Blaster Force 4 | Owners Manual - Page 8
any problem in workmanship or missing parts please call our toll free product service number: 1-800-225-0653. Weider provides replacement parts at no service number: 1-800-225-0653. 3. Before ordering parts by phone have ready information to expedite your order: a. Name of the product (BODY BLASTER - Weider Body Blaster Force 4 | Owners Manual - Page 9
4 1f2" HEX HEAD BOLT 100 1 1/2" X 3" PLASTIC INSERT CAP 102 r SQUARE PLASTIC INSERT CAP 107 5/16' X 2" HEX HEAD BOLT QTY 1 6 1 1 2 3 4 NOTE: As you lay out these parts, note that there is a flat plate welded to one side of the BASE TUBE (1). If you orient this Base Tube where you are looking at - Weider Body Blaster Force 4 | Owners Manual - Page 10
PAGE to WEJDER SPORTING GOODS With HEX each Upright oriented to the correct end of the Base, bolt HEAD BOLTS (107) and 5/16" NYLON LOCK NUTS (72). up through the Base and into the Uprights using 5/16" X 2" 11 Attach the PEC-DECK SEAT FRAME BRACE (33) to the Seat tube welded on the - Weider Body Blaster Force 4 | Owners Manual - Page 11
PAGE 11 WEIDER SPORTING GOODS El Remove the backing from the TOP MAST BODY BLASTER DECAL (140) and affix on the Top Mast of the ARM PRESS UPRIGHT (3). 140 0 0 0 0 0 2 PEC-DECK UPRIGHT 0 3 ARM PRESS UPRIGHT 4 DIP STATION BASE 100 72 0 O O O O 0 - Weider Body Blaster Force 4 | Owners Manual - Page 12
96 ASSEMBLE THESE TWO BOLTS FIRST PAGE 12 WEIDER SPORTING GOODS 96 m 5 HORIZONTAL r ALIGNMENT r 0 15 POSITION THIS HOLE TO THE BOTTOM 2 PECK-DECK UPRIGHT 0 0 0 55 0 0- 00 0 POSITION THIS HOLE TO THE BOTTOM 3 AI 15 - Weider Body Blaster Force 4 | Owners Manual - Page 13
AGE 13 WEIDER SPORTING GOODS STEP 3 GUIDE RODS & WEIGHT STACK ASSEMBLY PART NAME 115 1" I.D. X 2' O.D. METAL WASHER 116 1 1/4" O.D. X 2 314" LONG METAL SPACER 125 1' I.D. X 2 1/2' ROUND RUBBER BUMPER 126 PLASTIC GUIDE BUSHING 127 WEIGHT SELECTOR TUBE END PLUG 130 WEIGHT SELECTOR PIN QTY 8 4 4 48 - Weider Body Blaster Force 4 | Owners Manual - Page 14
PAGE 14 WELDER SPORTING GOODS 6 3 6 2 0 4 126 GED 6 7 49 CD 8 6 5 6 9 0 127 130 7 126 142 0 0 0 - Weider Body Blaster Force 4 | Owners Manual - Page 15
PAGE 15 WEID SPORTING GOODS STEP 4 GUIDE ROD TO SQUAT STATION ASSEMBLY PART NAME ' 80 3/8- FLAT WASHER 81 3/8' NYLON LOCK NUT 82 3/8' a 3/8" FLAT WASHER (80) onto the Bolt and then continue to bolt through the Guide Rod. Secure with a 3/8" NYLON LOCK NUT (81). Take notice that there is a - Weider Body Blaster Force 4 | Owners Manual - Page 16
) and a 3/8" THIN WALL LOCK NUT (87). Tighten securely. (SEE DETAIL A) Also at this time, go back to the' "tap and tighten the "L" BRACKETS (50) and GUIDE 0 RODS (6). -NO 0 0 PAGE 16 WEIDER SPORTING GOODS 0 3 10 10 80 87 117 5 85 80 87 10 117 5 117 10 85 80 80 DETAIL A - Weider Body Blaster Force 4 | Owners Manual - Page 17
PAGE 17 WEIDER SPORTING GOODS STEP S HACK SQUAT FRAME ASSEMBLY PART NAME 60 3" GUIDE WHEEL 72 5/16' NYLON LOCK NUT 74 5/16" X 2 FOAM ROLLER (13) onto each Arm. Using 3/8" X 8" HEX HEAD BOLTS (86), assemble the 3" GUIDE WHEELS (60) to the SQUAT FRAME (43) so that the wide rim of the Wheel is to - Weider Body Blaster Force 4 | Owners Manual - Page 18
PAGE 18 WEIDER SPORTING GOODS 10 80 108 128 10 O 118 10 80 128 / 81 0 0 118 hole setting and over 5'10" should use the top hole setting. u Set the Squat Slide assembly onto the Guide Rails so the Wheels are properly seated between the Rails. Assemble a 1" O.D. X 1" LONG BLACK PLASTIC BUSHING - Weider Body Blaster Force 4 | Owners Manual - Page 19
PAGE 19 WEIDER SPORTING GOODS STEP 6 DIP STATION ASSE MBLY PART NAME 72 6/16' NYLON LOCK NUT 81 3/8" NYLON LOCK NUT 88 3/8" X X 1 3/8' LONG METAL SPACER (119), then continue bolting through the other GUIDE ROD (6), and finally through the other side of the Connector Bracket. Secure with - Weider Body Blaster Force 4 | Owners Manual - Page 20
PAGE 20 WEIDER SPORTING GOODS STEP 7 PEC-DECK ARMS ASSEMBLY PART NAME ... nMi. : 71 5/16' FLAT WASHER 75 5/16' X 3/4' HEX HEAD BOLT 80 3/8' FLAT WASHER 81 3/8' NYLON LOCK NUT 89 3/8" X 4 112' HEX HEAD BOLT 102 2" SQUARE - Weider Body Blaster Force 4 | Owners Manual - Page 21
PAGE 21 WEIDER SPORTING GOODS STEP 8 LEG EXTENSION ASSEMBLY PART. NAME 72 6/16" NYLON LOCK NUT 76 5/16" X 23/4' HEX HEAD BOLT QTY 1 u Assemble the LEG EXTENSION TUBE (21) between the Seat Frame brackets with a 5/ - Weider Body Blaster Force 4 | Owners Manual - Page 22
PAGE 22 WEIDER SPORTING GOODS STEP, 9 ARM PRESS ASSEMBLY PART NAME a 69 5/16" X r ALL THREAD HEX HEAD BOLT 2 71 5/16" FLAT WASHER 4 72 5/16" NYLON LOCK NUT 4 ' 76 5/16' X 2 3/4' HEX HEAD BOLT 4 ' 102 2' SQUARE PLASTIC - Weider Body Blaster Force 4 | Owners Manual - Page 23
CABLE ROUTING B • C 0 N . PEC-DECK STATION LAT PULLDOWN • • TEC-DECK ARM 44. 3/ x. 45, ARM PRESS ATION LONG LAT CAELE 21 ADJLIST CABLE SLACK HERE FIRST DIP STATION LOW PULLEY LONG RENON PRESS CARtE 32 ADJUST CABLE SLACK HERE SECOND PFC-DECK MATSST 29 FINAL CABLE ADJUSTMENT J 46;1 • tf - Weider Body Blaster Force 4 | Owners Manual - Page 24
Leg Extension. 5. Periodically lubricate the Guide Rods with silicone or light machine oil to minimize friction and drag. IF YOUR HOME GYM FEELS LIKE IT IS BINDING UP HANDS, FINGERS, OR OTHER PARTS OF YOUR BODY BETWEEN MOVING PARTS OR WEIGHTS WHILE THE GYM IS IN USE. u KEEP ALL BOLTS AND FASTENERS - Weider Body Blaster Force 4 | Owners Manual - Page 25
kGE 25 WEIDER SPORTING GOODS STEP 10 CABLE ASSEMBLIES 1. LAT PULL -DOWN & LOWER PULLEY ASSEMBLY PART NAME 61 4 1/2' PULLEY 62 31 Mast joins. 2 93 3/8" X 2' HEX HEAD BOLT 1 u Bring the Cable through between the GUIDE RODS (6) on the DIP i 99 1/4' X 21/4" ROUND HEAD SCREW 1 120 3/8" I.D. - Weider Body Blaster Force 4 | Owners Manual - Page 26
3 1/2" PULLEY (C) (62) and set the Cable that is running between the GUIDE RODS (6) into the Pulley. Fit the Pulley and Cable in the V' bracket a 1/4" NYLON LOCK NUT (67). 91 12 DIP STATION 120 PAGE 26 WEIDER SPORTING GOODS FINGER TIGHTEN ONLY THIS BOLT 120 81 0 15 81 ONNECTOR BRACKET 93 - Weider Body Blaster Force 4 | Owners Manual - Page 27
WEIDER SPORTING GOODS 2. PEC-DECK WEIGHT STACK & LEG EXTENSION CABLE ASSEMBLY PART 2 1 Working from the Pec-Deck Station side of the Gym, lay the 90" 2 PEC-DECK CABLE (29) within or closest to the Dip Station). u Bolt through the GUIDE BRACKET (49), then the WEIGHT SELECTOR TUBE (9), and then - Weider Body Blaster Force 4 | Owners Manual - Page 28
PULLEY (G) (62), another 3/8" FLAT WASHER (80), and the other Connector Bracket. Fasten with a 3/8" NYLON LOCK NUT (81). 80 82 O 0 62 ° 51 PAGE 28 WEIDER SPORTING GOODS (3) 0 81 0 0 51 Hang this Pulley assembly over the top LAT BAR CABLE (28) as it loops between the two Pulleys at the top - Weider Body Blaster Force 4 | Owners Manual - Page 29
'AGE 29 WEIDER SPORTING GOODS Fit the ends of the Dual Connector Bracket assembly on the Pec-Deck Cable into the Bracket assembly of the Lat Cable and - Weider Body Blaster Force 4 | Owners Manual - Page 30
PAGE 30 3. PEC-DECK ARM CABLE ASSEMBLY WEIDER SPORTING GOODS PART NAME 61 4 1/2" PULLEY 62 3 1/2' PULLEY 72 S/16" NYLON LOCK NUT 73 5/16 stopper ball and tighten the set screw down tight!), against the Cable. As the Gym is used the Cable Cable run. It Is Important that will relax and excess slack - Weider Body Blaster Force 4 | Owners Manual - Page 31
PAGE 30 3. PEC-DECK ARM CABLE ASSEMBLY WEIDER SPORTING GOODS PART NAME 61 4 1/2" PULLEY 62 3 1/2" PULLEY 70 5/16' X 3 1/4' HEX HEAD BOLT the stopper ball and tighten the set screw down tightly against the Cable. As the Gym is used the Cable will relax and stretch and this procedure will have to be - Weider Body Blaster Force 4 | Owners Manual - Page 32
GE 31 WEIDER SPORTING GOODS 17 81 80 0 81 80 0 73 O 10 O'CLOCK 53 54 62 80 O 92 2 O'CLOCK 82 001 72 81 P. 31 PEC-DECK ARM CABLE - Weider Body Blaster Force 4 | Owners Manual - Page 33
4. BENCH PAGE 32 WEIDER SPORTING GOODS PRESS / HACK SQUAT CABLE ASSEMBLY PART NAME QTY 58 METAL ADJUSTER FERRULE 1 62 31/2" PULLEY 6 67 1/4' NYLON LOCK NUT 1 81 68 1/4' X 1 3/4" ROUND HEAD MACHINE SCREW 1 80 3/8" FLAT WASHER 4 81 3/8' NYLON LOCK - Weider Body Blaster Force 4 | Owners Manual - Page 34
AGE 33 WEIDER SPORTING GOODS Make a large loop in the Cable at -the Bench Press Arm end. Place a 3 1/2' PULLEY (P) (62) into the loop and bolt the Pulley within - Weider Body Blaster Force 4 | Owners Manual - Page 35
u Now bring the Cable end up and insert it up through the Cable adjuster ferrule welded to the back of the HACK SQUAT FRAME (5). Lightly tighten the set screw against the Cable enough to keep it in place. D At this time, make another dual Cable connector assembly by bolting a 3 1/2' PULLEY (T) (62) - Weider Body Blaster Force 4 | Owners Manual - Page 36
PAGE 35 WEIDER SPORTING GOODS S. LEG EXTENSION CABLE ASSEMBLY • PART NAME 59 3/8" SPRING CLIP 61 4 1/2' PULLEY 62 3 1/2" PULLEY 67 1/4" NYLON LOCK NUT 68 1/4' X 1 3/4" ROUND HEAD SCREW 71 5/16' FLAT WASHER 72 5/16' NYLON LOCK NUT - Weider Body Blaster Force 4 | Owners Manual - Page 37
increase the weight of the Arm Press, Pec-Deck, Lat Pull Down, and Squat Station. O 61 V `&. 81 2( 2 / 80 120 al 81 80 95 PAGE 36 WEIDER SPORTING GOODS .131 68 82 0 51 9 O 123 0 67 51 62 72 109 9 80 92 120 30 LEG EXTENSION CABLE 21 72 0 O 71 77 rS 71 - Weider Body Blaster Force 4 | Owners Manual - Page 38
AGE 37 WEIDER SPORTING GOODS USING DUAL STACKS: As mentioned previously, this gym has a special feature of allowing you to link both Weight stacks together to increase weight for the Arm Press, Lat Pull Down, Squat, and Low - Weider Body Blaster Force 4 | Owners Manual - Page 39
STEP 11 COMPLETING DIP STATION PAGE 38 WEIDER SPORTING GOODS PART NAME :Ii:i:K:x:i:: *i:: ::;;;;I 66 1/4" FLAT WASHER 71 5/16" FLAT WASHER 72 5/16' NYLON LOCK NUT 74 5/16' X 2 1/4' HEX HEAD BOLT 76 5/16' X 2 3/4' HEX HEAD BOLT 98 1/4" X - Weider Body Blaster Force 4 | Owners Manual - Page 40
PAGE 39 WEIDER SPORTING GOODS STEP 12 SQUAT STATION COMPLETION ::: - PARTNAME 63 1/4" X 3 1/2" CARRIAGE BOLT 66 1/4' FLAT WASHER 67 1/4" NYLON LOCK NUT 97 1/4" X 3/4" ROUND HEAD SCREW QTY 2 EI Select - Weider Body Blaster Force 4 | Owners Manual - Page 41
STEP 13 ARM PRESS STATION COMPLETION PAGE 40 WELDER SPORTING GOODS • .. ..... .... PART NAME 65 1/4' X 2 1/2" CARRIAGE BOLT 66 1/4' FLAT WASHER 67 1/4' NYLON LOCK NUT 72 5/16" NYLON LOCK NUT 76 5/16' X 23/4" HEX HEAD BOLT 97 1/4" X 3/4" ROUND HEAD - Weider Body Blaster Force 4 | Owners Manual - Page 42
(97). 42 2 5 97 -o 0- 44 65 65Nr97 97-.41 3 (0 o PEC-DECK 66 SEAT FRAME 6'7 56 97 0 56 7 6 97 76 - 66 67 STEP IS ACCESSORIES PART.NAME 105 1" ROUND PLASTIC INSERT CAP QTY •. 2 t \ Press a 1" ROUND PLASTIC INSERT CAP (105) into the end of the LAT BAR (111). Slide a 1" I.D. X 5" FOAM - Weider Body Blaster Force 4 | Owners Manual - Page 43
EXERCISE FREQUENCY • -o maintain or improve your condition, you must workout 2-3 times per week following the pattern described above. A I 'ay of rest between workouts is icreased to 4-5 times per week. recommended. After several months of exercise, the number The key to a successful program is - Weider Body Blaster Force 4 | Owners Manual - Page 44
determination of its responsibility to repair or replace under this Warranty. PARTS SERVICE 1-800-225-0653 If Weider denies responsibility it will explain its decision in writing. If Weider accepts responsibility to repair or replace the item or part under the warranty it will notify you
-
 1
1 -
 2
2 -
 3
3 -
 4
4 -
 5
5 -
 6
6 -
 7
7 -
8
-
9
-
10
-
11
-
12
-
13
-
14
-
15
-
16
-
17
-
18
-
19
-
20
-
21
-
22
-
23
-
24
-
25
-
26
-
27
-
28
-
29
-
30
-
31
-
32
-
33
-
34
-
35
-
36
-
37
-
38
-
39
-
40
-
41
-
42
-
43
-
44
 |
 |
LASTER
FORCE
eff
110111/1M
1
GYM
a
fa
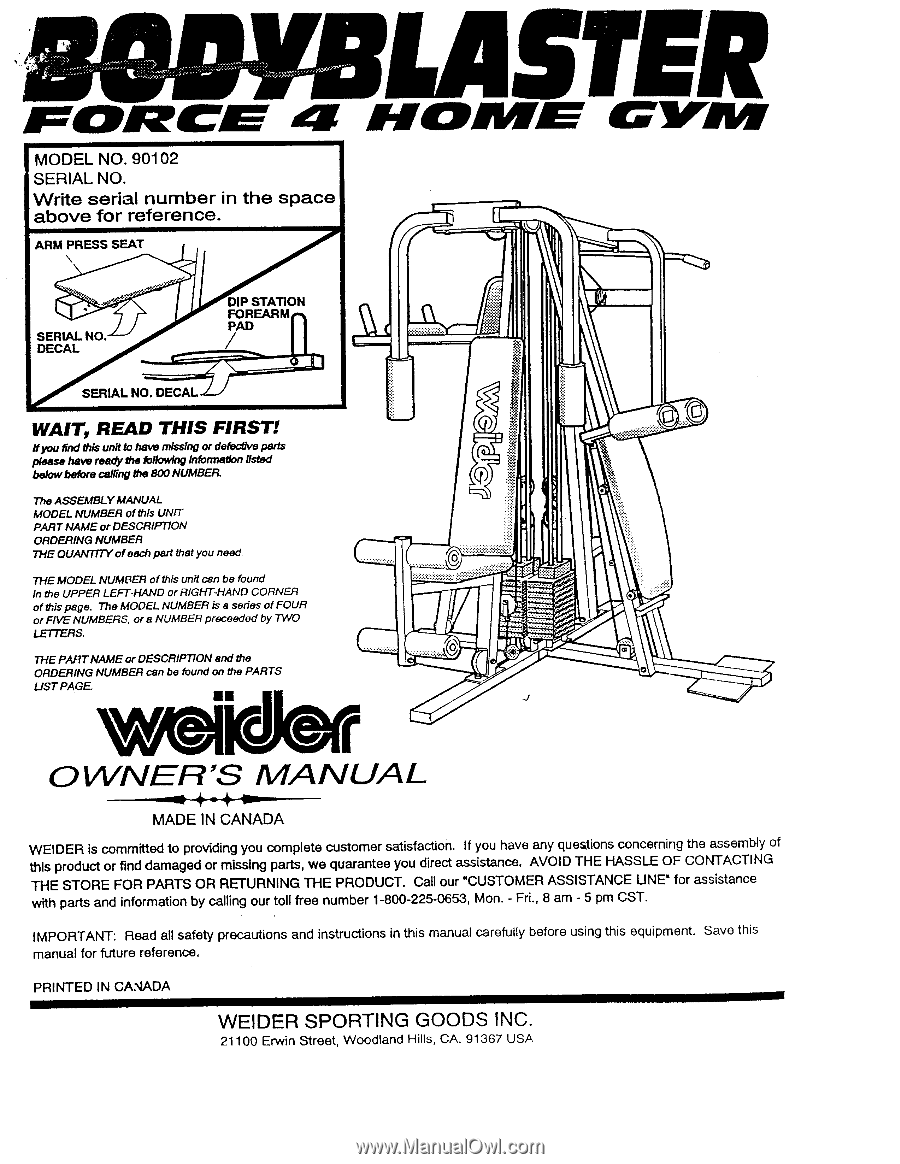
MODEL
NO.
90102
SERIAL
NO.
Write
serial
number
in
the
space
above
for
reference.
ARM
PRESS
SEAT
SERIAL
NO.
DECAL
•
SERIAL
NO.
DECAL
DIP
STATION
PADFOREARM
WAIT,
READ
THIS
FIRST!
if
you
find
this
unit
to
have missing
or
defective
parts
please
have
ready
the
following
infomuidon
listed
below
before
calling
the
800
NUMBER.
The
ASSEMBLY
MANUAL
MODEL
NUMBER
of
this
UNIT
PART
NAME
or
DESCRIPTION
ORDERING
NUMBER
THE
OUANTITY
of
each
part
that
you
need.
THE
MODEL
NUMBER
of
this
unit
can
be
found
In
the
UPPER
LEFT-HAND
or
RIGHT-HAND
CORNER
of
this
page.
The
MODEL
NUMBER
is
a
series
of
FOUR
or
FIVE
NUMBERS,
or
a
NUMBER
proceeded
by
TWO
Lb!
I
tRS.
THE
PART
NAME
or
DESCRIPTION
and
the
ORDERING
NUMBER
can
be
found
on
the
PARTS
UST
PAGE
viscddefi
l
OWNER'S
MANUAL
MADE
IN
CANADA
CO
0
WEIDER
is
committed
to
providing
you
complete
customer
satisfaction.
If
you
have
any
questions
concerning
the
assembly
of
this
product
or
find
damaged
or
missing
parts,
we
guarantee
you
direct
assistance.
AVOID
THE
HASSLE
OF
CONTACTING
THE
STORE
FOR
PARTS
OR
RETURNING
THE
PRODUCT.
Call
our
"CUSTOMER
ASSISTANCE
LINE"
for
assistance
with
parts
and
information
by
calling
our
toll
free
number
1-800-225-0653,
Mon.
-
Fri.,
8
am
-
5
pm
CST.
IMPORTANT:
Read
all
safety
precautions
and
instructions
in
this
manual
carefully
before
using
this
equipment.
Save
this
manual
for
future
reference.
PRINTED
IN
CANADA
WEIDER
SPORTING
GOODS
INC.
21100
Erwin
Street,
Woodland
Hills,
CA.
91367
USA