Weider Body Blaster Force 4 Owners Manual - Page 36
S. Leg Extension Cable Assembly
 |
View all Weider Body Blaster Force 4 manuals
Add to My Manuals
Save this manual to your list of manuals |
Page 36 highlights
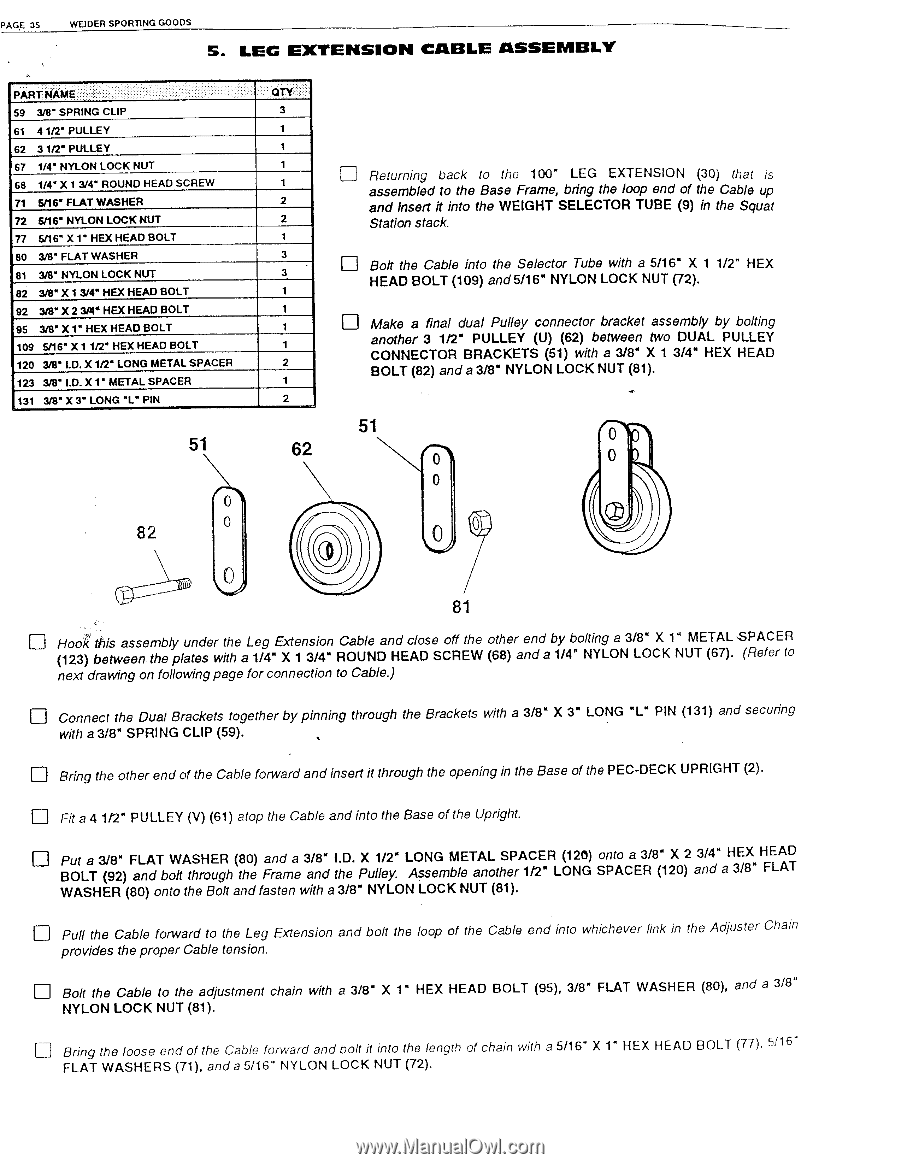
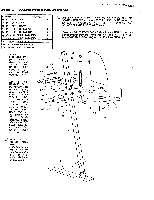
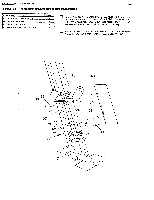
PAGE 35 WEIDER SPORTING GOODS S. LEG EXTENSION CABLE ASSEMBLY • PART NAME 59 3/8" SPRING CLIP 61 4 1/2' PULLEY 62 3 1/2" PULLEY 67 1/4" NYLON LOCK NUT 68 1/4' X 1 3/4" ROUND HEAD SCREW 71 5/16' FLAT WASHER 72 5/16' NYLON LOCK NUT 77 5/16' X 1" HEX HEAD BOLT 80 3/8' FLAT WASHER 81 3/8" NYLON LOCK NUT 82 3/8" X 1 3/4" HEX HEAD BOLT 92 3/8" X 2 3/4' HEX HEAD BOLT 95 3/8' X 1" HEX HEAD BOLT 109 5/16" X1 1/2" HEX HEAD BOLT 120 3/8' I.D. X 1/2' LONG METAL SPACER 123 318" W. X 1' METAL SPACER 131 3/8" X 3" LONG "L" PIN 51 0 82 0 QTY 3 1 1 1 1 2 2 1 3 3 1 1 1 1 2 1 2 62 P Returning back to the 100" LEG EXTENSION (30) that is assembled to the Base Frame, bring the loop end of the Cable up and Insert it into the WEIGHT SELECTOR TUBE (9) in the Squat Station stack. Bolt the Cable into the Selector Tube with a 5/16" X 1 1/2" HEX HEAD BOLT (109) and 5/16" NYLON LOCK NUT (72). Make a final dual Pulley connector bracket assembly by bolting another 3 1/2" PULLEY (U) (62) between two DUAL PULLEY CONNECTOR BRACKETS (51) with a 3/8" X 1 3/4" HEX HEAD BOLT (82) and a 3/8' NYLON LOCK NUT (81). 51 0 0 0 0 0 81 u Hook this assembly under the Leg Extension Cable and close off the other end by bolting a 3/8" X 1' METAL SPACER (123) between the plates with a 1/4" X 1 3/4" ROUND HEAD SCREW (68) and a 1/4" NYLON LOCK NUT (67). (Refer to next drawing on following page for connection to Cable.) u Connect the Dual Brackets together by pinning through the Brackets with a 3/8' X 3" LONG "L" PIN (131) and securing with a 3/8" SPRING CLIP (59). Bring the other end of the Cable forward and insert it through the opening in the Base of the PEC-DECK UPRIGHT (2). Fit a 4 1/2" PULLEY (V) (61) atop the Cable and into the Base of the Upright. Put a 3/8" FLAT WASHER (80) and a 3/8" I.D. X 1/2" LONG METAL SPACER (120) onto a 3/8" X 2 3/4" HEX HEAD BOLT (92) and bolt through the Frame and the Pulley. Assemble another 1/2" LONG SPACER (120) and a 3/8" FLAT WASHER (80) onto the Bolt and fasten with a 3/8" NYLON LOCK NUT (81). I I Pull the Cable forward to the Leg Extension and bolt the loop of the Cable end into whichever link in the Adjuster Chain provides the proper Cable tension. I Bolt the Cable to the adjustment chain with a 3/8" X 1" HEX HEAD BOLT (95), 3/8" FLAT WASHER (80), and a 3/8" NYLON LOCK NUT (81). Li Bring the loose end of the Cable forward and bolt it into the length of chain with a 5/16" X 1' HEX HEAD BOLT (77). 5/16 " FLAT WASHERS (71), and a 5/16" NYLON LOCK NUT (72).
-
 1
1 -
2
-
3
-
4
-
5
-
6
-
7
-
8
-
9
-
10
-
11
-
12
-
13
-
14
-
15
-
16
-
17
-
18
-
19
-
20
-
21
-
22
-
23
-
24
-
25
-
26
-
27
-
28
-
29
-
30
-
 31
31 -
 32
32 -
 33
33 -
 34
34 -
 35
35 -
 36
36 -
 37
37 -
 38
38 -
 39
39 -
 40
40 -
 41
41 -
42
-
43
-
44
 |
 |