Weider Body Blaster Force 4 Owners Manual - Page 15
Washer, Nylon, Square, Plastic, Metal, Spacer
 |
View all Weider Body Blaster Force 4 manuals
Add to My Manuals
Save this manual to your list of manuals |
Page 15 highlights
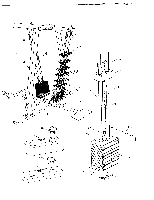
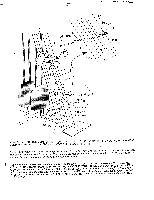
PAGE 15 WEID SPORTING GOODS STEP 4 GUIDE ROD TO SQUAT STATION ASSEMBLY PART NAME ' 80 3/8- FLAT WASHER 81 3/8' NYLON LOCK NUT 82 3/8' X 1 3/4" HEX HEAD BOLT 83 3/8' X 2 1/4" HEX HEAD BOLT 85 3/8" X 10" HEX HEAD BOLT 87 3/8' THIN WALL LOCK NUT 101 1 1/2" SQUARE PLASTIC CAP 117 3/8" X 1 3/4" LONG METAL SPACER Assemble a 3/8" FLAT WASHER (80) onto the bolt and then..continue to bolt through the GUIDE ROD (6). Secure with a 3/8" NYLON LOCK NUT (81). Assemble another GUIDE ROD (6) into the right and inside the TOP MAST CONNECTOR BRACKET (15). Insert a "L" BRACKET (50) between this Guide Rod and the right side of the Top Mast Connector Bracket Using a 3/8" X 1 3/4" HEX HEAD BOLT (82), bolt through the outside of the Top Mast Connector Bracket and then through the L Bracket. Assemble a 3/8" FLAT WASHER (80) onto the Bolt and then continue to bolt through the Guide Rod. Secure with a 3/8" NYLON LOCK NUT (81). Take notice that there is a series of 3 holes in one end of the HACK SQUAT RAILS (10). These holes should be oriented at the bottom when the Rails are assembled correctly. Position the HACK SQUAT RAILS (10) to the "L" BRACKET (50) at the top of the unit and assembling 3/8" FLAT WASHERS (80) onto two 3/8" X 2 1/4" HEX HEAD BOLTS (83), bolt through the Hack Squat Rails and into the "L` Bracket. Secure with 3/8" NYLON LOCK NUTS (81). Tighten securely. QTY 6 [11 Starting at the HACK SQUAT STATION (5), locate two "L" BRACKETS (50). (These Brackets are made of 1 1/4' wide material. 4 One side is 3' long with a slotted hole and the other side is 1 1/4' long 2 with a round hole.) 2 1 Li Mount the long flat side of one "L" BRACKET (50) to the left and 1 outside of the TOP MAST CONNECTOR BRACKET (15). Assemble a 2 GUIDE ROD (6) into the left and inside the Top Mast Connector 2 Bracket. Using a 3/8" X 1 3/4" HEX HEAD BOLT (82), bolt through the L Bracket and then through the Top Mast Connector Bracket. 82 50 15 81 15 5,0 82 LEFT 0 -n RIGHT 81 2 3 6 6 101 50 81 101 83 0 50 80 83 0 2 81 6 10 10 u Cap the top of the HACK SQUAT RAILS (10) with 1 1/2" SQUARE PLASTIC INSERT CAPS (101).
-
 1
1 -
2
-
3
-
4
-
5
-
6
-
7
-
8
-
9
-
 10
10 -
 11
11 -
 12
12 -
 13
13 -
 14
14 -
 15
15 -
 16
16 -
 17
17 -
 18
18 -
 19
19 -
 20
20 -
21
-
22
-
23
-
24
-
25
-
26
-
27
-
28
-
29
-
30
-
31
-
32
-
33
-
34
-
35
-
36
-
37
-
38
-
39
-
40
-
41
-
42
-
43
-
44
 |
 |
