Weider Body Blaster Force 4 Owners Manual - Page 22
Thread, Washer, Nylon, Square, Plastic, Insert, Round, Pivot, Bushing, Orient, Bracket, Threaded,
 |
View all Weider Body Blaster Force 4 manuals
Add to My Manuals
Save this manual to your list of manuals |
Page 22 highlights
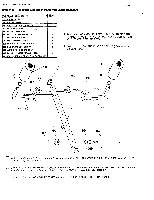
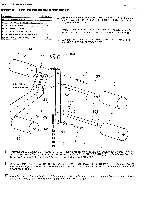
PAGE 22 WEIDER SPORTING GOODS STEP, 9 ARM PRESS ASSEMBLY PART NAME a 69 5/16" X r ALL THREAD HEX HEAD BOLT 2 71 5/16" FLAT WASHER 4 72 5/16" NYLON LOCK NUT 4 ' 76 5/16' X 2 3/4' HEX HEAD BOLT 4 ' 102 2' SQUARE PLASTIC INSERT CAP 2 1105 1' ROUND PLASTIC INSERT CAP 129 2" SQUARE PIVOT BUSHING 4 25 2 69 THREADED PLATE First locate the 1" O.D. X 16" LONG ROUND PIVOT TUBE (25). Insert this Tube into the hole through the Top Mast of the ARM PRESS UPRIGHT- (3). Center the Tube through the Frame and bolt down through the threaded plate in the top of the Mast with two 5/16" X 2" ALL THREAD HEX HEAD BOLTS (69). 0 ARM PRESS TOP MAST Tighten firmly. ARM PRESS TOP MAST 25 129 Drive a 2' SQUARE PIVOT BUSHING (129) into the top end of 129 the ARM PRESS ARMS (26). @IF 72 Align Arms with PIVOT TUBE (25) in Top 76 71 72 141 Mast and press Arms onto Pivot Tube. 2 Next, assemble the ARM PRESS 76 71 CROSS TUBE (27) between 38 105 the Arm Press Arms so the welded 0 brackets on the Tube are to the 0 back and the left side when facing the Arm 38 105 Press Station. 102 Assemble the 27 ORIENT THIS BRACKET 26 72 TO THE LEFT OF THIS TUBE 3 26 102 Cross Tuba with 5/16" X 2 3/4" HEX HEAD BOLTS (76), 5/16' FLAT WASHERS (71), and5/16" NYLON LOCK NUTS (72). 71 76 71 76 38 105 io 0 105 38 u Cap the ends of the ARM PRESS ARMS (26) handles with 1" ROUND PLASTIC INSERT CAPS (105). u Cap the endsof the ARM PRESS ARMS (26) with 2" SQUARE PLASTIC CAPS (102). El Wipe a small amount of liquid detergent over the lower section of the ARM PRESS ARMS (26) and press on a 1" I.D. X 5" FOAM GRIP (38). Remove the ARM PRESS 300 LBS. TWIN STACK DECAL (141) from the backing sheet and affix on the front of the ARM PRESS CROSS TUBE (27).
-
 1
1 -
2
-
3
-
4
-
5
-
6
-
7
-
8
-
9
-
10
-
11
-
12
-
13
-
14
-
15
-
16
-
 17
17 -
 18
18 -
 19
19 -
 20
20 -
 21
21 -
 22
22 -
 23
23 -
 24
24 -
 25
25 -
 26
26 -
 27
27 -
28
-
29
-
30
-
31
-
32
-
33
-
34
-
35
-
36
-
37
-
38
-
39
-
40
-
41
-
42
-
43
-
44
 |
 |
