Weider Body Blaster Force 4 Owners Manual - Page 34
Weider Body Blaster Force 4 Manual
 |
View all Weider Body Blaster Force 4 manuals
Add to My Manuals
Save this manual to your list of manuals |
Page 34 highlights
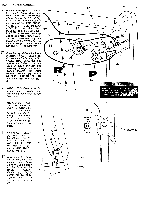
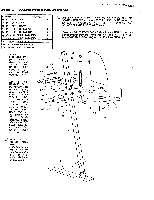
AGE 33 WEIDER SPORTING GOODS Make a large loop in the Cable at -the Bench Press Arm end. Place a 3 1/2' PULLEY (P) (62) into the loop and bolt the Pulley within the V' bracket welded to the back of the ARM PRESS CONNECTOR TUBE (27) using a 3/8" X 2 1/4" HEX HEAD BOLT (83) to bolt through a 3/8" FLAT WASHER (80), the loop end of the CABLE (32), another 3/8" FLAT WASHER (80), and then through the 1.1" Bracket and the PULLEY (62). Secure with a 3/8" NYLON LOCK NUT (81). 32 81 Bring the'looped Cable back and fit another 3 1/2" PULLEY (R) (62) onto the Cable. Align a "L" CABLE TRAP BRACKET (54) against the Pulley to trap the Cable in place and bolt this assembly through the sleeve welded through the ARM PRESS UPRIGHT (3). Use a 318' X 5" HEX HEAD BOLT (94) and a 3/8" NYLON LOCK NUT (81). 62 3 NOTE: Thls., Cable assembly should form a circular loop between the Upright and the Arm Press Arms. Moving to the FRAME BASE (1) of the HACK SQUAT STATION, (5), fit the straight end of the Cable into the ' ' Pulley bracket welded to the Base. The Cable should run out towards the end of the Base. Fit a 3 1/2" PULLEY (S) (62) into the bracket and over the Cable and bolt in place with a 3/8' X 1 3/4" 81 HEX HEAD BOLT (82) and a 3/8" NYLON LOCK NUT (81). Now bring the Cable end up and insert it up through the Cable adjuster ferrule welded to the back of the HACK SQUAT FRAME (5). Lightly tighten the set screw againsu the Cable enough to keep it in place. 81 94 0 83 8 27 62 ------- THE (94) 3/8" X 5" BOLT IN THIS STEP IS EXTRA LONG. THE ADDITIONAL LENGTH OF THE BOLT NJILL BE USED LATER IF THE USER DECIDES TO CONNECT BOTH WEIGHT STACKS. (SEE PAGE 37 USING DUAL STACKS) 58 TIGHItN SECOND FERRULE DOWN TIGHT AGAINST WELDED FERRULE 10 SQUAT RAIL Qo
-
 1
1 -
2
-
3
-
4
-
5
-
6
-
7
-
8
-
9
-
10
-
11
-
12
-
13
-
14
-
15
-
16
-
17
-
18
-
19
-
20
-
21
-
22
-
23
-
24
-
25
-
26
-
27
-
28
-
 29
29 -
 30
30 -
 31
31 -
 32
32 -
 33
33 -
 34
34 -
 35
35 -
 36
36 -
 37
37 -
 38
38 -
 39
39 -
40
-
41
-
42
-
43
-
44
 |
 |
