Weider Body Blaster Force 4 Owners Manual - Page 10
Nylon, Plastic, Insert
 |
View all Weider Body Blaster Force 4 manuals
Add to My Manuals
Save this manual to your list of manuals |
Page 10 highlights
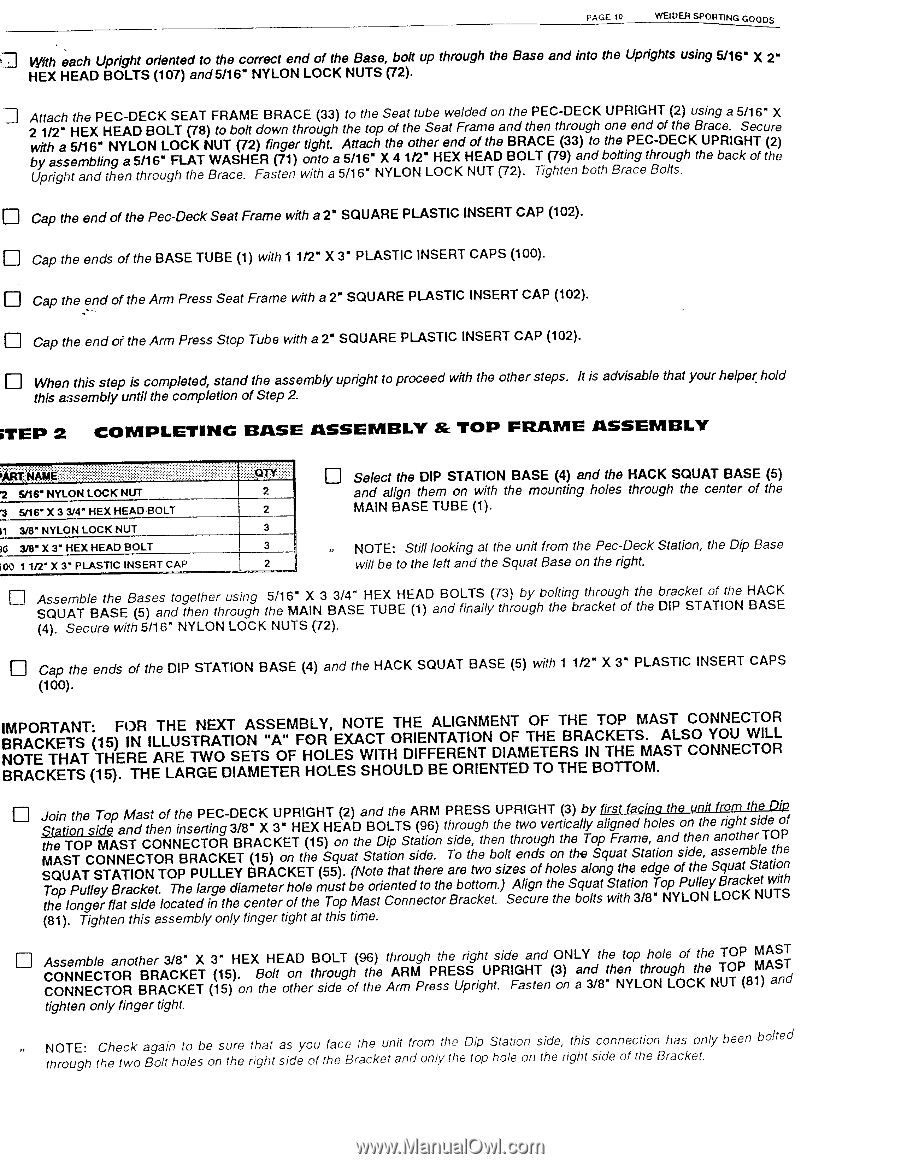
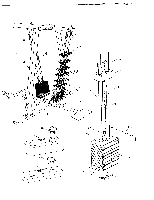
PAGE to WEJDER SPORTING GOODS With HEX each Upright oriented to the correct end of the Base, bolt HEAD BOLTS (107) and 5/16" NYLON LOCK NUTS (72). up through the Base and into the Uprights using 5/16" X 2" 11 Attach the PEC-DECK SEAT FRAME BRACE (33) to the Seat tube welded on the PEC-DECK UPRIGHT (2) using a 5/16" X 2 1/2" HEX HEAD BOLT (78) to bolt down through the top of the Seat Frame and then through one end of the Brace. Secure with a 5/16" NYLON LOCK NUT (72) finger tight. Attach the other end of the BRACE (33) to the PEC-DECK UPRIGHT (2) by assembling a 5/16" FLAT WASHER (71) onto a 5/16" X 4 1/2' HEX HEAD BOLT (79) and bolting through the back of the Upright and then through the Brace. Fasten with a 5/16" NYLON LOCK NUT (72). Tighten both Brace Bolts. Cap the end of the Pec-Deck Seat Frame with a 2' SQUARE PLASTIC INSERT CAP (102). Cap the ends of the BASE TUBE (1) with 1 1/2" X 3" PLASTIC INSERT CAPS (100). Cap the end of the Arm Press Seat Frame with a 2" SQUARE PLASTIC INSERT CAP (102). Cap the end of the Arm Press Stop Tube with a 2" SQUARE PLASTIC INSERT CAP (102). When this step is completed, stand the assembly upright to proceed with the other steps. It is advisable that your helper hold this assembly until the completion of Step 2. STEP 2 COMPLETING BASE ASSEMBLY & TOP FRAME ASSEMBLY TI 72 S/16' NYLON LOCK NUT 73 5/16" X 3 3/4' HEX HEAD BOLT 81 3/8" NYLON LOCK NUT u Select the DIP STATION BASE (4) and the HACK SQUAT BASE (5) 2 and align them on with the mounting holes through the center of the 2 MAIN BASE TUBE (1). 3 96 3/8' X 3" HEX HEAD BOLT 3 109 11/2' X 3" PLASTIC INSERT CAP 2 NOTE: Still looking at the unit from the Pec-Deck Station, the Dip Base will be to the left and the Squat Base on the right. u Assemble the Bases together using 5/16" X 3 3/4" HEX HEAD BOLTS (73) by bolting through the bracket of the HACK SQUAT BASE (5) and then through the MAIN BASE TUBE (1) and finally through the bracket of the DIP STATION BASE (4). Secure with 5/16" NYLON LOCK NUTS (72). u Cap the ends of the DIP STATION BASE (4) and the HACK SQUAT BASE (5) with 1 1f2" X 3" PLASTIC INSERT CAPS (100). IMPORTANT: FOR THE NEXT ASSEMBLY, NOTE THE ALIGNMENT OF THE TOP MAST CONNECTOR BRACKETS (15) IN ILLUSTRATION "A" FOR EXACT ORIENTATION OF THE BRACKETS. ALSO YOU WILL NOTE THAT THERE ARE TWO SETS OF HOLES WITH DIFFERENT DIAMETERS IN THE MAST CONNECTOR BRACKETS (15). THE LARGE DIAMETER HOLES SHOULD BE ORIENTED TO THE BOTTOM. Join the Top Mast of the PEC-DECK UPRIGHT (2) and the ARM PRESS UPRIGHT (3) by first facing the unit from the Dip Station side and then inserting 3/8" X 3" HEX HEAD BOLTS (96) through the two vertically aligned holes on the right side of the TOP MAST CONNECTOR BRACKET (15) on the Dip Station side, then through the Top Frame, and then another TOP MAST CONNECTOR BRACKET (15) on the Squat Station side. To the bolt ends on the Squat Station side, assemble the SQUAT STATION TOP PULLEY BRACKET (55). (Note that there are two sizes of holes along the edge of the Squat Station Top Pulley Bracket. The large diameter hole must be oriented to the bottom.) Align the Squat Station Top Pulley Bracket with the longer flat side located in the center of the Top Mast Connector Bracket. Secure the bolts with 3/8" NYLON LOCK NUTS (81). Tighten this assembly only finger tight at this time. Assemble another 3/8" X 3" HEX HEAD BOLT (96) through the right side and ONLY the top hole of the TOP MAST CONNECTOR BRACKET (15). Bolt on through the ARM PRESS UPRIGHT (3) and then through the TOP MAST CONNECTOR BRACKET (15) on the other side of the Arm Press Upright. Fasten on a 3/8" NYLON LOCK NUT (81) and tighten only finger tight. NOTE: Check again to be sure that as you face the unit from the Dip Station side, this connection has only been bolted through the two Bolt holes on the right side of the Bracket and only the top hole on the right side of the Bracket.
-
 1
1 -
2
-
3
-
4
-
 5
5 -
 6
6 -
 7
7 -
 8
8 -
 9
9 -
 10
10 -
 11
11 -
 12
12 -
 13
13 -
 14
14 -
 15
15 -
16
-
17
-
18
-
19
-
20
-
21
-
22
-
23
-
24
-
25
-
26
-
27
-
28
-
29
-
30
-
31
-
32
-
33
-
34
-
35
-
36
-
37
-
38
-
39
-
40
-
41
-
42
-
43
-
44
 |
 |