Xerox 6505/N User Guide - Page 114
Scanning to a USB Flash Drive
 |
View all Xerox 6505/N manuals
Add to My Manuals
Save this manual to your list of manuals |
Page 114 highlights
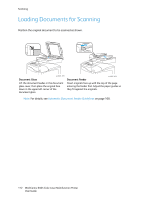
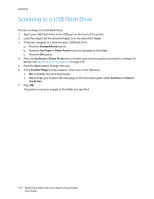
Scanning Scanning to a USB Flash Drive To scan an image to a USB Flash Drive: 1. Insert your USB Flash Drive in the USB port on the front of the printer. 2. Load the original on the document glass or in the document feeder. 3. If desired, navigate to a folder on your USB Flash Drive: a. Press the Forward Arrow button. b. Press the Up Arrow or Down Arrow button to navigate to the folder. c. Press the OK button. 4. Press the Up Arrow or Down Arrow button to select any scanning options you want to change. For details, see Adjusting Scanning Options on page 120. 5. Press the Start button to begin the scan. 6. If the Another Page? prompt appears, select one of the following: • No completes the scanning process. • Yes prompts you to place the next page on the document glass. Select Continue or Cancel the Action. 7. Press OK. The printer scans your images to the folder you specified. 114 WorkCentre 6505 Color Laser Multifunction Printer User Guide
-
 1
1 -
2
-
3
-
4
-
5
-
6
-
7
-
8
-
9
-
10
-
11
-
12
-
13
-
14
-
15
-
16
-
17
-
18
-
19
-
20
-
21
-
22
-
23
-
24
-
25
-
26
-
27
-
28
-
29
-
30
-
31
-
32
-
33
-
34
-
35
-
36
-
37
-
38
-
39
-
40
-
41
-
42
-
43
-
44
-
45
-
46
-
47
-
48
-
49
-
50
-
51
-
52
-
53
-
54
-
55
-
56
-
57
-
58
-
59
-
60
-
61
-
62
-
63
-
64
-
65
-
66
-
67
-
68
-
69
-
70
-
71
-
72
-
73
-
74
-
75
-
76
-
77
-
78
-
79
-
80
-
81
-
82
-
83
-
84
-
85
-
86
-
87
-
88
-
89
-
90
-
91
-
92
-
93
-
94
-
95
-
96
-
97
-
98
-
99
-
100
-
101
-
102
-
103
-
104
-
105
-
106
-
107
-
108
-
 109
109 -
 110
110 -
 111
111 -
 112
112 -
 113
113 -
 114
114 -
 115
115 -
 116
116 -
 117
117 -
 118
118 -
 119
119 -
120
-
121
-
122
-
123
-
124
-
125
-
126
-
127
-
128
-
129
-
130
-
131
-
132
-
133
-
134
-
135
-
136
-
137
-
138
-
139
-
140
-
141
-
142
-
143
-
144
-
145
-
146
-
147
-
148
-
149
-
150
-
151
-
152
-
153
-
154
-
155
-
156
-
157
-
158
-
159
-
160
-
161
-
162
-
163
-
164
-
165
-
166
-
167
-
168
-
169
-
170
-
171
-
172
-
173
-
174
-
175
-
176
-
177
-
178
-
179
-
180
-
181
-
182
-
183
-
184
-
185
-
186
-
187
-
188
-
189
-
190
-
191
-
192
-
193
-
194
-
195
-
196
-
197
-
198
-
199
-
200
-
201
-
202
-
203
-
204
-
205
-
206
-
207
-
208
-
209
-
210
-
211
-
212
-
213
-
214
-
215
-
216
-
217
-
218
-
219
-
220
-
221
-
222
-
223
-
224
-
225
-
226
-
227
-
228
-
229
-
230
-
231
-
232
 |
 |