Xerox 6505/N User Guide - Page 129
Basic Faxing, Sending a Fax from the Printer
 |
View all Xerox 6505/N manuals
Add to My Manuals
Save this manual to your list of manuals |
Page 129 highlights
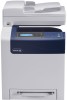
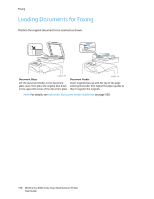
Faxing Basic Faxing This section includes: • Sending a Fax from the Printer on page 129 • Sending a Fax from Your Computer on page 130 Note: Before faxing, you must set the country code and fax number for the printer. For details, see Fax Configuration on page 139. Sending a Fax from the Printer To send a fax from the printer to a single recipient using the default settings: 1. Place your original document on the document glass or in the document feeder. 2. On the control panel, press the Fax button. 3. At Fax to, press the OK button. 4. To address the fax, press the Up Arrow or Down Arrow button to select an option: • Keypad allows you to enter the fax number manually using the alphanumeric keypad. • Speed Dial allows you to select a previously programmed speed dial. Use the alphanumeric keypad to enter a three-digit speed dial number. • Fax Address Book allows you to select a number from the Fax Address Book. For details, see Faxing to an Individual in the Address Book on page 133. • Group Dial allows you to send the fax to numerous recipients. For details, see Faxing to an Address Book Group on page 136. • Search Local Phone Book allows you to search the printer address book using a partial name. For details, see Searching the Local Phone Book on page 136. • Search Server Phone Book allows you to search the server address book using a partial name. For details, see Searching the Server Phone Book on page 136. 5. Press OK. 6. Press the Up Arrow or Down Arrow button to select the fax options you want to change. For details, see Selecting Fax Options for Single Jobs on page 137. 7. Press the Start button. 8. If the Another Page? prompt appears, select one of the following: • No completes the scanning process. • Yes prompts you to place the next page on the document glass. Select Continue or Cancel the Action. 9. Press OK. The printer scans the pages and transmits the fax. Note: If monitor reports are set to print, the report shows the fax transmission status. For details, see Printing Monitor Reports on page 140. WorkCentre 6505 Color Laser Multifunction Printer 129 User Guide
-
 1
1 -
2
-
3
-
4
-
5
-
6
-
7
-
8
-
9
-
10
-
11
-
12
-
13
-
14
-
15
-
16
-
17
-
18
-
19
-
20
-
21
-
22
-
23
-
24
-
25
-
26
-
27
-
28
-
29
-
30
-
31
-
32
-
33
-
34
-
35
-
36
-
37
-
38
-
39
-
40
-
41
-
42
-
43
-
44
-
45
-
46
-
47
-
48
-
49
-
50
-
51
-
52
-
53
-
54
-
55
-
56
-
57
-
58
-
59
-
60
-
61
-
62
-
63
-
64
-
65
-
66
-
67
-
68
-
69
-
70
-
71
-
72
-
73
-
74
-
75
-
76
-
77
-
78
-
79
-
80
-
81
-
82
-
83
-
84
-
85
-
86
-
87
-
88
-
89
-
90
-
91
-
92
-
93
-
94
-
95
-
96
-
97
-
98
-
99
-
100
-
101
-
102
-
103
-
104
-
105
-
106
-
107
-
108
-
109
-
110
-
111
-
112
-
113
-
114
-
115
-
116
-
117
-
118
-
119
-
120
-
121
-
122
-
123
-
 124
124 -
 125
125 -
 126
126 -
 127
127 -
 128
128 -
 129
129 -
 130
130 -
 131
131 -
 132
132 -
 133
133 -
 134
134 -
135
-
136
-
137
-
138
-
139
-
140
-
141
-
142
-
143
-
144
-
145
-
146
-
147
-
148
-
149
-
150
-
151
-
152
-
153
-
154
-
155
-
156
-
157
-
158
-
159
-
160
-
161
-
162
-
163
-
164
-
165
-
166
-
167
-
168
-
169
-
170
-
171
-
172
-
173
-
174
-
175
-
176
-
177
-
178
-
179
-
180
-
181
-
182
-
183
-
184
-
185
-
186
-
187
-
188
-
189
-
190
-
191
-
192
-
193
-
194
-
195
-
196
-
197
-
198
-
199
-
200
-
201
-
202
-
203
-
204
-
205
-
206
-
207
-
208
-
209
-
210
-
211
-
212
-
213
-
214
-
215
-
216
-
217
-
218
-
219
-
220
-
221
-
222
-
223
-
224
-
225
-
226
-
227
-
228
-
229
-
230
-
231
-
232
 |
 |