Xerox 6505/N User Guide - Page 120
Adjusting Scanning Options, Adjusting Scan Settings
 |
View all Xerox 6505/N manuals
Add to My Manuals
Save this manual to your list of manuals |
Page 120 highlights
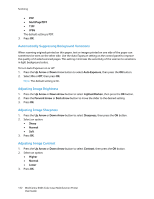
Scanning Adjusting Scanning Options This section includes: • Adjusting Scan Settings on page 120 • Changing the Default Scan Settings on page 123 • Limiting Access to Scan Operations on page 125 Adjusting Scan Settings You can modify these settings for individual jobs, once you select the scan mode. You can also change the default values for some settings. For details, see Changing the Default Scan Settings on page 123. This section includes: • Setting the File Format on page 120 • Setting the Color Mode on page 120 • Setting the Scan Resolution on page 121 • Specifying the Original Document Size on page 121 • Specifying the Scanned Image File Format on page 121 • Automatically Suppressing Background Variations on page 122 • Adjusting Image Brightness on page 122 • Adjusting Image Sharpness on page 122 • Adjusting Image Contrast on page 122 • Adjusting the Top and Bottom Margins on page 123 • Adjusting the Left and Right Margins on page 123 • Adjusting the Middle Margin on page 123 Setting the File Format 1. Press the Up Arrow or Down Arrow button to select File Format, then press the OK button. 2. Select a setting: • PDF • MultiPage TIFF • TIFF • JPEG 3. Press OK. Setting the Color Mode If the original image contains color, you can scan the image in color or in black and white. Selecting black and white significantly reduces the file size of the scanned images. 120 WorkCentre 6505 Color Laser Multifunction Printer User Guide
-
 1
1 -
2
-
3
-
4
-
5
-
6
-
7
-
8
-
9
-
10
-
11
-
12
-
13
-
14
-
15
-
16
-
17
-
18
-
19
-
20
-
21
-
22
-
23
-
24
-
25
-
26
-
27
-
28
-
29
-
30
-
31
-
32
-
33
-
34
-
35
-
36
-
37
-
38
-
39
-
40
-
41
-
42
-
43
-
44
-
45
-
46
-
47
-
48
-
49
-
50
-
51
-
52
-
53
-
54
-
55
-
56
-
57
-
58
-
59
-
60
-
61
-
62
-
63
-
64
-
65
-
66
-
67
-
68
-
69
-
70
-
71
-
72
-
73
-
74
-
75
-
76
-
77
-
78
-
79
-
80
-
81
-
82
-
83
-
84
-
85
-
86
-
87
-
88
-
89
-
90
-
91
-
92
-
93
-
94
-
95
-
96
-
97
-
98
-
99
-
100
-
101
-
102
-
103
-
104
-
105
-
106
-
107
-
108
-
109
-
110
-
111
-
112
-
113
-
114
-
 115
115 -
 116
116 -
 117
117 -
 118
118 -
 119
119 -
 120
120 -
 121
121 -
 122
122 -
 123
123 -
 124
124 -
 125
125 -
126
-
127
-
128
-
129
-
130
-
131
-
132
-
133
-
134
-
135
-
136
-
137
-
138
-
139
-
140
-
141
-
142
-
143
-
144
-
145
-
146
-
147
-
148
-
149
-
150
-
151
-
152
-
153
-
154
-
155
-
156
-
157
-
158
-
159
-
160
-
161
-
162
-
163
-
164
-
165
-
166
-
167
-
168
-
169
-
170
-
171
-
172
-
173
-
174
-
175
-
176
-
177
-
178
-
179
-
180
-
181
-
182
-
183
-
184
-
185
-
186
-
187
-
188
-
189
-
190
-
191
-
192
-
193
-
194
-
195
-
196
-
197
-
198
-
199
-
200
-
201
-
202
-
203
-
204
-
205
-
206
-
207
-
208
-
209
-
210
-
211
-
212
-
213
-
214
-
215
-
216
-
217
-
218
-
219
-
220
-
221
-
222
-
223
-
224
-
225
-
226
-
227
-
228
-
229
-
230
-
231
-
232
 |
 |