Xerox 6505/N User Guide - Page 78
Printing Envelopes from Tray 1, System, Up Arrow, Down Arrow, Tray Settings, Tray 1, Paper Type
 |
View all Xerox 6505/N manuals
Add to My Manuals
Save this manual to your list of manuals |
Page 78 highlights
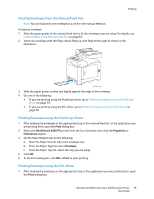
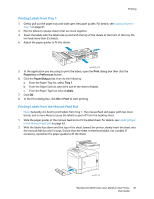
Printing Printing Envelopes from Tray 1 To load envelopes: 1. Gently pull out the paper tray. For details, see Loading Paper in Tray 1 on page 61. 2. Slide the paper guides to the edge of the tray. 3. Insert the envelopes with the flaps closed, flaps down, and flaps to the right. You can load envelopes up to the maximum fill line in the tray. Note: You cannot print on the reverse side of the envelope. Envelopes can get wrinkled or the print quality can be reduced, depending on the envelope type used. wc6505-051 4. Slide the paper guides so they rest lightly against the edges of the envelopes. 5. Insert the tray back into the printer until it stops. 6. On the control panel, press the System button to display the Menu screen. 7. Press the Up Arrow or Down Arrow button to select Tray Settings, then press the OK button. 8. At Tray 1, press OK. 9. Press the Up Arrow or Down Arrow button to select Paper Type, then press OK. 10. Press the Up Arrow or Down Arrow button to select Envelope, then press OK. 11. Press the Return button once to back out of the menu. 12. Press the Up Arrow or Down Arrow button to select Paper Size, then press OK. 13. Press the Up Arrow or Down Arrow button to select the desired envelope size, then press OK. 14. Do one of the following: • If you are printing using the PostScript driver, go to Printing Envelopes using the PostScript Driver on page 79. • If you are printing using the PCL driver, go to Printing Envelopes using the PCL Driver on page 79. 78 WorkCentre 6505 Color Laser Multifunction Printer User Guide
-
 1
1 -
2
-
3
-
4
-
5
-
6
-
7
-
8
-
9
-
10
-
11
-
12
-
13
-
14
-
15
-
16
-
17
-
18
-
19
-
20
-
21
-
22
-
23
-
24
-
25
-
26
-
27
-
28
-
29
-
30
-
31
-
32
-
33
-
34
-
35
-
36
-
37
-
38
-
39
-
40
-
41
-
42
-
43
-
44
-
45
-
46
-
47
-
48
-
49
-
50
-
51
-
52
-
53
-
54
-
55
-
56
-
57
-
58
-
59
-
60
-
61
-
62
-
63
-
64
-
65
-
66
-
67
-
68
-
69
-
70
-
71
-
72
-
 73
73 -
 74
74 -
 75
75 -
 76
76 -
 77
77 -
 78
78 -
 79
79 -
 80
80 -
 81
81 -
 82
82 -
 83
83 -
84
-
85
-
86
-
87
-
88
-
89
-
90
-
91
-
92
-
93
-
94
-
95
-
96
-
97
-
98
-
99
-
100
-
101
-
102
-
103
-
104
-
105
-
106
-
107
-
108
-
109
-
110
-
111
-
112
-
113
-
114
-
115
-
116
-
117
-
118
-
119
-
120
-
121
-
122
-
123
-
124
-
125
-
126
-
127
-
128
-
129
-
130
-
131
-
132
-
133
-
134
-
135
-
136
-
137
-
138
-
139
-
140
-
141
-
142
-
143
-
144
-
145
-
146
-
147
-
148
-
149
-
150
-
151
-
152
-
153
-
154
-
155
-
156
-
157
-
158
-
159
-
160
-
161
-
162
-
163
-
164
-
165
-
166
-
167
-
168
-
169
-
170
-
171
-
172
-
173
-
174
-
175
-
176
-
177
-
178
-
179
-
180
-
181
-
182
-
183
-
184
-
185
-
186
-
187
-
188
-
189
-
190
-
191
-
192
-
193
-
194
-
195
-
196
-
197
-
198
-
199
-
200
-
201
-
202
-
203
-
204
-
205
-
206
-
207
-
208
-
209
-
210
-
211
-
212
-
213
-
214
-
215
-
216
-
217
-
218
-
219
-
220
-
221
-
222
-
223
-
224
-
225
-
226
-
227
-
228
-
229
-
230
-
231
-
232
 |
 |