Xerox F116 User Guide - Page 24
Nstalling, Second, Paper, Cassette, Option
 |
UPC - 095205004793
View all Xerox F116 manuals
Add to My Manuals
Save this manual to your list of manuals |
Page 24 highlights
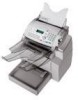
MFL 251 523 984_ FAXCENTRE F116_F116 L US.book Page 20 Mercredi, 11. août 2004 4:48 16 Installation INSTALLING THE SECOND PAPER CASSETTE UNIT (OPTION) Remove the second paper cassette unit and tray 2 from their packaging, including the protective tape used to hold the various components in place. Place the machine on top of the base unit. Make sure to align the coupling pins of the base unit with the holes located underneath the machine. Remove the cover from tray. Press down on the paper lifting plate located inside of tray until it locks. Place a tray of up to 500 sheets of paper into tray so that the side that was facing up when the paper was unwrapped is still facing up. Replace the cassette cover and insert tray into the second paper cassette unit. NOTE : Be sure to use both hands whenever tray is removed from or inserted into the second paper cassette unit. The second paper cassette paper unit only accepts Letter paper format. - 20 - Date en cours : 11 août 2004 \\Sct01002\BE31-DOC\DOC 31 - En cours\Travaux en cours\Fax\MFL V 2\LU 251 523 984B MFL_V2 FAXCENTRE F116_F116L XEROX FR_GB_ESP\Anglais\Installation.fm
-
 1
1 -
2
-
3
-
4
-
5
-
6
-
7
-
8
-
9
-
10
-
11
-
12
-
13
-
14
-
15
-
16
-
17
-
18
-
 19
19 -
 20
20 -
 21
21 -
 22
22 -
 23
23 -
 24
24 -
 25
25 -
 26
26 -
 27
27 -
 28
28 -
 29
29 -
30
-
31
-
32
-
33
-
34
-
35
-
36
-
37
-
38
-
39
-
40
-
41
-
42
-
43
-
44
-
45
-
46
-
47
-
48
-
49
-
50
-
51
-
52
-
53
-
54
-
55
-
56
-
57
-
58
-
59
-
60
-
61
-
62
-
63
-
64
-
65
-
66
-
67
-
68
-
69
-
70
-
71
-
72
-
73
-
74
-
75
-
76
-
77
-
78
-
79
-
80
-
81
-
82
-
83
-
84
-
85
-
86
-
87
-
88
-
89
-
90
-
91
-
92
-
93
-
94
-
95
-
96
-
97
-
98
-
99
-
100
-
101
-
102
-
103
-
104
-
105
-
106
-
107
-
108
-
109
-
110
-
111
-
112
-
113
-
114
-
115
-
116
-
117
-
118
-
119
-
120
-
121
-
122
-
123
-
124
-
125
-
126
-
127
-
128
-
129
-
130
-
131
-
132
-
133
-
134
-
135
-
136
-
137
-
138
-
139
-
140
-
141
 |
 |
