Xerox XDM1525D-WU User Manual - Page 10
Step 1: Assemble the Scanner
 |
View all Xerox XDM1525D-WU manuals
Add to My Manuals
Save this manual to your list of manuals |
Page 10 highlights
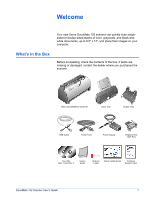
Step 1: Assemble the Scanner Installation To assemble the scanner: 1. Remove the scanner from its protective foam and plastic bag. 2. Check inside the document feeder mechanism and carefully remove any foam particles that may have gotten inside it. Leave the cover open so you can attach the Input tray. Remove any foam particles from inside the scanner NOTE: If the Input and Output tray get in the way when you connect the USB cable and power cord, you can attach them later when you're finished installing the software. 3. Align the tabs on the Input tray with the slots inside the scanner and slide the tray down into place. Snap the paper guide extension into the paper tray. DocuMate 152 Scanner User's Guide 5
-
 1
1 -
2
-
3
-
4
-
 5
5 -
 6
6 -
 7
7 -
 8
8 -
 9
9 -
 10
10 -
 11
11 -
 12
12 -
 13
13 -
 14
14 -
 15
15 -
16
-
17
-
18
-
19
-
20
-
21
-
22
-
23
-
24
-
25
-
26
-
27
-
28
-
29
-
30
-
31
-
32
-
33
-
34
-
35
-
36
-
37
-
38
-
39
-
40
-
41
-
42
-
43
-
44
-
45
-
46
-
47
-
48
-
49
-
50
-
51
-
52
-
53
-
54
-
55
-
56
-
57
-
58
-
59
-
60
-
61
-
62
-
63
-
64
-
65
-
66
-
67
-
68
-
69
-
70
-
71
-
72
-
73
-
74
-
75
-
76
-
77
-
78
-
79
-
80
-
81
-
82
-
83
-
84
-
85
-
86
-
87
-
88
-
89
-
90
-
91
-
92
-
93
-
94
-
95
-
96
-
97
-
98
-
99
-
100
-
101
-
102
-
103
-
104
-
105
-
106
-
107
-
108
-
109
-
110
-
111
-
112
-
113
-
114
-
115
-
116
-
117
-
118
-
119
-
120
-
121
-
122
-
123
-
124
-
125
-
126
-
127
-
128
 |
 |

DocuMate 152 Scanner User’s Guide
5
Installation
Step 1: Assemble the Scanner
To assemble the scanner:
1.
Remove the scanner from its protective foam and plastic bag.
2.
Check inside the document feeder mechanism and carefully
remove any foam particles that may have gotten inside it.
Leave the cover open so you can attach the Input tray.
3.
Align the tabs on the Input tray with the slots inside the scanner
and slide the tray down into place. Snap the paper guide
extension into the paper tray.
NOTE:
If the Input and Output tray get in the way when you
connect the USB cable and power cord, you can attach them
later when you’re finished installing the software.
Remove any foam particles
from inside the scanner