Xerox XDM5105D-WU User Guide - Page 8
Automatic Document Feeder ADF, Power On/Off Switch - 510
 |
UPC - 785414106004
View all Xerox XDM5105D-WU manuals
Add to My Manuals
Save this manual to your list of manuals |
Page 8 highlights
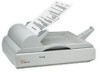
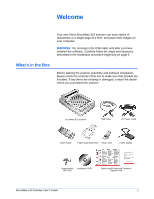
Welcome Document Cover-Protects the document from light and contamination during scanning. Document Pad-Helps to secure the document in place on the scanner glass. Reference Frame-Place items face down within this frame. Markings on the border of the frame show where to align various paper sizes. Glass-Place items face down aligned at the upper left corner of the glass. Paper Stop-Holds items in place as they are ejected from the Automatic Document Feeder. Adjust the Paper Stop for letter-sized or legal-sized pages. Paper Guide-Holds pages in place. Adjust to fit the size of the paper to scan. Paper Guide Extension-Unfolds to support various page lengths. Automatic Document Feeder (ADF)-Feeds a stack of pages onto the glass for scanning. The ADF can hold up to 50 pages at a time. Lock-Locks or unlocks the scanning head; located on the underside of the scanner. Status Lights-Shows the scanner's status. Blinking Green Ready light: scanner is preparing itself or the lamp is warming up. Steady Green Ready light: the scanner is on and ready to scan. Blinking Check light: the hardware is not ready to scan. See "Error Light Troubleshooting Codes" on page 118 for additional details about the Status Lights. USB Port-Connects the scanner to the computer. ADF Port-Connects the ADF cable from the Automatic Document Feeder to the scanner. Power Jack-Connects the power cord to the scanner. Power On/Off Switch-Turns the scanner's power on and off. ADF Cable-Connects the ADF to the scanner body. The cable provides power to the ADF and must be plugged in for it to operate. DocuMate 510 Scanner User's Guide 3
-
 1
1 -
2
-
 3
3 -
 4
4 -
 5
5 -
 6
6 -
 7
7 -
 8
8 -
 9
9 -
 10
10 -
 11
11 -
 12
12 -
 13
13 -
14
-
15
-
16
-
17
-
18
-
19
-
20
-
21
-
22
-
23
-
24
-
25
-
26
-
27
-
28
-
29
-
30
-
31
-
32
-
33
-
34
-
35
-
36
-
37
-
38
-
39
-
40
-
41
-
42
-
43
-
44
-
45
-
46
-
47
-
48
-
49
-
50
-
51
-
52
-
53
-
54
-
55
-
56
-
57
-
58
-
59
-
60
-
61
-
62
-
63
-
64
-
65
-
66
-
67
-
68
-
69
-
70
-
71
-
72
-
73
-
74
-
75
-
76
-
77
-
78
-
79
-
80
-
81
-
82
-
83
-
84
-
85
-
86
-
87
-
88
-
89
-
90
-
91
-
92
-
93
-
94
-
95
-
96
-
97
-
98
-
99
-
100
-
101
-
102
-
103
-
104
-
105
-
106
-
107
-
108
-
109
-
110
-
111
-
112
-
113
-
114
-
115
-
116
-
117
-
118
-
119
-
120
-
121
-
122
-
123
-
124
-
125
-
126
-
127
-
128
-
129
-
130
-
131
-
132
-
133
-
134
-
135
 |
 |
