Yamaha CVP-206 Owner's Manual - Page 17
Turning the Power On, and Off, Using headphones, Connect the power cord
 |
View all Yamaha CVP-206 manuals
Add to My Manuals
Save this manual to your list of manuals |
Page 17 highlights
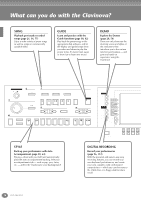
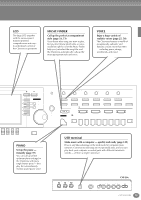
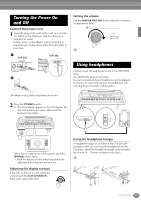
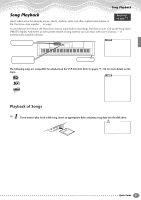
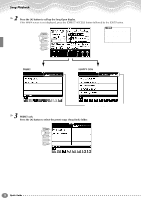
Turning the Power On and Off Connect the power cord 1 Insert the plugs at the ends of the cord, one into the AC INLET on the Clavinova, and the other into a standard AC outlet. In some areas, a plug adapter may be provided to match the pin configuration of the AC wall outlets in your area. CVP-206 CVP-204 Setting the volume Use the [MASTER VOLUME] dial to adjust the volume to an appropriate level. MASTER VOLUME FADE IN / OUT MIN MAX CAUTION Do not use the Clavinova at a high volume level for a long period of time, or your hearing may be damaged. Using headphones Connect a pair of headphones to one of the [PHONES] jacks. Two [PHONES] jacks are provided. Two sets of standard stereo headphones can be plugged in. (If you are using only one pair of headphones, you can plug them into either of these jacks.) (The shape of plug differs depending on locale.) 2 Press the [POWER] switch. → The main display appears in the LCD display. The drive lamp below the lower right end of the keyboard also lights. CVP-206 INPUT VOLUME MIC. LINE IN MIC. LINE PHONES MIN MAX CVP-204 PHONES POWER ON OFF The drive lamp lights. A F B G C H D I E J BALANCE CHANNEL ON / OFF PART When you're ready to turn off the power, press the [POWER] switch again. → Both the display and the drive lamp below the right end of the keyboard will turn off. Adjusting the display contrast If the LCD is difficult to read, adjust the contrast with the [LCD CONTRAST] knob at the right of the LCD. LCD CONTRAST Using the Headphone Hanger A headphone hanger is included in the CVP-206/204 package so that you can hang the headphones on the Clavinova. Install the headphone hanger using included two screws (4 × 10 mm) as shown in the figure. CAUTION Do not hang anything other than the headphones on the hanger. Otherwise, the Clavinova or the hanger may be damaged. CVP-206 CVP-204 CVP-206/204 17
-
 1
1 -
2
-
3
-
4
-
5
-
6
-
7
-
8
-
9
-
10
-
11
-
 12
12 -
 13
13 -
 14
14 -
 15
15 -
 16
16 -
 17
17 -
 18
18 -
 19
19 -
 20
20 -
 21
21 -
 22
22 -
23
-
24
-
25
-
26
-
27
-
28
-
29
-
30
-
31
-
32
-
33
-
34
-
35
-
36
-
37
-
38
-
39
-
40
-
41
-
42
-
43
-
44
-
45
-
46
-
47
-
48
-
49
-
50
-
51
-
52
-
53
-
54
-
55
-
56
-
57
-
58
-
59
-
60
-
61
-
62
-
63
-
64
-
65
-
66
-
67
-
68
-
69
-
70
-
71
-
72
-
73
-
74
-
75
-
76
-
77
-
78
-
79
-
80
-
81
-
82
-
83
-
84
-
85
-
86
-
87
-
88
-
89
-
90
-
91
-
92
-
93
-
94
-
95
-
96
-
97
-
98
-
99
-
100
-
101
-
102
-
103
-
104
-
105
-
106
-
107
-
108
-
109
-
110
-
111
-
112
-
113
-
114
-
115
-
116
-
117
-
118
-
119
-
120
-
121
-
122
-
123
-
124
-
125
-
126
-
127
-
128
-
129
-
130
-
131
-
132
-
133
-
134
-
135
-
136
-
137
-
138
-
139
-
140
-
141
-
142
-
143
-
144
-
145
-
146
-
147
-
148
-
149
-
150
-
151
-
152
-
153
-
154
-
155
-
156
-
157
-
158
-
159
-
160
-
161
-
162
-
163
-
164
-
165
-
166
-
167
-
168
-
169
-
170
-
171
-
172
 |
 |
